GroupWise to Exchange 2007 - Part 3: Ability to collaborate and convert
GroupWise to Exchange 2007 - Interoperability and transition (Part 1)
GroupWise to Exchange 2007 - Interoperability and transition (Part 2)
Nathan Winters
In Part 2 of this series, I showed you how to install the components needed to enable connectivity between GroupWise and Exchange. In this part 3, I will continue the discussion by showing you how to configure. If everything goes according to plan and works well, it will go into the test and introduce some problems with the fix in section 4.
GroupWise configuration
To start configuring GroupWise on your Windows workstation, the first thing to do is go to syspublicwin32 on the eDirectory server as shown in Figure 1, then run NWADMIN32.exe .
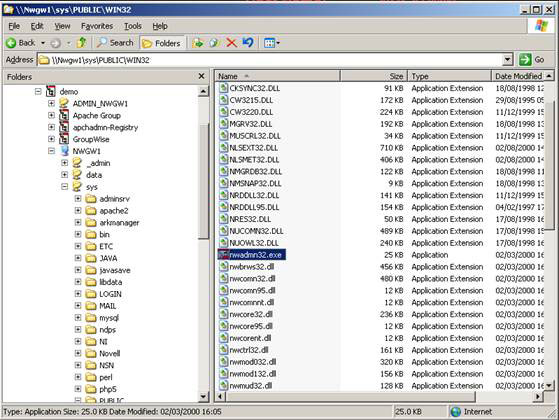
Figure 1: The directory is located in the NWADMIN32.exe file
We will return to NetWare Administrator but now let it be in the running state.
Open ConsoleOne. We are running version 1.3.6f with GroupWise Snap-ins.
In the left pane, under My World , open GroupWise System , select the Domain that GroupWise Server is running with the API installed. In our case is DOM1 . Right-click and select New Gateway as shown in Figure 2.
These instructions are different from NetWare Administrator instructions but they still work normally.
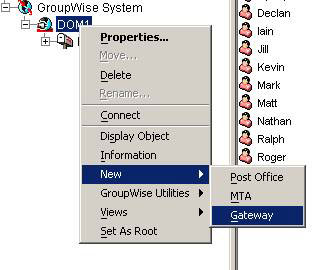
Figure 2: Starting the New Gateway creation process
In the Create GroupWise Gateway / Internet Agent dialog box shown in Figure 3, you use the attributes below.
Select Gateway (including GroupWise WebAccess) .
The Gateway name we use is Exchange .
You should leave all the remaining settings in the default mode
- Gateway Home Directory: API
- Language: English - UK
- Time Zone: ( GMT )
- Gateway type: API
- Version: 4.x
- Platform: NetWare
Do not check the Define additional properties box, press OK .
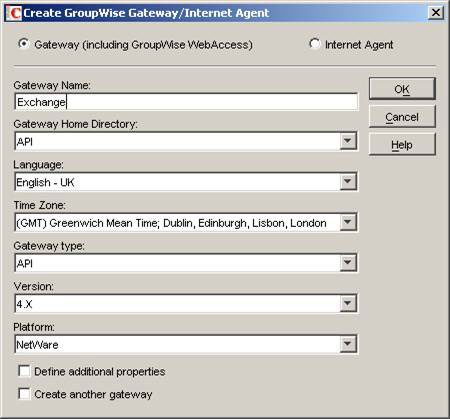
Figure 3: Creating the GroupWise Gateway / Internet Agent dialog box
Now we switch to NetWare Administrator that was previously opened. We are running Version 5.1.9f also with GroupWise Snap-in.
Open the GroupWise Object section, and the Domain object. Right-click on the new Exchange Gateway we just created and select Details .
Select Optional Gateway Settings as shown in Figure 4.
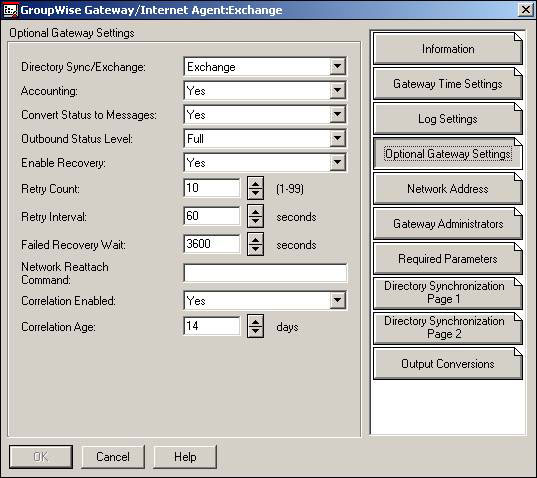
Figure 4: Optional settings area of the new GroupWise Gateway
Set the values below
- Directory Sync / Exchange: Exchange
- Convert Status to Messages: Yes
- Outbound Status Level: Full
The Required Parameters option and verify both the Root Directory lists in accordance with the format shown in Figure 5. They must be in /:, so in our case, both are NWGW1 / DATA: dom1wpgateapi
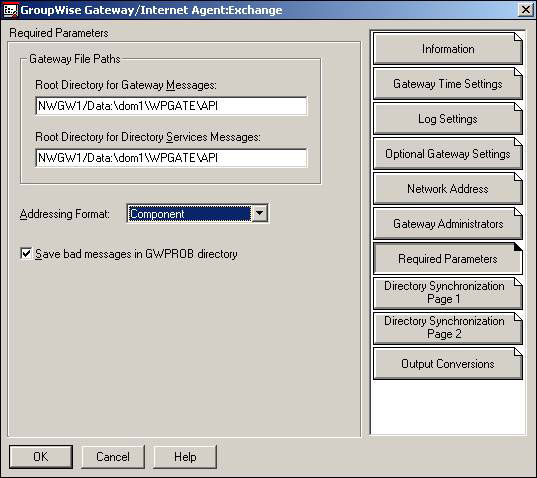
Figure 5: Checking the necessary parameters for the new GroupWise Gateway
Set Addressing Format: to Component and click OK .
Now that the gateway has been properly configured, we can load it from the NetWare system console using the command below.
API
We have mostly done with GroupWise systems; Now just configure the API to communicate with Exchange.
The API gateway that we just installed is how messages will be distributed between GroupWise and Exchange systems. Now we need to instruct GroupWise which messages to send using this Gateway or more specifically, in a switch to Exchange, we want all correspondence with Exchange to be used. gateway.
We do this by using the External Foreign Domain within the GroupWise system, linked to it through the API gateway.
In Netware Administrator (NWADMIN32.exe), select GroupWise View . from the Tools menu.
Open the domain object section, navigate to the Exchange Gateway object we just created, right-click it and select Create . as shown in Figure 6.
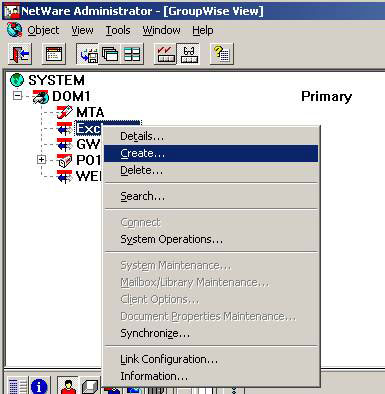
Figure 6: Creating an External Foreign Domain
Select External Domain and click OK in the window like Figure 7.
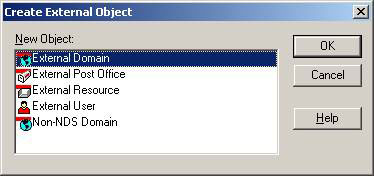
Figure 7: Select to create External Domain
In the External Domain Name: field in Figure 8, we usually enter Exchange . You can enter another name as it must correspond to the GWISE proxy address that you create in Exchange Recipient Policy within ESM and this is the default for Exchange.
Change Domain Type: to External Foreign , because this new domain will be used to display Exchange system with GroupWise system.
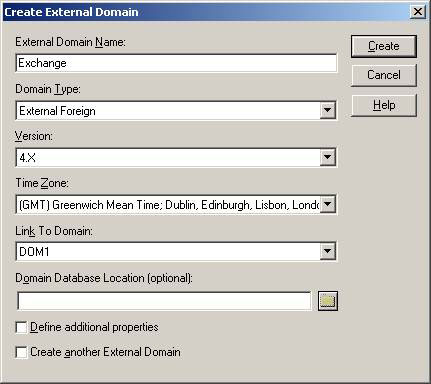
Figure 8: Configuring the External Foreign Domain
Leave version 4.x because API gateway is version 4.1.
The value listed in Link To Domain: needs to be the domain that the API gateway has been installed inside, in our case DOM1 . Click Create .
Switch back to ConsoleOne. Right-click the newly created Exchange domain and select GroupWise Utilities , Link Configuration . as shown in Figure 9.
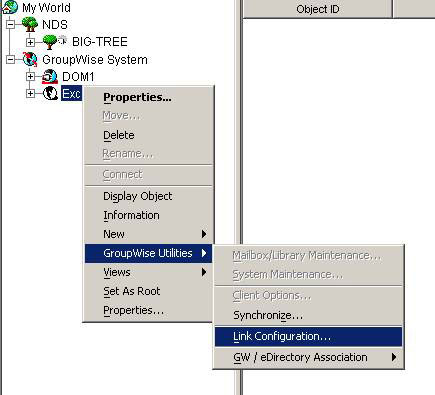
Figure 9: Starting the process of linking the External domain to Gateway
Click the right mouse button and the Exchange domain just created inside the GroupWise Link Configuration Tool and select Edit . as shown in Figure 10.
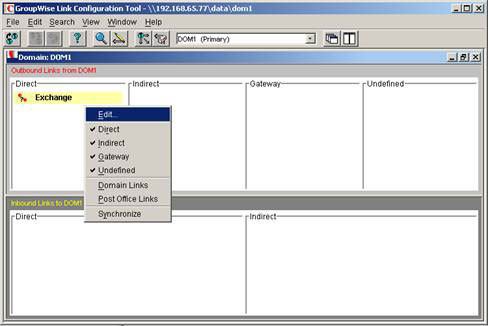
Figure 10: GroupWise link configuration tool
Change the Link Type link type: to Gateway , make sure the Gateway Link: under Settings must list the Exchange gateway we created above as you see in Figure 11.
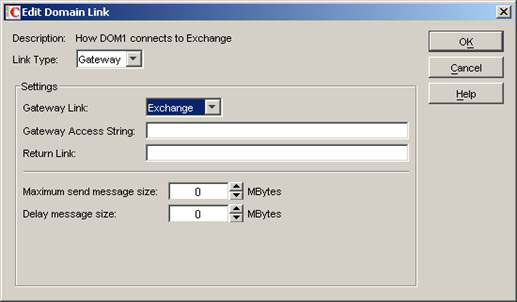
Figure 11: Configuring the link between External Domain and Gateway
Click OK then File, Exit to close the GroupWise Link Configuration Tool .
When prompted for Save link changes for Domain as shown in Figure 12: click Yes
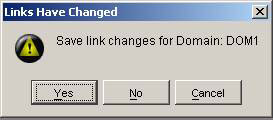
Figure 12: Save link changes
We have implemented GroupWise configuration, thus summarizing some of the components made here.
We have installed most of the new versions of GroupWise API, 4.1 Patch 5, configured GroupWise so that it can recognize the existence of the Exchange system by setting an external foreign domain.
Account terms
We will configure the Exchange Connector for GroupWise, but before we do so, we need to set up an eDir account for the connector. This job takes a bit of time.
Remember, the API gateway is simply a set of files and folders within the GroupWise system, the system is running on Novell. In fact, Exchange Connector is not very different, we will take a closer look at the directory / file structure in some of the following articles.
Now you need to understand that in order for the Exchange connector to interact with the GroupWise directory structure, and 'just' the GroupWise directory structure, we need to create and secure an account for it.
You can do this from NetWare Administrator or ConsoleOne. We use NetWare Administrator.
Right-click the eDirectory OU directory structure, where you want to create the service account, select Create . , then select User from the New Object class list of classes as shown in Figure 13.
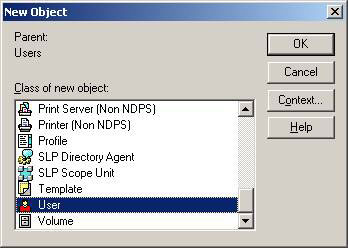
Figure 13: New object window, where to create user objects
The next window that opens is where you set up the user as shown in Figure 14. Under Login name: we enter Exchange and under Last name: is Service . Select the Define Additional Properties check box and click Create .
Login name note : in this case, Exchange.Users.Demo
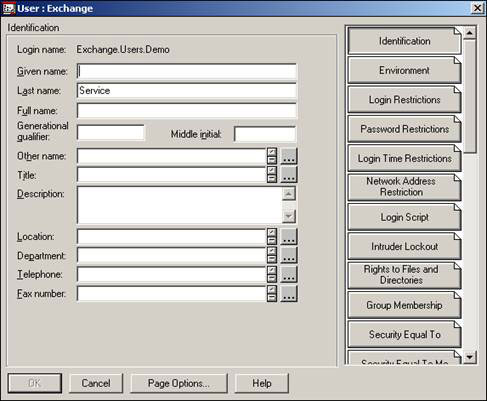
Figure 14: New user setup
To set a password, use the options available in Password Restrictions . Do it by clicking on Rights to Files and Directories , see Figure 15. It is not a friendly interface, but we will all do it here to set account permissions. just created for API root directory.
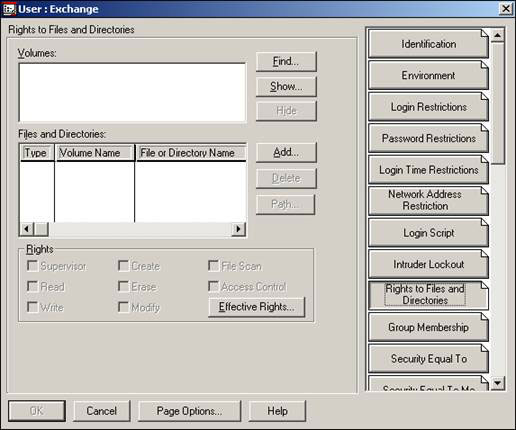
Figure 15: Permissions for files and directories
Under Volumes: click Show . and find the drive in which the API gateway is installed. This is the drive listed in the NWGAPI.PRM file, in this case, it is the DATA in NWGW1, or as NWGW1_DATA appears in the Select Object dialog box shown in Figure 16.
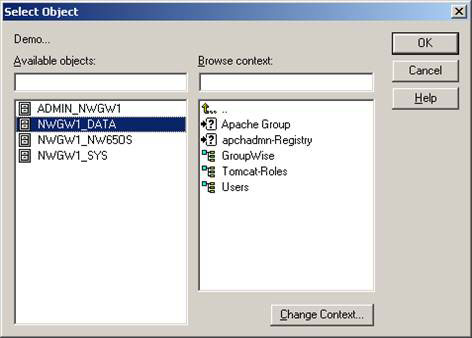
Figure 16: Select object dialog box
Once you have selected the correct drive on the left panel of Available objects: click OK , then in the Files and Directories section: select Add .
Use the right panel to browse to the API gateway directory as shown in Figure 17, in our case is in DOM1wpgate and click OK .
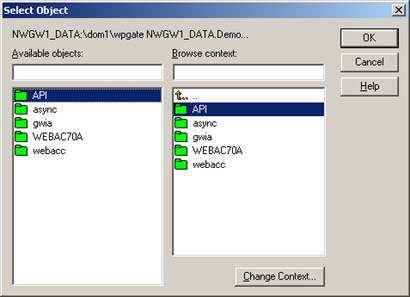
Figure 17: Select the API directory to assign permissions
Go back to the Rights to Files and Directories window as shown in Figure 15, in the Rights section, you can assign everything except the Supervisor , Access Control and OK .
The Rights to Files and Directories screen will now be displayed as shown in Figure 18.
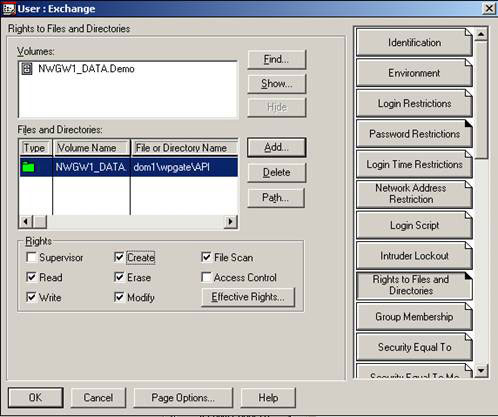
Figure 18: Benefits for Files and Folders
Setting up an account for the connector to access data, we can now switch to Exchange configuration.
Configure Exchange
When we installed the Connector for Novell GroupWise as above, we also added a new proxy address generator. If you right-click and Recipient Policy (default or optional) and switch to the E-Mail Addresses (Policy) tab, you will see the new GWISE address type as shown in Figure 19.
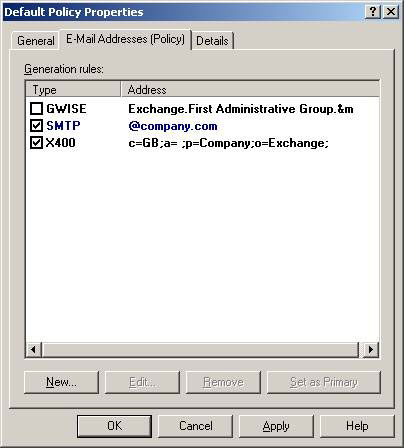
Figure 19: Default Recipient Policy showing GWISE address space
Note that the default GWISE address starts with Exchange that corresponds to the name of the External Foreign Domain that we set up earlier. The GWISE address continues with First Administrative Group - the first administrative group, and ends with & m , corresponding to Exchange Alias. We suggest you change & m to & d to better match the user's display name.
The GWISE address policy is very important because the proxy addresses it creates will be synchronized with the GroupWise system and it manages how the converted users will appear in GroupWise. We will address these issues later.
We will not go into Exchange recipient policy, check the box in the default policy or create a new policy. Now you may have understood why the proxy address format is important.
After setting up the address, we will switch to configuring the Connector for Novell GroupWise . Right-click it in Exchange System Manager (ESM) and on the General tab we need to enter the API gateway path. As we have seen in Windows when installing the API gateway on the Netware server, we use the UNC path format.
In this case, it is NWGW1DataDom1WPgateAPI .
We also set up the Netware Account to use the account created in eDirectory as shown in Figure 20.
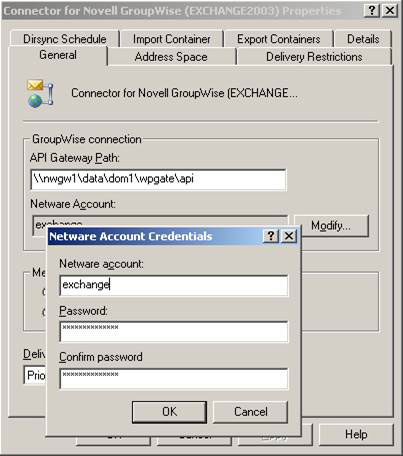
Figure 20: Enter details for the Netware account
Next, in the Address Space tab, Add . a GWISE address type, with an address (*) and a cost of 1. This will tell Exchange to send all mail with GroupWise locations only on the Connector,
On the Import Container tab, go to Create a new Windows user account when creating a copy of a mailbox for the entire main Windows account does not exist in the domain as shown in Figure 21. We will use Connector to provide objects. Active Directory users.
One thing to note here is that you may have to reduce the password policy in the Default Domain Policy because the Exchange Connector for GroupWise cannot create complex passwords. Here we recommend that you remove the request for complex passwords and set the minimum password length to 0 for simplicity, you can re-enable the password policy and change the passwords. some time later. Don't forget to run GPUPDATE / FORCE on its DC or wait about 90 minutes before this new policy goes into effect.
Click Modify . and choose where you want the user objects created within Active Directory.
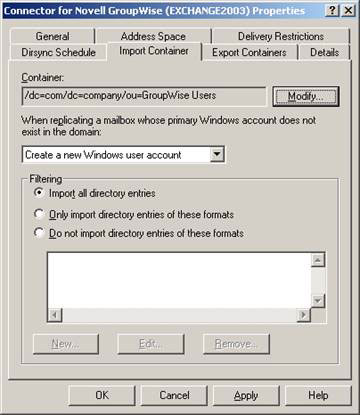
Figure 21: Select to create a new AD user when importing
You should create two Organizational Units within AD, one for import and one for export, because then we can have more control over which Exchange objects that synchronize with GroupWise.
Click OK to exit the property page. Now you have finished configuring the connector!
Conclude
Until this series, at this point you should understand some of the conversion theory, you will have to install the connectors to allow communication between GroupWise and Exchange, and then configure them. In Part 4 of this series, we will introduce the connector and run and introduce how to test if everything works as planned.
GroupWise to Exchange 2007 - Interoperability and transformation (Part 4)
You should read it
- ★ GroupWise to Exchange 2007 - Interoperability and transformation (Part 5)
- ★ GroupWise to Exchange 2007 - Interoperability and transformation (Part 7)
- ★ GroupWise to Exchange 2007 - Part 1: Ability to collaborate and convert
- ★ GroupWise to Exchange 2007 - Interoperability and transformation (Part 6)
- ★ GroupWise to Exchange 2007 - Interoperability and transformation (Part 8)