Balancing download of Exchange 2007 SP1 Hub Transport servers with Windows Network Load Balancing (Part 1)
Henrik Walther
Exchange Server 2007 Hub Transport servers (RTM and SP1) are capable of failover by default. That means that if you install multiple Hub Transport servers in an Active Directory and one of those servers has problems, the other server will maintain the connections. In addition, when multiple Hub Transport servers are deployed in Active Directory, connections are automatically load-balanced between these servers. There is only one exception to this formula that is when the Hub Transport server role is installed on a server that also holds the mailbox server role. In this scenario, the Hub Transport server belonging to the mailbox server will always take precedence over other Hub Transport servers in Active Directory.
The default failover action built into the Hub Transport server works well in many organizations, but there are some situations when you are an Exchange or adviser mail administrator (for example). , have a stream of enterprise applications (LOB), Microsoft Office SharePoint Server 2007 portal (MOSS 2007), or can manage System Center Operations Manager 2007 (SCOM 2007) to submit Exchange messages must use SMTP forwarding when these applications cannot log into the mailbox using MAPI and then send these messages as mailboxes.
If you fall into such a situation, which option would you choose? Unsupported Exchange Server 2007 RTM version for load balancing Hub Transport servers by means of Windows Network Load Balancing (WNLB). This means that if you have an application that needs to use the Exchange 2007 messaging environment to forward messages, you need to specify two SMTP servers in the application (usually not possible), use DNS round robin ( a load balancing technique between two servers but this solution is not as smart as NLB) or MX record (not possible if the application only allows you to specify a smart host).
As mentioned, balancing the load of Hub Transport servers in Exchange 2007 RTM is not supported, but now with Exchange Server 2007 Service Pack 1 (SP1) everything has changed, the service pack This new is supported to enable load balancing for Hub Transport servers by using standard hardware or WNLB load balancers.
Although this service pack is currently supported to configure Hub Transport servers in an NLB, keep in mind that it is not supported to balance the load for the connection between Hub Transport servers on the public network. company by this method. You should only use NLB to load balance for incoming SMTP connections from applications (such as LOB, MOSS, bsg SCOM 2007, etc.) and other non-Exchange sources and client connections (to send messages , POP & IMAP clients use the default client receiver on Hub Transport server).
In this series, I will show you step by step how to configure Hub Transport servers in an NLB using WNLB. We will also verify some things work as expected to look at the ability to fix errors and load balancing work for outgoing mail flow.
The environment is used in this articleIf you want to deploy and test the solution explained in this series in your own environment (should be done in a lab environment for the first time), the following environmental requirements will be required:
- 1 x Windows 2003 Server SP2 Domain Controller and Global Catalog (DC01)
- 1 x Windows 2003 Server SP2 with the Exchange 2007 SP1 Mailbox and the Client Access Server role installed (Mailbox01)
- 2 x Windows 2003 Server SP2 with the Exchange 2007 SP1 Hub Transport Server role installed (HT01 & HT02
Note :
Because the NLB cluster configured in this series is configured in unicast mode, you need to install two network interface cards (NICs) in each Hub Transport server.
With the new environment, the first thing you want to do is create an A-record for the NLB cluster in DNS. To do so, log on to the domain controller in the Active Directory forest, then open the DNS manager by clicking Start > Run and typing dnsmgmt.msc .
Now open the Forward Lookup Zones item and right-click the search item in Active Directory. In the right-click menu, select New Host (A) , and then type the name you want to use. As you can see in Figure 1, we used MAIL for this installation. Then type the IP address you want to use as the IP address of the Windows NLB cluster (this is the IP address on the same subnet as NLB member servers).
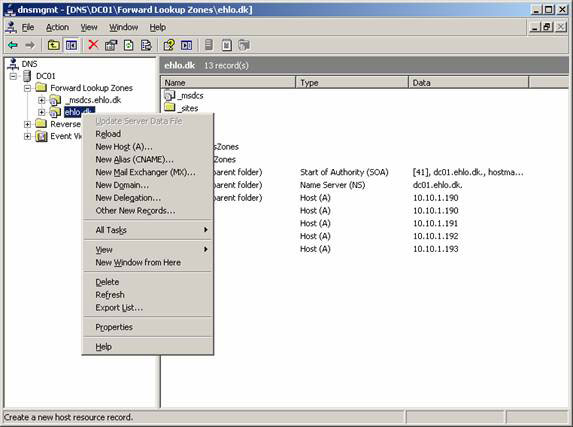
Figure 1: Create a DNS Record for the Windows NLB Cluster in DNS Manager
Now click Add Host ( Figure 2 ) and then click OK and Done . Close DNS Manager.
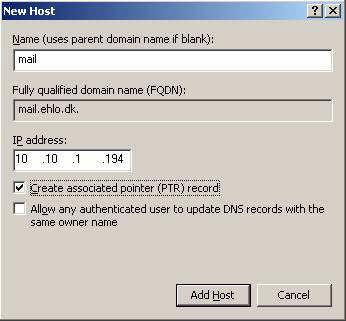
Figure 2: Enter the DNS name and IP address
Although not required (as explained above), we will use unicast mode with the two network adapters installed in this setting (this gives the best performance). To configure the second network adapter on each Exchange 2007 Hub Transport server, open the Network Connections and set each LAN connection to a name as shown in Figure 3.
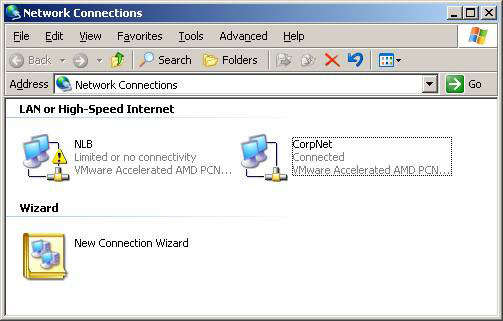
Figure 3: Name the network connections
Open the properties page of the NLB adapter, then configure the TCP / IP settings as shown in Figure 4. You can specify an IP address and Subnet mask. Click OK.
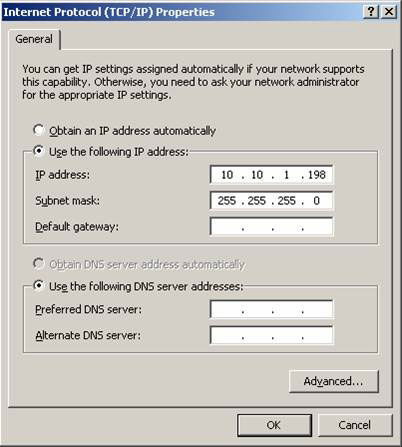
Figure 4: Configuring TCP / IP Settings for NLB NIC
Enable network load balancing on the first Hub Transport server
OK, now it's time to enable NLB on the first Hub Transport server in our installation. This can be done via the properties page of the network adapter, or by using the Network Load Balancing Manager. We enable it through the properties page of the network adapter and then add the second Hub Transport server to the NLB clust in the next section. So open the NLB LAN adapter's properties page, then check the Network Speaker d Balancing checkbox, as shown in Figure 5. When you check this box, click the Properties button .
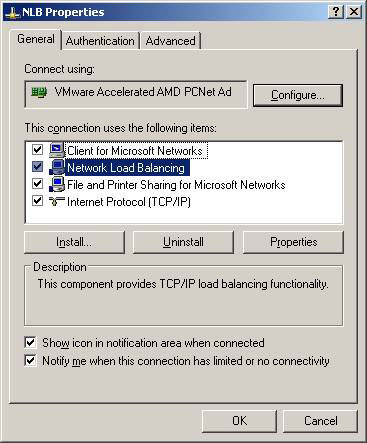
Figure 5: Enable network load balancing
Under the Cluster Parameters tab (Figure 6) , enter the IP address, subnet mask and Full Internet name for the NLB cluster. Next, make sure the unicast is selected in the Cluster operation mode .
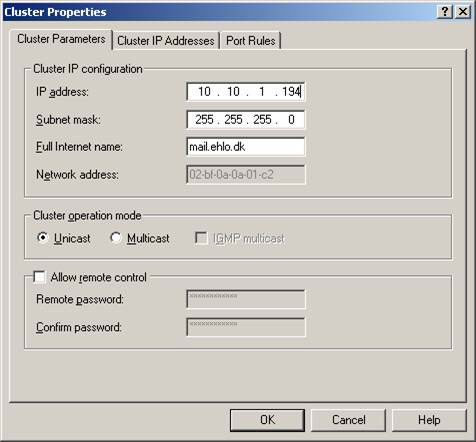
Figure 6: Configuring Cluster parameters
Click the Host Parameters tab, enter the IP address and the configured subnet mask for the network adapter (Figure 7). Leave the other settings by default.
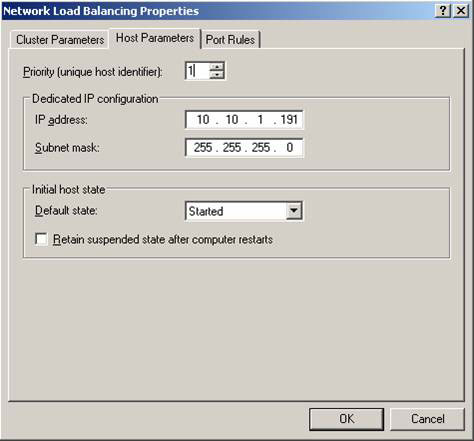
Figure 7: Configuring Host parameters
Click the Port Rules tab, then select the default port mode and click Remove .
Now we need to add a rule for each port on which the NLB cluster accepts client requests on it. To do so, click the Add button, then enter the corresponding port under Port range (Figure 8). You also need to make sure Affinity is set to Single . Finally, click OK to add the port rule.
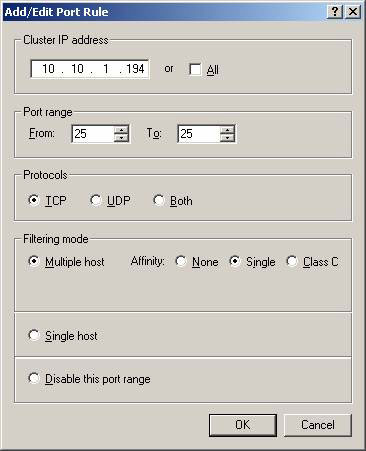
Figure 8: Configuring the rules for NLB Cluster Port
Doing so for each port has been requested, so you have a list of rules that are similar to those shown in Figure 9 depending on which client access service you want to allow in your organization. .
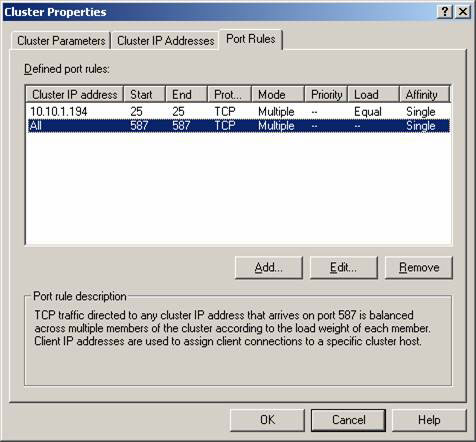
Figure 9: List of rules for the configured port
Click OK and OK (Figure 10).
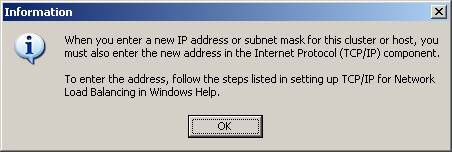
Figure 10: Message dialog box
Now add a new virtual IP cluster address for the TCP / IP properties for the network adapter, see Figure 11.

Figure 11: Adding the IP Cluster address in the TCP / IP Settings page
Finally click Add and OK. Now we have installed a Windows NLB cluster on each member server.
Add the second Hub Transport server to the NLB Cluster
Now let us add a second Exchange 2007 Client Access server to the cluster. To do this, open Network Load Balancing Manager by clicking Start > Run and typing NLBMGR.EXE (or click Administrative Tools > Network Load Balancing Manager ). This will help you open the Network Load Balancing Manager as shown in Figure 12.
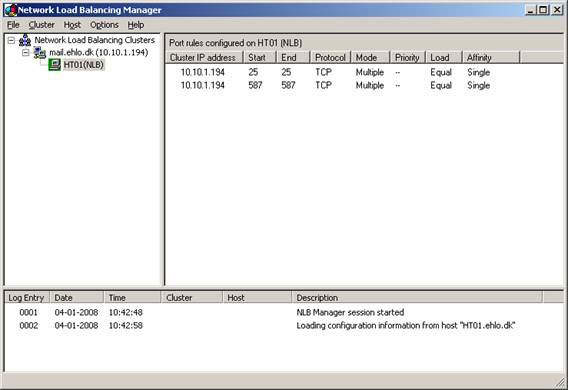
Figure 12: Network Load Balancing Manager
To add a second server to the NLB cluster, click Cluster in the menu, then select Add Host . In the window that appears, type in the name of this server, then click Connect (Figure 13). Select the corresponding cluster and click Finish.
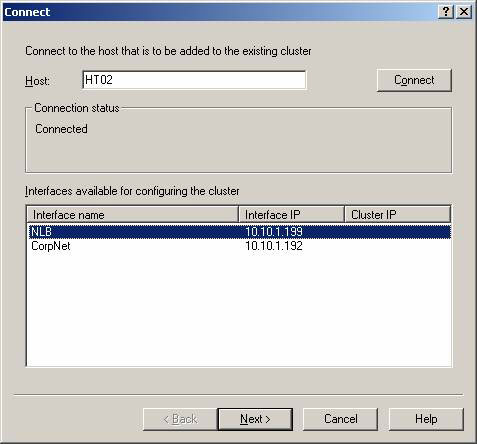
Figure 13: Add the second Client Access Server to the NLB Cluster
Next, type the IP address and subnet mask of the network adapter that will be associated with the NLB cluster, and then click Finish (Figure 14).
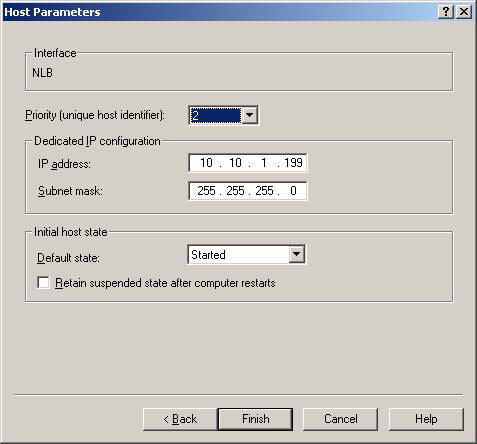
Figure 14: Host Parameter Settings configuration for the second Hub Transport server
Now wait a bit for the server to be added and configured appropriately (Figure 15).
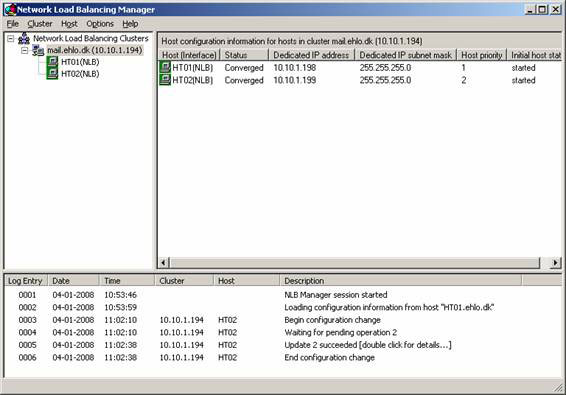
Figure 15: The second Hub Transport server is added to the NLB Cluster
Close Network Load Balancing Manager . Now we have load-balanced Hub Transport servers in a lab environment, but there are still some configuration steps needed. However, this is just part of the lesson, the next steps will be introduced in the next section, invite you to read.
 Balancing download of Exchange 2007 SP1 Hub Transport servers with Windows Network Load Balancing (Part 2)
You should read it
- ★ Introduction to Exchange 2007's Edge Transport Server (Part 1)
- ★ Balancing download of Exchange 2007 SP1 Hub Transport servers with Windows Network Load Balancing (Part 2)
- ★ Installing, configuring, and testing Exchange 2007 CCR on Mailbox Server (Part 2)
- ★ Transport Dumpster in Exchange 2007 (Part 2)
- ★ Standby Continuous Replication Management (SCR) - Part 1