Cannot find Snipping Tool on Windows 10? This is how to fix it
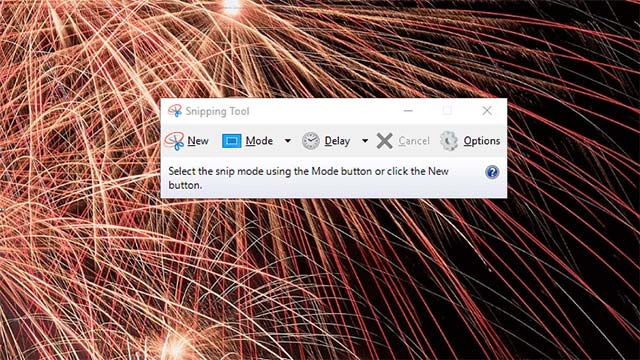
Snipping Tool is a screen capture application that is very useful on Windows 10 in particular and on all Windows versions in general.
Snipping Tool is a screen capture application that is very useful on Windows 10 in particular and on all other Windows versions in general.Normally, you can easily open this tool by entering the keyword Snipping Tool in the Windows search box and pressing Enter.However, we can not always find the Snipping Tool through the search box on Windows 10, in which case how to do it?Here are the methods that you can use to access Snipping Tool when the system's search function has problems.
- Instructions for enabling or disabling Snipping Tool in Windows 10
Reset search index
The search index on Windows 10 can be disabled on some desktops and laptops that use SSD storage.If your computer uses SSD, that may be the reason why search engines cannot return the results of Snipping Tool.In this case, the most feasible solution would be to rebuild the search index.You can rebuild the search index in Windows 10 by applying the following steps:
Step 1: Press the Windows + R shortcut key combination .
Step 2: Enter the Control Panel keyword in the Run search box and click the OK button.
Step 3: Click on the Indexing Options option to open the indexing window as shown in the screenshot below.

Step 4: Click on Advanced to open the Index Settings tab .

Step 5: Now, click Rebuild and click OK to complete the index reset process.
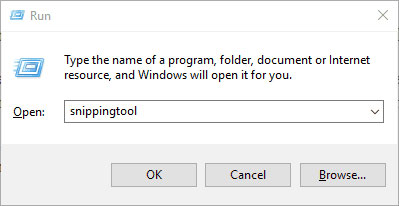
Open the Snipping Tool with the Run dialog box
There are many different ways for you to open Snipping Tool, one of which is to use the Run dialog itself.How to proceed as follows.First, press the Windows + R key combination to open the Run dialog box. Next, type the keyword snippingtool into the text box and then press the OK button.
- Quickly open the tools in Control Panel with Run
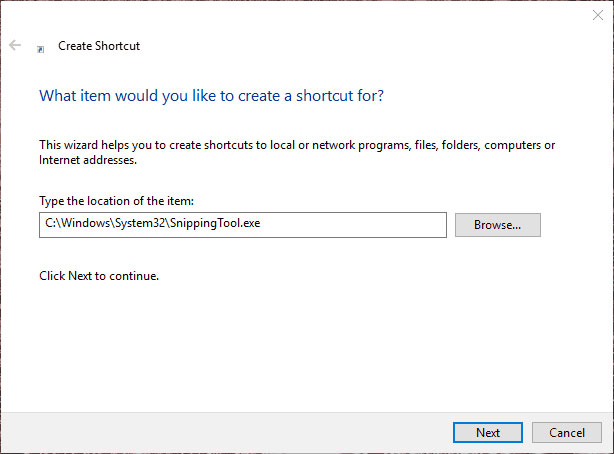
Create a Snipping Tool shortcut right on your desktop
Also, you can create a Snipping Tool shortcut right on your Windows desktop for quick access.Here's how you can create a shortcut for Snipping Tool on your desktop:
Step 1: First, right-click on the desktop and select New> Shortcut.
Step 2: Next, the Create shortcut dialog box will be opened. Here, you enter the link C: WindowsSystem32SnippingTool.exe into the Browse text field as shown below.Then click Next.
Step 3: Now, click Finish to add the Snipping Tool shortcut to the desktop.
Step 4: In addition, you can also add the Snipping Tool shortcut to the Start menu or taskbar (taskbar).To add a Snipping Tool shortcut to the Start menu, right-click the shortcut and select the Pin to Start option.
To add a Snipping Tool shortcut to the taskbar, right-click the shortcut and select the Pin to taskbar option.
Open Snipping Tool from its own System32 folder
In addition, you can also open Snipping Tool from the System32 folder of this tool.The steps are as follows.First, click the File Explorer button on the taskbar. Then open this folder in File Explorer: C: WindowsSystem32 and click the Snipping Tool shortcut located in the System32 folder itself to open this tool.

- How to fix C: windowssystem32configsystemprofiledesktop Is Unavailable on Windows 10
Activate the Snipping tool in the Group Policy Editor
Note that the Group Policy Editor group policy editor in Windows 10 Pro and Windows 10 Enterprise will include the option to not allow Snipping Tool to launch (Snipping Tool to run option).In this case, you must check if the above option is configured to turn on in Win 10 Pro and Enterprise.
- How to reset Local Group Policy settings on Windows 10
Step 1: Press Windows + X key combination to open the Run dialog box.
Step 2: In the Run dialog box, enter the keyword Gpedit.msc and click OK .
Step 3: Next, navigate to User Configuration> Administrative Templates> Windows Components> Tablet PC> Accessories on the left side of the Group Policy Editor window .
Step 4: You will see a Do not allow Snipping Tool to run option on the right side of the Accessories window, click it.
Step 5: Click on Disabled to disable this option.
Step 6: Finally, you click Apply and then OK to confirm and apply the new installation.
Use alternative screen capture tools
If you've tried all the above methods and still can't open the Snipping Tool, the last way is to use alternative screen capture tools.There are many third-party software that can completely replace Snipping Tool.Furthermore some third-party screen capture tools also include more useful options than Snipping Tool.Please refer to our article '15 useful screen capture application for Windows' to choose the most suitable applications for you.
Above are the error correction methods that cannot open Snipping Tool on Windows 10, hoping the information in the post is useful to you!
See more:
- Fix the error not connected to the headset in Windows 10
- How to map network drives in Windows 10
- How to view the application's energy usage with Task Manager on Windows 10
- Errors on the latest Windows 10 updates and how to fix them (updated continuously)
- Snipping Tool cannot be used, summarize effective ways to fix it
- Instructions for enabling or disabling Snipping Tool in Windows 10
- How to fix Snipping Tool keeps showing error
- 5 Best Alternatives to Windows Snipping Tool
- Snipping Tool on Windows 10 and 11 can store data that users have deleted?
- Why do people abandon Snipping Tool on Windows to switch to ShareX?
- How to create and use useful Snipping Tool shortcuts in Windows
- How to use Text Actions in Snipping Tool on Windows 11
- 5 new Snipping Tool features that make it even more useful.
- Snipping Tool on Windows 11 added useful screen recording feature
- Snipping Tool finally supports GIF files
- Instructions for recording screen using Snipping Tool on Windows 11
- Why do people abandon Snipping Tool on Windows to switch to ShareX?
- Snipping Tool cannot be used, summarize effective ways to fix it
- How to use Text Actions in Snipping Tool on Windows 11
- Windows 11 adds a new optical text recognition feature to the Snipping Tool
- 5 Best Alternatives to Windows Snipping Tool
- Snipping Tool on Windows 10 and 11 can store data that users have deleted?


-
 How to use the DirectX Diagnostic Tool to troubleshoot problems.
-
What's new in CorelDRAW Graphics Suite 2018?
-
Learn the basics of the Mesh Tool in Illustrator.
-
Draw and edit curves with the Curvature tool in Illustrator.
-
How to enable and disable the Screenshot tool in Firefox browser.
-
Optimize Windows 10 using VMware OS Optimization Tool
 How to use the DirectX Diagnostic Tool to troubleshoot problems.
 What's new in CorelDRAW Graphics Suite 2018?
 Learn the basics of the Mesh Tool in Illustrator.
 Draw and edit curves with the Curvature tool in Illustrator.
 How to enable and disable the Screenshot tool in Firefox browser.
 Optimize Windows 10 using VMware OS Optimization Tool