Table of Contents
This practical guide explains how to use text actions in snipping tool on windows 11 with clear steps and useful context. It also covers common requirements, potential problems, and the details that can help you get better results.
What Is the Text Actions Feature in Snipping Tool?
At the time of writing, the current version of Snipping Tool allows you to take and annotate screenshots. You can even record the screen using the Snipping Tool.
However, the latest build of the Microsoft Insider Dev and Canary channels has an updated version of the Snipping Tool, including the "Text Actions" feature. This brings OCR support to screenshots, meaning you can scan captured images to find text.
You can copy a selected portion of the specified text or copy all the text from the screenshot before saving. Furthermore, you can also re-edit the text and then copy the remaining text from the image.
How to Enable and Use the Text Actions Feature in Snipping Tool
The Text Actions feature in Snipping Tool is available to Windows Insiders in Canary and Dev channels. So if you're using one of these channels, update your Windows Insider PC to the latest build available.
You can also use UUP Dump to download Windows Insider builds without registering for the Windows Insider program. After installing the latest build, you must check for available updates for Snipping Tool using the Microsoft Store. The Text Actions feature is included in version 11.2308.33.0 and above. So you must install the latest update for Snipping Tool to update to this version.
Follow these steps to use the Text Actions feature in the Snipping Tool:
1. Press the Win key, type Snipping Tool and press the Enter key. Alternatively, press the Win + Shift + S keys to launch the tool.
2. Now, select any screenshot size option and take a screenshot.
3. Switch to the Snipping Tool window which will display the screenshot. Click the Text Actions icon.
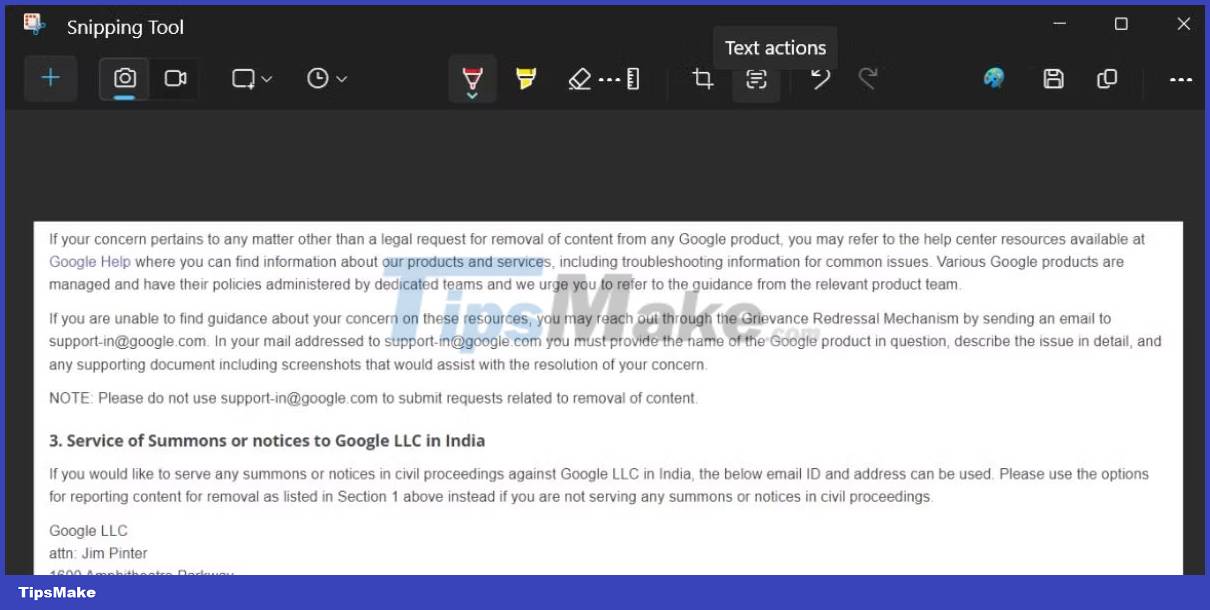
4. This feature will identify all the text in the captured screenshot and highlight it. Click and drag your mouse to select a specific word or sentence from the screenshot.
5. Click Copy all text to copy everything from the image and save it to the clipboard.

6. Press the Win key, type Notepad and press Enter.
7. Paste all copied text into Notepad and save for later use.
How to Rearrange Text in Snipping Tool
In addition to text recognition and copying, you can also edit text in the Snipping Tool. Redacting a document means excluding certain types of text that contain sensitive information. Currently, you only get two redaction options in the tool: Email address and phone number.
After taking a screenshot and clicking the Text Actions button, you will see a Quick Redact option next to the Copy All text option. Click on the Quick Redact option, it will deselect and hide all phone numbers and email addresses. Now you can copy the remaining text using the Copy All text button.
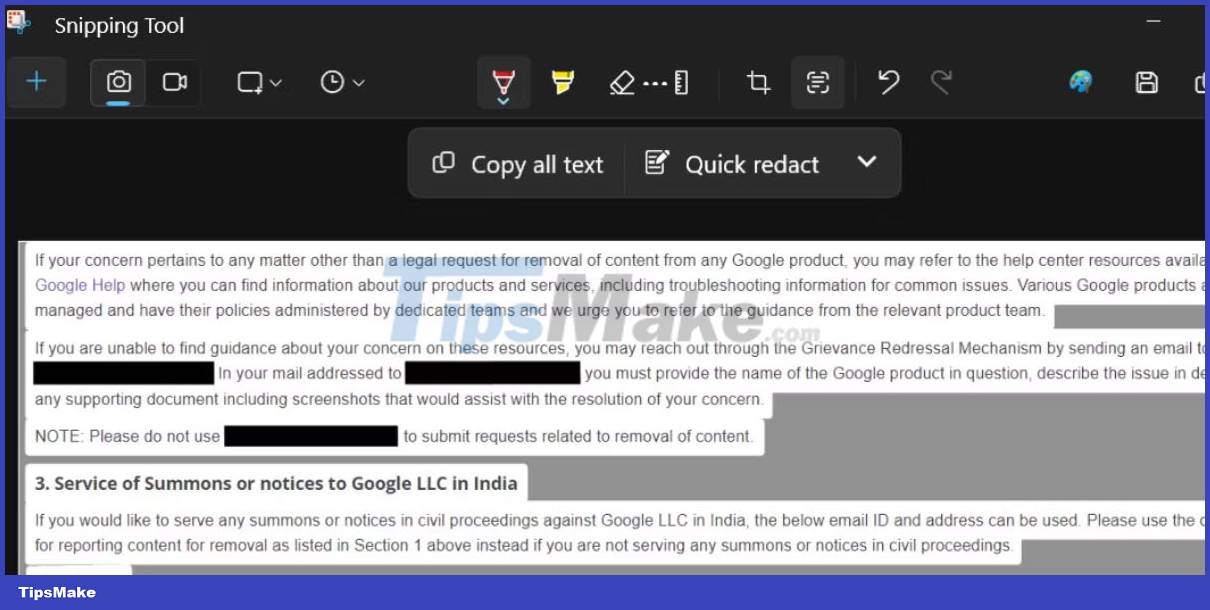
If you only want to apply one type of redact option, click the arrow icon next to the Quick Redact option. Now, uncheck any options and then click on the Quick Redact option again. Finally, if you want to remove the redaction effect from the screenshot, click the arrow icon and then click the Remove all redactions button.
Text Actions in the Snipping Tool eliminate the need to use Google Lens in a web browser. It also works without the Internet and can even redact sensitive information. This feature is expected to arrive with the Windows 23H2 update for all Windows users.
Conclusion
Understanding Windows 11 makes it easier to compare options, avoid common mistakes, and apply the information in this guide more effectively. Review the relevant requirements before making changes or choosing a solution.
FAQ
How do you use text actions in snipping tool on windows 11?
Follow the steps in this guide in order, confirm the required settings or tools, and verify the result before making additional changes.
Is it safe to use text actions in snipping tool on windows 11?
It is generally safe when you follow the recommended instructions, use trusted tools, and avoid changing settings you do not understand.
What should you do if the process does not work?
Recheck the requirements, restart the device or application when appropriate, and review each step for missed settings or compatibility issues.
Related Articles
 How to Use Snipping Tool on Windows 10 Full Set10 minutes read
 Cannot Find Snipping Tool on Windows 10? This Is How to Fix It8 minutes read
 Steps to Fix Snipping Tool Not Working Error on Windows5 minutes read
 Draw a Frame Around Text Using the Snipping Tool: Step-by-Step Guide4 minutes read
 Snipping Tool Cannot Be Used, Summarize Effective Ways to Fix It Explained7 minutes read
 Instructions for Enabling or Disabling Snipping Tool in Windows3 minutes read
Reader Comments 0
Sign in with email or Google to join the discussion.