Table of Contents
This article provides a clear overview of Detailed How to Graph in Excel, with the main facts, useful context, and practical details organized for easy reading.
The graph in Excel helps us identify an overview of a problem or in other words, show the inventoried data
Guide Graphing
Types of Graphs
Column: Bar graph
Line: Line graph Pie: Pie chart Bar: Bar chart Area: Area chart XY (Scatter): XY chart (Scattered) Stock: Stock chart Bubble: Bubble chart Radar: Radar chart
How to Graph
Step 1: To draw a graph you must first create an existing data on the application.
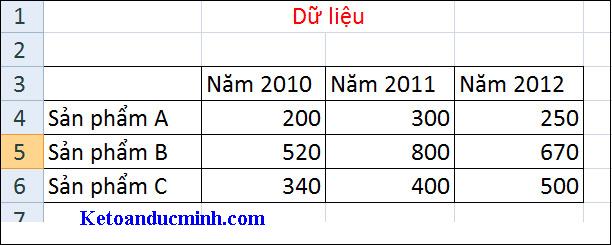
Data of the graph
Step 2: You only need to scan the data you may need to chart. Then choose Insert-> Column, here I draw the new column chart, select the column. If you may need to draw another chart, choose another one. The following results:
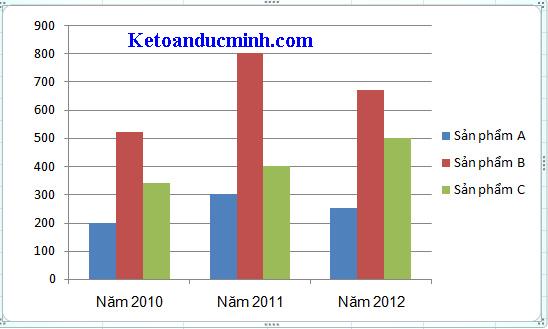
On it is just a graph form. There are many other types, depending on the topic that you draw.
Add Title, Add Caption to Horizontal Axis, Vertical Axis
To add a title for the horizontal (or vertical) axis Chart Tools -> Layout -> Labels -> Axis Titles -> select a style from the list
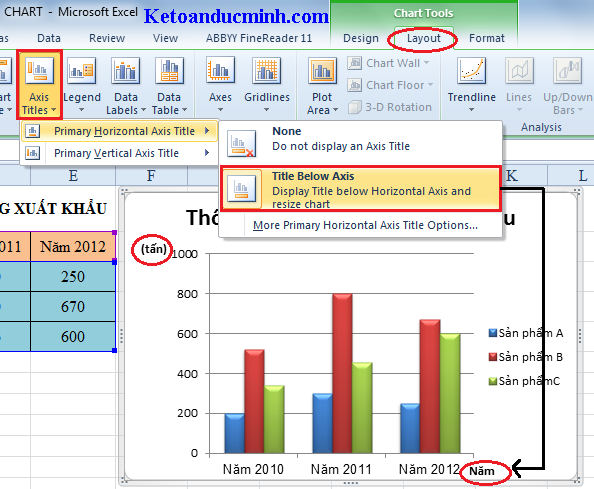
Note
The Distance Between the Numbers on the Axis
For vertical axis, right-click the vertical axis and then select Format Axis. Then you go into that editing is according to the topic that edited. Above is the whole graphing method as well as correction in the graph, please refer to it.
social shareand social shareFAQ
What is the main focus of Detailed How to Graph in Excel?
The article explains the most important facts, context, and practical details related to Detailed How to Graph in Excel.
Who may find this information useful?
It is useful for readers who want a clear overview, practical context, and a better understanding of the subject.
What should readers verify before taking action?
Check current product versions, official requirements, regional availability, and any details that may have changed since the original publication.
Related Articles
 How to Graph in Excel: Step-by-Step Guide5 minutes read
 How to Make a Line Graph in Microsoft Excel5 minutes read
 How to Make a Bar Graph in Excel4 minutes read
 Chart: How to Add a Second Y Axis to a Graph in Microsoft Excel4 minutes read
 Command: How to Import, Graph, and Label Excel Data in Matlab6 minutes read
 Create Excel Charts: How to Graph Functions in Excel4 minutes read
Reader Comments 0
Sign in with email or Google to join the discussion.