Customize settings or change Microsoft Office with Office Deployment Tool
Office Deployment Tool (ODT) is a command-line tool that you can use to deploy (install) Office for computers. Using ODT, you can choose which Office suite to install or remove.
Table of Contents
In previous versions of Microsoft Office, users could select Install Options and customize the installation by installing only the selected Office applications, choosing an application to be installed on the first use, or completely turning off. application. After that, this can be changed, other Office applications will be installed or disabled.
In Office 2016 and above, including Office 365, users can no longer do this. The full set of Office applications will be installed, be it MSI installation from ISO or Click-to-Run, no longer able to delete or add individual Office applications.
Office Deployment Tool (ODT) is a command-line tool that you can use to deploy (install) Office for computers. Using ODT, you can choose which Office suite to install or remove. You can also add or delete additional languages and edit many different options.
ODT requires a configuration script (XML file), which can be created using the Office Customization Tool or manually.
This tutorial will show you how to create, modify configuration scripts, and use it with ODT to customize an Office installation or modify an existing installation.
Microsoft Office version
1. To use ODT, the configuration script requires version information (Product ID) to install. Installing the wrong version may make activating Office impossible.
Always use the correct Product ID that corresponds to the Office 365 subscription, product key, or volume license.
2. Version summary. In the 'Activation' column is the activation method available for each version:
P = Product retail key
S = Subscription / license for Office 365 Personal, Home, Business or Enterprise plans
V = Volume licensing (KMS or MAK)
Product ID Version Activate O365 Home and Student HomeStudentRetail P O365 Home and Business HomeBusinessRetail P Office 2016 Personal PersonalRetail P O365 Personal O365PersonalRetail S O365 Home O365HomePremRetail S O365 ProPlus O365ProPlusRetail V O365 Enterprise E3, E4, E5 O365ProPlusRetail SV O365 Premium O365BusinessRetail S O365 Small Business Premium O365SmallBusinessRetail S O365 ProPlus 2019 VL ProPlus2019Volume V O365 Standard 2019 VL Standard2019Volume V Office 2019 Home & Student HomeStudent2019Retail P Office 2019 Home & Business HomeBusiness2019RetailConfigure installation options with the Office Customization Tool
1. Using ODT requires that the configuration file is in XML format. When the setup is run, it reads the installation options from this file. Office Customization Tool is a web-based application for creating ODT configuration files with a few mouse clicks.
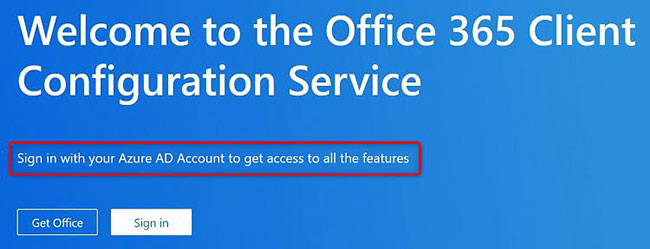
2. Go to the Office Configuration Tool.
Note: Microsoft has changed the login requirements for the Office Configuration Tool. Using a Microsoft account is no longer possible. Signing in now requires an Azure AD account (also called a work or school account).
3. Expand the Products and releases section :
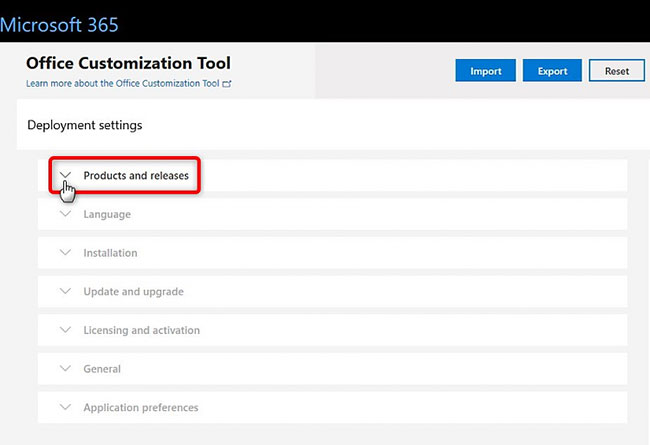
4. Select the bit architecture (# 1), the version of Office from Office Suites (# 2), which Office applications you want to install and exclude (# 3), your preferred update channel (# 4) and Which version do you want to install (# 5):

Note:
Select version (# 2 in screenshot):
Office Customization Tool allows you to choose the version of O365 ProPlus, O365 Business, Office 2019 Standard VL or Office 2019 ProPlus VL.
If you are installing any other version, choose O365 ProPlus and edit the configuration script in Notepad, when the configuration file is ready and downloaded to change the version's Product ID and fix the error. See step 3 on how to edit a configuration script.
Excluded applications (# 3 in the screenshot):
- In Business and ProPlus versions, exclude OneDrive Desktop. OneDrive is integrated and pre-installed in Windows 10, no need to install with Office.
- In OneDrive (Groove) is SharePoint. Please exclude if not necessary.
- If your organization has moved to Microsoft Teams, exclude Skype for Business .
Channel selection (# 4 in screenshot):
- Monthly Targeted = Office Insider, Updated weekly, shown as Channel = "Insiders" in the script.
- Monthly = Updated monthly, displayed as Channel = "Monthly" in the script.
- Semi-Annual = Updated twice a year, in January and July, displayed as Channel = "Broad" in the script.
- Semi-Annual Targeted = Updated twice a year in March and September, shown as Channel = "Targeted" in the script.
5. Click Next or expand Language.
Select the main installation language and additional languages you want to install. In additional languages, you can choose Full to install the complete language pack. If a full language package is not available, select Partial to see a list of partially translated languages. Proofing shows you languages that don't have full or partial language packs, but Office proofing tools are available.
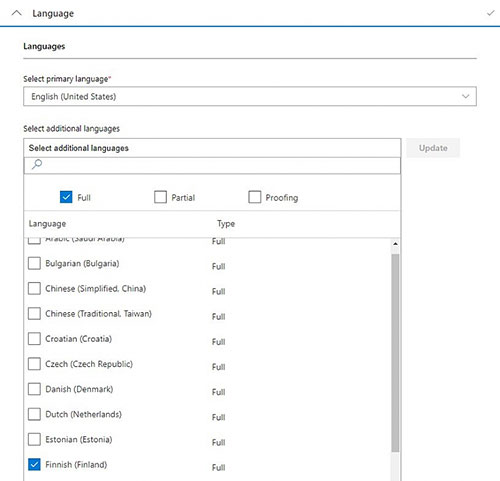
In this example, the article has chosen English as the primary language and language packs for Finnish, Swedish and German (Finland, Sweden and Germany).
6. Click Next or expand Installation.
Select where Office will be installed. The Office Content Delivery Network (CDN) always downloads Office installation files from the cloud (recommended, no source path required).Local source downloads the Office setup files to a local or shared folder across the network, and the installation is run from this directory. The ability to share or folder must exist when the setup is run.
In case you choose Local source , setup will check what content is available to share or on certain folders and download only what's missing. When the setup is run for the first time, content not excluded in the configuration script will be downloaded and saved on the given Source path . This saves time and bandwidth in case you have multiple computers. Use the network share feature as the Source path , downloads are only made once, and Office can be deployed from that share to all computers.
Similarly, if you want to modify an existing Office installation. Suppose you originally installed the Finnish Office, except Access and Publisher. Now, you want to add Swedish, Access and Publisher language packs to your existing installation. Because the setup has found the Office core to be downloaded and most applications from the source (shared over the network), just download the added components.
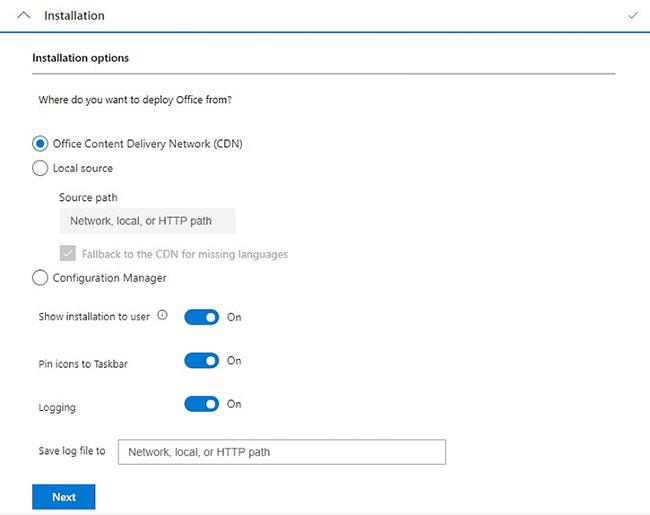
Turn off Show installation to user if you do not want any information or progress bar on running the installation to be displayed to the user. But the article recommends that you enable this option.
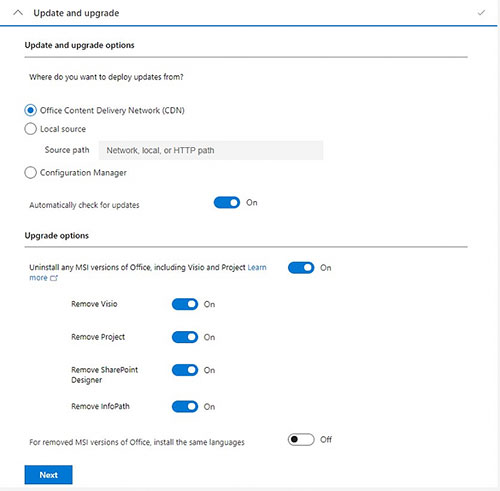
7. Click Next or expand Update and upgrade .
Select whether you want future updates and updates to be installed from the local CDN or source. Turn on or off automatic updates, choose whether you want to delete everything left over from the previous MSI installation, before installing the Click-to-Run version of Office:
8. Click Next or expand Licensing and activation .
In case you have selected a volume licensed version of Office in step 4, choose your bulk licensing method. For all versions, select Automatically accept the EULA . Do not turn on Autoactivate:

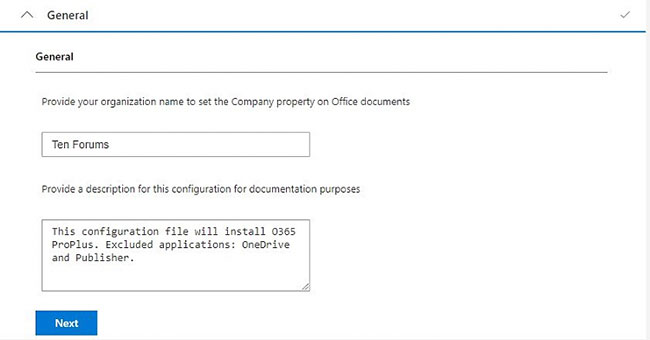
9. Click Next or expand General.
This step is optional, but if desired, you can add your name or the name of an organization and the information will be saved in the configuration file:
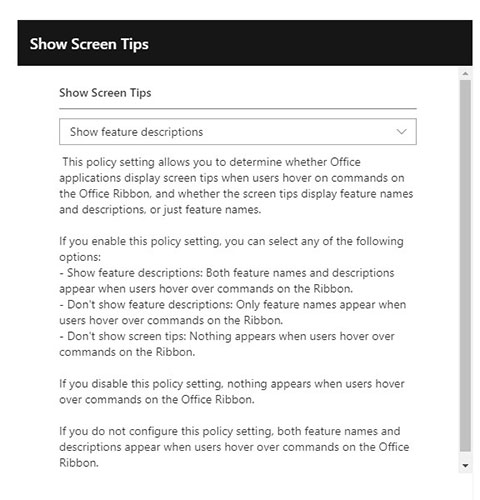
10. Click Next or expand Application preferences. This step is optional, you can reserve many general Office options here if you like.
Click an option to change it and set the value as you want:
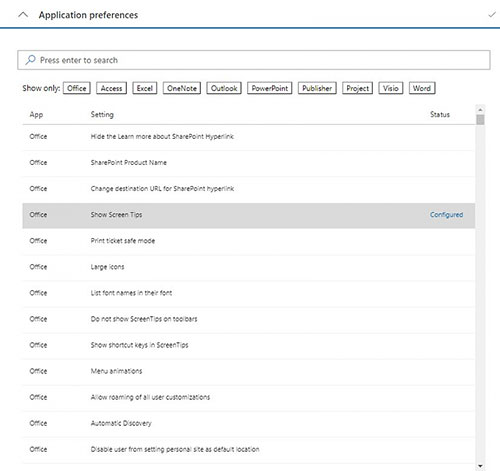
A pop-up window opens to allow you to change options:
11. All done. You can now export (download) the configuration file:

12. In this example, the article has created a configuration script to install O365 ProPlus, except OneDrive, Publisher and Skype for Business (displayed as "Lync" in the script). The main language is US English (American English), additional languages are Finnish, Swedish and German (Finland, Sweden and Germany), and the monthly update channel ( Monthly ). There is no set up display progress for users:
PHP Code:
Here is another sample script to install O365 Home 32 bit in English, with no additional languages.Semi-Annual update channel, auto turn off update, display setup process for users and EULA automatically accepted. Office setup files will be downloaded for sharing via the W10PCOfficeSetup network and Office is installed from there:
PHP Code:
Note that the Semi-Annual channel is displayed as "Broad" in the script above. Monthly Targeted will show as "Insiders" , Monthly is "Monthly" and Semi-Annual Targeted is "Targeted".
Manually configure and edit installation options
1. Configuration XML files can be created and edited manually. The sample files in step 12 in part 2 are a good base, showing some of the most common options. See the full list of options and commands at:
https://docs.microsoft.com/en-gb/DeployOffice/configuration-options-for-the-office-2016-deployment-tool
2. Configuration files can be created in any text editor and named as you like. It must be saved as an XML file ending in .xml
3. See the second part of the sample script in step 12 of section 2. Because the Office Customization Tool does not allow the selection of O365 Home version, the example used O365 ProPlus instead when creating the script, so the Product ID when exporting script file to PC is. The example changed manually in Notepad to.
The article also edited the script to exclude Publisher, change the installation source from network-to-cloud sharing (CDN), to change the update channel to Monthly and add the Finnish language pack .
Here is the initial configuration script exported (downloaded) from the Office Customization Tool:
PHP Code:
And here too after manual editing:
PHP Code:
Run setup to install Office
1. Download ODT.
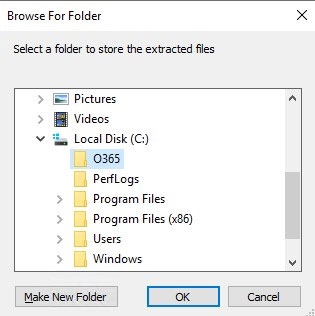
2. Create a folder on the root of C: drive , name it O365 (you can name the folder as you like).
3. Unblock the downloaded EXE file, then run it. The file name is officedeploymenttool_12345-67890.exe, where 12345-67890 is the current version number. At the time of this writing, the ODT version is 11107-33602.
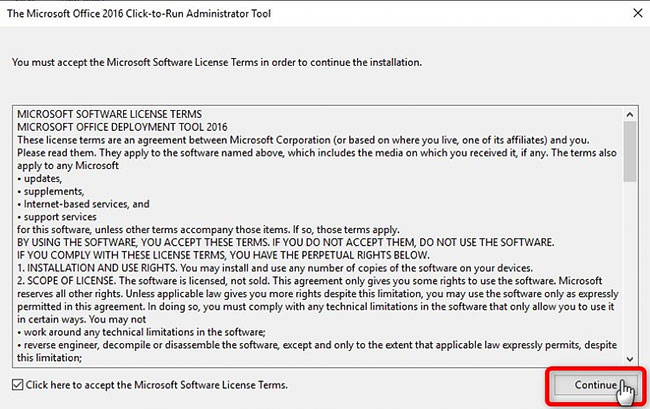
4. Accept the license, click Continue :
5. To extract the ODT, select the folder you created in step 2 in section 4 and click OK :
6. Copy the XML configuration file into the same directory.
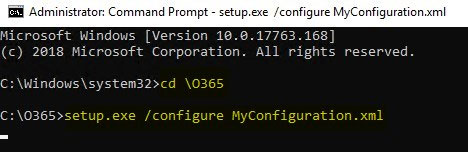
7. Open Command Prompt with admin rights, navigate to O365 folder with the following command:
cd O365
8. If you selected the cloud (CDN) as the source in step 6 in part 2, enter the following command:
setup.exe /configure YourConfigurationFile.xml
9. Office will be installed as configured in the script.
10. If you selected local or shared network as the Source path in step 6 in section, the Office setup files should be downloaded first with the following command:
setup.exe /download YourConfigurationFile.xml
11. Once downloaded, you can install Office from your local source using the command in step 8, section 4.
Note that when installing from network sharing, ODT must be running on the computer on which you want to install Office. However, the configuration file and the Source path for downloaded Office setup files can be placed on a network share.
To download:
setup.exe /download ServerNameO365ShareYourConfigurationFile.xml
To install:
setup.exe /configure ServerNameO365ShareYourConfigurationFile.xml
Change existing Office settings
1. You can change your current Office settings whenever you want. You can create a new script or modify an existing one as described in step 3 in part 3
2. Run the modified script with switch / configure as shown in step 8 or step 11 in section 4, depending on whether the configuration script is saved locally or shared over the network.
3. Office settings will be modified, features removed or added as stated in the configuration file.
All operations are completed!
Note:
Depending on the options selected, using ODT to install or modify Office can be confusing, because sometimes no indication of the process is displayed.
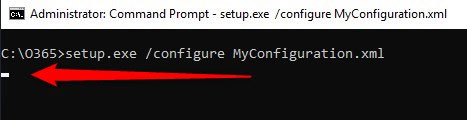
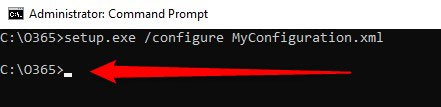
Even if you don't see any progress, keep running the Command Prompt until the setup is ready and Office Setup is finished. The cursor appears under your command on column 1, the setup is still running, download or install Office:
When the installation is ready, a prompt will be displayed:
Hope you are succesful.
Was this article helpful?
Your feedback helps us improve.
Related Articles
 8 default settings for optimizing Microsoft Office 20169 minutes read
 The default settings should change on Microsoft Office7 minutes read
 How to install Word and Excel in Office 2016 only3 minutes read
 How to Personalize Microsoft Office2 minutes read
 How to customize the Windows 8.1 interface2 minutes read
 5 install Microsoft Word you should customize12 minutes read
Reader Comments 0
Sign in with email or Google to join the discussion.