Create bootable USB with Linux Mint 19.3
In today's article, TipsMake.com will show you how to upgrade from the latest Linux Mint 17.3 to the existing Linux Mint 19.3. Here is a step by step guide to doing this!
In today's article, TipsMake.com will show you how to upgrade from the latest Linux Mint 17.3 to the existing Linux Mint 19.3. Here is a step by step guide to doing this!
Download Linux Mint 19.3
https://linuxmint.com/download.php
Create a USB boot
Once the ISO file ( linuxmint-19.3-cinnamon-64bit.iso ) is downloaded, it's time to create a USB boot. Do not use dd and unetbootin ! Linux Mint will not be able to boot from USB.
Instead, follow the official instructions on how to create boot media. On an existing Linux Mint installation, right-click the ISO file and open it with Disk Image Writer (or Make bootable USB stick ). For other distributions (or even operating systems), the Etcher open source tool is recommended.
The article was successful using the Disk Image Writer application. Linux Mint has booted correctly from USB.
Linux Mint 19.3 has booted - what to do next?
Linux Mint is a "live image". Feel free to experiment and use Mint. But if you want to install Linux Mint, you must open the setup application. That shortcut can be found on the desktop and is named " Install Linux Mint ". Pretty handy, right?
Establish
The installer is a pure one-click setup. It starts with the language selection and then the keyboard layout.


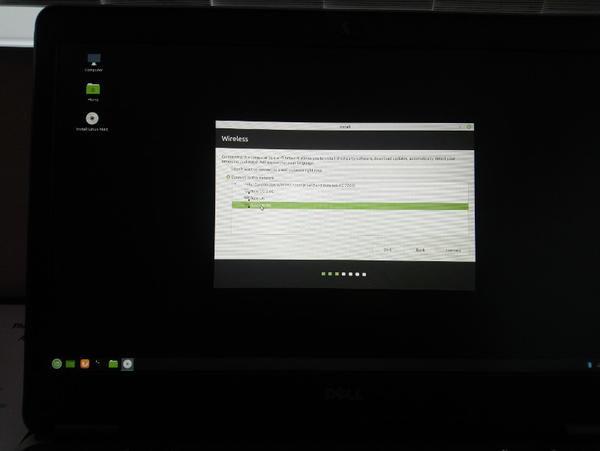
The next window is to create a connection to the wireless network (if not already connected to the network). This connection allows direct download and installation of third-party tools (such as proprietary drivers and software) that match the hardware.

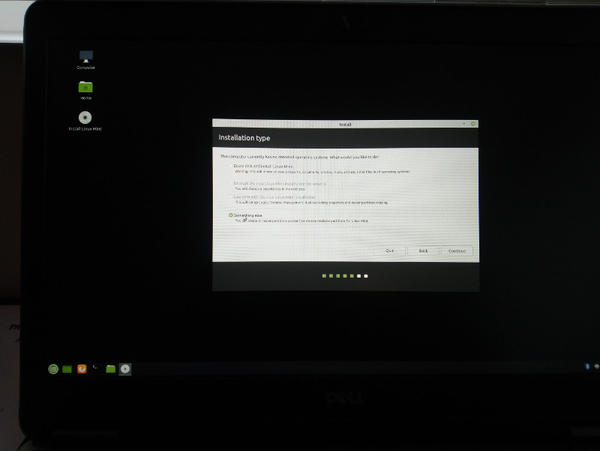
The next step is the only part of the setup that requires advanced knowledge. The Installation type question can be answered by using the most basic settings ( Erase disk and install Linux Mint - basically installing Linux Mint only in one section. root zone. Advanced users can click Something else. The author of the article also clicked "Something else" and created two partitions himself. The first partition is 4GB (4096MB), the other is the only root partition mounted.
Note : When performing an upgrade from an existing installation, the author deleted the existing partitions before launching the setup using gparted from the live image.

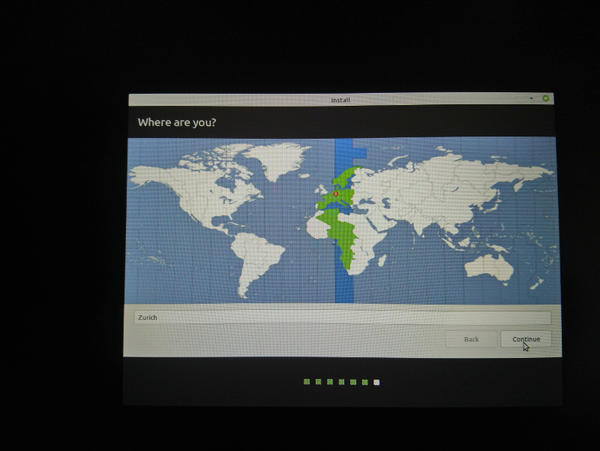
After setting up the drive partition, you can select the region / location (time zone) and then create the user (first).

After this user window, installation will begin. Once the installation is completed, it is possible to reboot and (with the installation media removed) Linux Mint 19.3 will boot from the HDD.
- 10 reasons you can't not 'love' Linux Mint
- How to upgrade from Linux Mint 19.3 to Linux Mint 20
- 6 Best New Features in Linux Mint 21.2 'Victoria'
- How to create a Linux Bootable USB drive
- Linux Mint 20.2 'Uma' Released: What's Notable?
- Some notable changes on Linux Mint 20
- How to set up or disable Linux Mint update notifications
- Why Linux Mint is the best distro to start migrating from Windows 11 to Linux?
- Distinguish Ubuntu and Linux Mint
- How to change desktop theme on Linux Mint
- Create multifunctional USB boot with XBoot
- What is open source software?
- 6 reasons Linux makes 'give up' Windows
- Dynamic website design with Drupal source code 7 - Part 7
- Why will Chromebook fail?
- Chrome OS is about to be released, the netbook is not yet available
- Block ads in browsers and Android apps
- 8 Windows 8 'borrowed' features of Linux
- NukeViet 3.0 officially launched
- Dynamic website design with Drupal source code 7 - Part 1
 How to Install Linux Mint Operating System
 6 Best New Features in Linux Mint 21.2 'Victoria'
 Linux Mint 20.2 'Uma' Released: What's Notable?
 How to upgrade from Linux Mint 19.3 to Linux Mint 20
 Some notable changes on Linux Mint 20
 10 reasons you can't not 'love' Linux Mint