How to secure Linux server with fail2ban
With fail2ban, your Linux computer will automatically block IP addresses with too many connection errors. It is a secure way. The following article will show you how to use them.
Table of Contents
With fail2ban, your Linux computer will automatically block IP addresses with too many connection errors. It is a secure way. The following article will show you how to use them.
Security
If your computer accepts new connection requests, such as Secure Shell connections or operates a website or email browser, you need to protect it from outside attacks.
To do this, you need to control faulty connection requests to your account. If not authenticated for a short time, they will be banned from taking further actions.
The simplest way to do this is to automate the entire process. With a simple configuration, fail2ban will control, ban or unblock all connections for you.
fail2ban integrates with the iptable of the Linux firewall. It will enforce a ban on suspicious IP addresses by adding rules to the firewall. To explain it more closely, the following iptables will appear with a blank set of rules.
Of course, if you are concerned about security, you are probably using a firewall equipped with a common set of rules. fail2ban only adds or deletes the program's own rules, so the firewall functions on your computer will remain intact.
Empty rule set will use this command:
sudo iptables -L Typing the above command will result as a picture
Install fail2ban
Installing fail2ban is very simple. On Ubuntu 20.04, follow these steps:
sudo apt-get install fail2banOn Fedora 32, enter:
sudo dnf install fail2banOn Manjaro 20.0.1, we use:
sudo pacman -Sy fail2banConfigure fail2ban
The installation of fail2ban includes the default jail.conf configuration file. This file is overwritten when fail2ban is upgraded, so the chance to edit this file is almost zero.
Instead, we change the file jail.conf instead of jail.local. When configuration changes in jail.local, they will stay the same during the upgrade. Both files are automatically read by fail2ban.
Ways to copy files:
sudo cp /etc/fail2ban/jail.conf /etc/fail2ban/jail.localYou can open the file with gedit:
sudo gedit /etc/fail2ban/jail.localFind the two sections [DEFAULT] and [sshd] in the file. You can find [DEFAULT] around the 40th line. This is an extremely informative and commented section.
 Two sections [DEFAULT] and [sshd]
Scroll down to about 90th, you will see 4 settings should know:
- ignoreip : This is a list of IP addresses that have free needles, never banned. They are IP addresses (127.0.0.1) listed from the default, along with the equivalent IPv6 (:: 1). If you also know that other IP addresses cannot be banned, add to this list by leaving a blank line between each address.
- bantime : The period in which each IP address is banned (the letter 'm' stands for minutes / minutes). If you enter a value without 'm' or 'h' (hours / hour), the system will automatically count in seconds. If the value is -1, the IP address will be permanently banned. Be careful with this.
- findtime : The amount of IP time prohibited after too many connection failures.
- maxretry : The value represents 'connection failed too many times'.
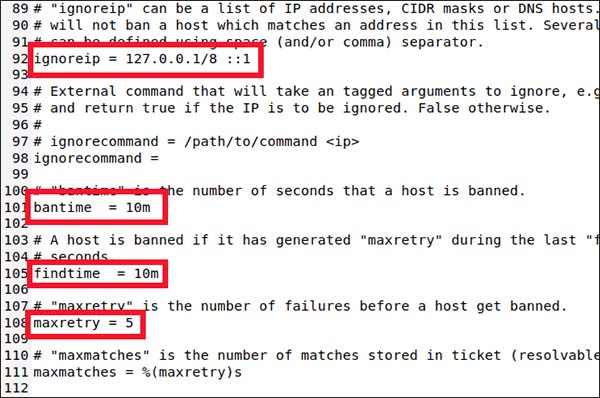 4 values should know
If connections from the same IP address encounter a maxretry failure connection within a certain findtime, they will be blocked for a period of time in bantime. The only exception is that this IP is present in the ignoreip list.
fail2ban only put the IP address into jail for a certain period of time. fail2ban supports many different types of jail, and each represents the settings that are applied to a specific type of connection. This allows you to have various adjustments for connection types. Or fail2ban is only used to control a set of different connection types.
You will have to guess the word in the section [DEFAULT], but the settings we see are the default. Now for the settings for SSH jail.
Create a Jail profile
Jail allows connections to and from the dashboard of fail2ban. If the default settings do not match what you want to jailbreak, you can set individual values like bantime, findtime and maxretry.
Down to about line 280, you will see the section [sshd].
 In the section [sshd]
This is where you can set the jailbreak values for SSH connections. To include this jailbreak in your dashboard and ban, type the following:
enabled = trueType next:
maxretry = 3The default setting is 5, but be extra careful with SSH connections. Reduce to 3, then save and close the file.
A jailbreak can use both the default and specific jail settings.
Activate fail2ban
fail2ban has been installed, must now activate auto-start service.
To enable fail2ban, use the systemctl command:
sudo systemctl enable fail2banThey are also used to start the service:
sudo systemctl start fail2banWe can also check the status of the service using systemctl:
sudo systemctl status fail2ban.serviceWhen the green light came on, everything was in perfect condition.
 The blue line has been turned on
Now let's see how fail2ban works:
sudo fail2ban-client status Bad fail2ban operation
This reflects what was installed above. Activate a single jail, named [sshd]. If we include the name of the jail in the previous command, we can see:
sudo fail2ban-client status sshd List of broken IP connections
A list of broken connections and banned IP addresses will appear. Of course all the indicators are equal to 0 now.
Jail Testing.
On another computer, an SSH connection request was sent to the device under test and the password was deliberately mistakenly entered. You will have three times to retype the password for each connection.
The maxretry value will pop out right after the connection fails 3 times, not 3 times the wrong password. This means 3 incorrect password attempts with one failed connection.
Try another connection and type the wrong password 3 times. The first time after the third connection, fail2ban will be turned on.
 fail2ban will be enabled
After the next time, we will receive no response from the server, no explanation, no further notice.
You must press Ctrl + C to return to the command prompt. If you try again, another response pops up:
ssh dave@ubuntu20-04.local Notice of connection refusal
Earlier, the error message was 'Permission denied'. This time, the connection was denied.
Take a look at the details of [sshd] jail again:
sudo fail2ban-client status sshd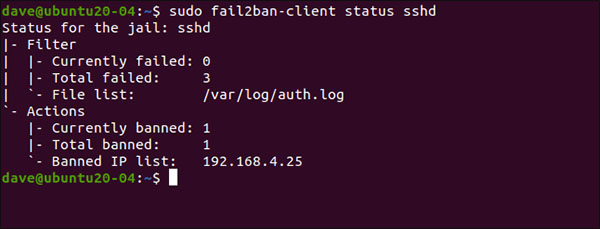 There are three failed connections, and an IP address (192.168.4.25) is banned
As mentioned above, fail2ban ban IPs by adding new rules to the firewall's rule set. Let's take a look at that set of rules now (the first is blank):
sudo iptables -L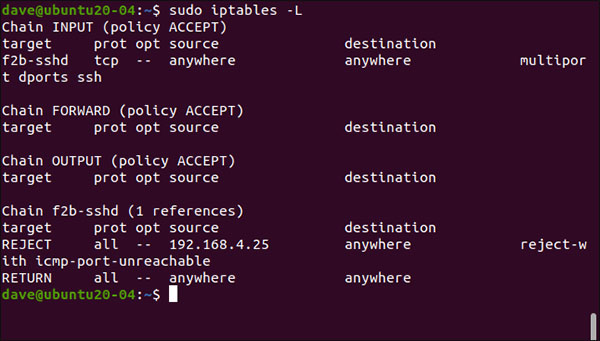 New rules are added to the firewall
A rule has been added to the INPUT policy, sending SSH traffic to the f2b-ssh string. The rule in the f2b-sshd string denies SSH connections from the address 192.168.4.25. The default bantime settings have not been replaced, so after 10 minutes, these IP addresses will be unblocked and may require resuming from the beginning.
If you set a long bantime (like a few hours) but suddenly want to revisit that IP address sooner, you can adjust the time.
Type the following:
sudo fail2ban-client set sshd unbanip 192.168.5.25On the server, if you require another SSH connection and type the correct password, we will be connected:
ssh dave@ubuntu20-04.local When connection is allowed
Simple and effective
Simple is always effective and fail2ban is a quick solution to the problem. It only takes a little time to install and then all operations on the computer are automatic.
Was this article helpful?
Your feedback helps us improve.
Related Articles
 8 ways to secure SSH server connections on Linux8 minutes read
 7 Enterprise Linux Server Distributions7 minutes read
 How to manage remote Linux server using SSH11 minutes read
 How to secure Linux Home Server7 minutes read
 How to secure SSH server15 minutes read
 The 5 best Linux server distributions5 minutes read
Reader Comments 0
Sign in with email or Google to join the discussion.