How to create USB Boot Live Kali Linux
The most popular and fastest way to apply Kali Linux is to run it from a USB drive. This method has many advantages. To do this, we first need to create a bootable USB drive from an ISO image of Kali Linux.
Table of Contents
The most popular and fastest way to apply Kali Linux is to run it from a USB drive. This method has many advantages:
- It is not destructive - it does not change the hard drive of the installed system or operating system and to return to normal operation, you just need to delete the USB drive 'Kali Live' and restart the system. system.
- It's portable - you can bring Kali Linux in your bag and run it in minutes on an existing system.
- It is customizable - you can choose to burn your own customized Kali Linux file and insert it into the USB drive using the same procedure.
- It has continuity - with a little effort, you can configure the USB Kali Linux Live drive to store continuously, so the data you collect is saved on reboots.
To do this, we first need to create a bootable USB drive from a Kali Linux ISO file.
What you need to create USB Boot Live Kali Linux
- The verified copy of the latest ISO file is appropriate for the system you will run on.
- If you are running on Windows platform, you will also need to download the Win32 Disk Imager utility. On Linux and OS X, you can use the dd command, which is preinstalled on those platforms.
- USB drive (4GB or larger). Systems with direct SD card slots can use SD cards of similar capacity. This process is identical.
Link to download Win32 Disk Imager: https://launchpad.net/win32-image-writer
How to install USB Live Kali Linux
The specifics of this process will vary depending on whether you are performing this process on Windows, Linux or OS X systems.
Create Kali USB drive that can boot on Windows
1. Plug the USB drive into the available USB port on Windows PC. Note to specify which drive (eg 'F:') is used when mounting and starting the downloaded Win32 Disk Imager software.
2. Select the Kali Linux ISO file and verify that the overwritten USB drive is correct. Click the ' Write ' button.
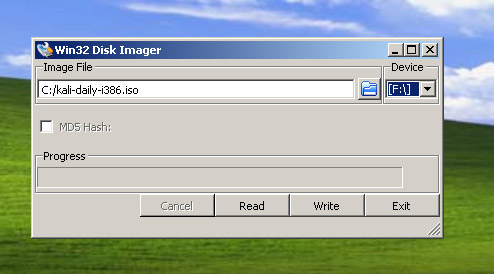
3. When the image selection process is complete, remove the USB device from the Windows machine safely. You can now use a USB device to boot into Kali Linux.
Creating a USB drive Kali can boot on Linux
Creating USB Kali Linux is easy to boot in Linux environment. After you have downloaded and verified your Kali ISO file, you can use the dd command to copy it to USB by following the following procedure. Note that you will need to run as root or execute the dd command with sudo. The following example assumes the desktop is Linux Mint 17.1 - depending on the distribution you are using, some specific details may vary slightly, but in general, the process will be relatively similar.
WARNING: Although it is easy to burn Kali Linux images to a USB drive, you may accidentally overwrite the drive you do not want if you do not understand exactly what you are doing or incorrectly specify the path. output. Check carefully what you are doing before performing the override. You can't change anything after that, so be careful.
1. First, you need to specify the device path to use to burn the image to your USB drive. If no USB drive is inserted into the port, execute the command:
sudo fdisk -l
At the command prompt in the terminal window (if you do not use the advanced privileges with fdisk , you will not receive any results). You will get output similar to this, displaying a single drive - '/ dev / sda' - containing three partitions ( / dev / sda1, / dev / sda2, and / dev / sda5 ):

2. Now, plug your USB drive into an available USB port on the system, and run the same command, " sudo fdisk -l " for the second time. Now, the result will look like this, showing an additional device not previously available, in this example ' / dev / sdb ', a 16GB USB drive:

3. Carry out (carefully!) The recording of the potassium ISO file on a USB device. The following example command assumes that the ISO image you are writing is named " linux-linux-2017.1-amd64.iso " and is in the current working directory. The block parameter can be increased, and while it can speed up the operation of the dd command, sometimes it also creates USB drives that cannot be booted, depending on your system and various factors. . Recommended value, 'bs = 512k', is cautious and reliable.
dd if = potassium-linux-2017.1-amd64.iso of = / dev / sdb bs = 512k
This step will take about ten minutes or longer. Be patient!
- Basic Linux commands everyone needs to know
The dd command will not respond until it is completed, but if your drive has an access indicator, you may see it up and down over time. The time to record the above image will depend on the speed of the system used, the USB drive itself and the USB port installed. After the recording process has completed, the screen will display as follows:
  5823 + 1 records in
  5823 + 1 records out
  3053371392 bytes (3.1 GB) copied, 746,211 s, 4.1 MB / s
You can now boot into the Kali Live environment using a USB device.
Create USB Drive Kali can boot on OS X
OS X is based on UNIX, so creating a Kali Linux USB drive is bootable in the same OS X environment as it does on Linux. After you download and verify the selected Kali ISO file, you use the dd command to copy to USB.
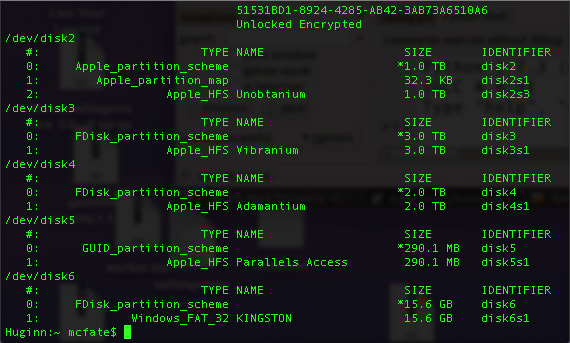
1. If no USB drive is plugged into the system, open the Terminal window and type the diskutil list command at the command prompt.
2. You will get a list of device paths (like / dev / disk0, / dev / disk1 , etc.) of the drives mounted on the system, along with information about partitions on each drive .

3. Plug the USB device into the USB port of the computer and run the list of commands for the second time. The path of the USB drive will most likely be the last one. In any case, it will be a path not previously available. In this example, you can see that there is currently a / dev / disk6 that was not previously available.
4. Disconnect the drive (assuming, in this example, USB is / dev / disk6 - do not copy this copy, verify the correct path on your own system!):
diskutil unmount / dev / disk6
5. Proceed (carefully!) To write a potassium ISO file on a USB device. The following command assumes that your USB drive is on the path / dev / disk6 and you are in the same Kali Linux ISO directory, named " linux-linux-2017.1-amd64.iso ":
sudo dd if = potassium-linux-2017.1-amd64.iso of = / dev / disk6 bs = 1m
Note: Increasing the block size (bs) will speed up the recording process, but will also increase the chance of creating a poor quality USB. Using value on OS X has created a reliable image consistently.
Recording USB drives may take more than half an hour. Be patient!
The dd command does not respond until it is completed, but if your drive has an access indicator, you may see it up and down over time. The time to record the above image will depend on the speed of the system used, the USB drive itself and the USB port installed. After the dd command has finished writing the drive, the screen will appear like this:
  2911 + 1 records in
  2911 + 1 records out
  3053371392 bytes transferred in 2151.132182 secs (1419425 bytes / sec)
You can now boot into the Kali Live environment using a USB device.
To boot from an alternative drive on OS X, open the boot menu by pressing the Option key immediately after turning on the device and selecting the drive you want to use.
See more:
- How to install VmWare Tools on Kali Linux
- Instructions for installing Kali Linux on Windows 10 are easier than ever
- How to install and use Kali Linux on VmWare virtual machine
Was this article helpful?
Your feedback helps us improve.
Related Articles
 How to install Kali Linux dual boot on macOS15 minutes read
 How to install Kali Linux on macOS10 minutes read
 How to create a Live CD Linux disc7 minutes read
 How to install Kali Linux running Dual Boot with Windows11 minutes read
 How to create customized Potassium ISO5 minutes read
 How to install and use Kali Linux on VmWare virtual machine9 minutes read
Reader Comments 0
Sign in with email or Google to join the discussion.