How to Install Linux Mint
This wikiHow teaches you how to replace your computer's operating system with Linux Mint. You can do this on both Windows and Mac computers. Back up your computer. Since you'll be replacing your computer's operating system with Linux, it's...
Table of Contents
Part 1 of 4:
Preparing to Install
-
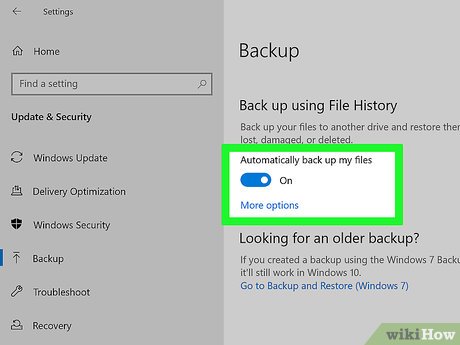 Back up your computer. Since you'll be replacing your computer's operating system with Linux, it's good practice to back up your computer's files and preferences, even if you don't want to keep them on Linux. This way, if something goes wrong during setup, you'll be able to restore your computer.
 -
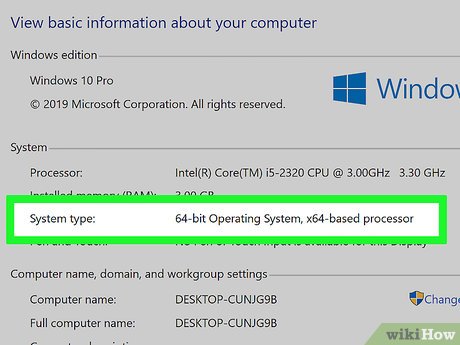 Check your computer's bit number. Skip this step if you're on a Mac. Knowing whether your computer runs a 32-bit operating system or a 64-bit operating system will help determine which version of Linux Mint you can download.
 -
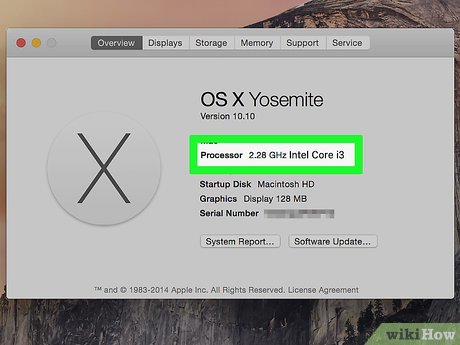 Check your Mac's processor type. Linux can only be installed on Macs that have Intel processors. To check, click the Apple menu, click About This Mac, and look for the "Processor" heading. You should see "Intel" listed in the processor's information; if you don't, you can't install Linux on your Mac.
- Skip this step on Windows.
-
 Download the Linux Mint ISO file. Go to https://linuxmint.com/download.php, click either 32-bit or 64-bit (depending on your computer's bit number) to the right of the "Cinnamon" heading, and click a regional link below the "Mirror" heading.
- On a Mac, select the 64-bit option.
-
 Download a USB burning program. This will depend on your operating system:[1]
- Windows - Go to https://www.pendrivelinux.com/universal-usb-installer-easy-as-1-2-3/, scroll down, and click Download UUI.
- Mac - Go to https://etcher.io/ and click Etcher for macOS at the top of the page.
-
 Insert a USB flash drive into your computer. Plug the flash drive into one of your computer's USB ports, which can usually be found on the side or back of the computer.
- On a Mac, you'll need a USB-C flash drive (or a USB 3 to USB-C adapter).
-
 Format the USB flash drive. This will erase the flash drive and make it compatible with your computer. Make sure that you choose the correct file system:
- Windows - Select NTFS or FAT32 for the file system.
- Mac - Select Mac OS Extended (Journaled) for the file system.
- Leave your USB flash drive plugged in. Now that your flash drive is formatted and Linux has downloaded, you can proceed with installing Linux.
Part 2 of 4:
Installing the Linux Desktop on Windows
-
 Install your USB burning program. Double-click the flash drive-shaped Universal USB Installer icon, click Yes when prompted, and click I Agree. This will open the program's main window.
 -
 Create a bootable USB. Click the "Step 1" drop-down menu and click Linux Mint, then do the following:
- Click Browse
- Click your Linux Mint ISO file.
- Click Open
- Click the "Step 3" drop-down box.
- Click your USB flash drive's letter.
- Click Create in the bottom-right corner.
- Click Yes when prompted.
-
 Close UUI. Click the Close button when it becomes available. You can now install Linux Mint from the flash drive.
 -
 Restart your computer. Click Start, click Power
 , and click Restart in the menu. Your computer will begin to restart.
-
 Immediately press the BIOS key. This key is usually one of the F keys (e.g., F2), Esc, or Del. You'll need to press this key before the Windows 10 startup screen appears.
- The key that you're supposed to press may briefly be listed at the bottom of the screen.
- You can check your computer's manual or documentation online in order to see which key you need to press.
- If you see the startup screen, you'll need to restart the computer and try again.
-
 Find the "Boot Order" section. On most computers, you'll use the arrow keys to select the "Advanced" or "Boot" tab to do this.
- Some BIOS models have the boot order options on the initial page on which you arrive.
-
 Select your computer's USB drive. It should be labeled "USB Drive", "USB Disk", or "Removable Storage" (or something similar). Again, use the arrow keys to select the appropriate option.
 -
 Move the drive to the top of the boot list. With the "USB Drive" (or similar) option selected, press the + key until the selected option is at the top of the boot list.
- If this doesn't work, check the key legend on the right side (or bottom) of the screen to see which key you should press to move the selected option.
-
 Save and exit. For most BIOS pages, you'll press a key to do this; check the on-screen key legend to see which key you need to press. Once you save and exit, you should arrive at the Linux boot screen.
- On some computers, you'll have to press another key to confirm the changes when prompted.
-
 Select the "Linux Mint" option. For Linux Mint 18.3, for example, you'd select Boot linuxmint-18.3-cinnamon-64bit here.
- The wording will vary slightly depending on the version of Linux Mint and your computer's bit number.
- Don't select the "acpi=off" version of Mint.
-
 Press ↵ Enter. This will prompt Linux to begin installing the desktop client.
 -
 Wait for the Linux desktop to load. It shouldn't take more than a few minutes. Once it finishes, you can proceed with installing Linux on your hard drive.
Part 3 of 4:
Installing the Linux Desktop on Mac
-
 Install Etcher. Double-click the etcher DMG file, verify the download if prompted, and then click and drag the "etcher" icon onto the Applications folder.
 -
 Open Etcher. You can find it in the Applications folder.
 -
 Click ⚙️. It's in the top-right side of the Etcher window.
 -
 Check the "Unsafe mode" box. This option is near the bottom of the page.
 -
 Click Enable unsafe mode when prompted. Doing so will enable Unsafe Mode, which allows you to write the ISO file onto any drive.
 -
 Click Back. It's in the upper-right side of the page.
 -
 Click Select image. This blue button is on the left side of the Etcher window.
 -
 Click the Linux Mint ISO file. Doing so selects it.
 -
 Click Open. It's in the bottom-right corner of the window.
 -
 Click Select drive. You'll see this blue button in the middle of the page.
 -
 Select your flash drive. Click your flash drive's name, then click Continue at the bottom of the window.
 -
 Click Flash!. This blue button is on the far-right side of the Etcher window. Doing so will create a bootable version of Linux on the USB drive, allowing you to install Linux from the drive.
 -
 Restart your Mac. Click the Apple menu, click Restart..., and click Restart when prompted.
-
 Immediately hold down the ⌥ Option key. You'll hold this down until you arrive at the boot options screen.
- Make sure that you start holding down this key immediately after clicking Restart a second time.
-
 Click EFI Boot. In some cases, you'll click your flash drive's name or the Linux Mint option instead. This will open the Linux Mint installation screen.
 -
 Select the "Linux Mint" option. For Linux Mint 18.3, for example, you'd select Boot linuxmint-18.3-cinnamon-64bit here.
- The wording will vary slightly depending on the version of Linux Mint and your computer's bit number.
- Don't select the "acpi=off" version of Mint.
-
 Press ↵ Enter. This will prompt Linux to begin installing the desktop client.
 -
 Wait for the Linux desktop to load. It shouldn't take more than a few minutes. Once it finishes, you can proceed with installing Linux on your hard drive.
Part 4 of 4:
Installing Linux
-
 Double-click Install Linux Mint. This disc-shaped icon is on the desktop. A window will open.
 -
 Select a setup language. Click the language that you want to use, then click Continue in the bottom-right corner of the window.
 - Set up Wi-Fi. Click a Wi-Fi network, enter the password in the "Password" text field, click Connect, and click Continue.
-
 Check the "Install third-party software" box. It's at the top of the page.
 -
 Click Continue.
 - Click Yes when prompted. This will indicate that you want to erase any previous partitions and merge your computer's hard drive space.
-
 Indicate that you want to replace your operating system with Linux. Check the "Erase disk and install Linux Mint" box, click Continue, click Install Now, and click Continue when prompted.
 -
 Select a time zone. Click a vertical time zone bar that correlates with your geographic location, then click Continue in the bottom-right corner.
 -
 Select an operating system language. Click a language on the left side of the window, select a keyboard layout on the right side of the window, and click Continue.
 -
 Enter your personal details. This includes typing in your name, your computer's name, your preferred username, and a password, and then clicking Continue. Linux will begin installing onto your computer.
 -
 Remove the USB flash drive from your computer. While your Mac probably won't try to reinstall Linux when rebooting, it's best to limit the number of boot options during the initial installation phase.
 -
 Click Restart Now when prompted. Doing so will cause your computer to restart, thereby saving the installation on your hard drive. You will now be able to use Linux on your computer like any other operating system.
4.5 ★ | 2 Vote
- Create bootable USB with Linux Mint 19.3
- 10 reasons you can't not 'love' Linux Mint
- How to upgrade from Linux Mint 19.3 to Linux Mint 20
- 6 Best New Features in Linux Mint 21.2 'Victoria'
- Linux Mint 20.2 'Uma' Released: What's Notable?
- Some notable changes on Linux Mint 20
- How to Install Linux Mint Operating System
- How to set up or disable Linux Mint update notifications
- Why Linux Mint is the best distro to start migrating from Windows 11 to Linux?
- Distinguish Ubuntu and Linux Mint
MORE LIKE THIS
- How to Convert a Doc File to a Docx File
- How to Download Microsoft Word
- How to Insert Fillable Fields on Word on PC or Mac
- How to Copy and Paste in Microsoft Word
- How to Protect a PDF File from Copying
- How to Type in Korean on a Computer
- How to Recover Word Documents
- How to Reinstall Wireless Drivers
- How to Connect a Wireless Mouse
- How to Trim a Video on PC or Mac
-
 Create an AI voiceover for poems and inspiring stories.
-
Instructions on creating a Froggy Jumps game on Educaplay
-
How to make a piano game using Scratch
-
Instructions on how to add ChatGPT to Google Sheets
-
How to rotate any page horizontally in Word
-
How to install SPSS on a MacBook: A step-by-step guide.
 Create an AI voiceover for poems and inspiring stories.
 Instructions on creating a Froggy Jumps game on Educaplay
 How to make a piano game using Scratch
 Instructions on how to add ChatGPT to Google Sheets
 How to rotate any page horizontally in Word
 How to install SPSS on a MacBook: A step-by-step guide.