Create and work with vector graphics in Photoshop
Photoshop has basic support for vector images. In this tutorial, readers will have the opportunity to learn how to work with vector graphics in Photoshop, instead of using Illustrator..
Adobe Illustrator is an industry standard application for graphic design. This is the best tool for working with vector-based files.
Sadly, not everyone has Illustrator, but many people have Photoshop. Photoshop has basic support for vector images. In this tutorial, readers will have the opportunity to learn how to work with vector graphics in Photoshop, instead of using Illustrator.
- How to use Photoshop CS5 - Part 1: Toolbox
What is vector image?
Photoshop is designed primarily for raster images. Raster images are a data structure that represents a colored rectangular grid of pixels, which can be viewed directly through a screen, paper, or display device. These are polygonal images drawn in pixels. However, the file size can be large and users can zoom in without reducing the image quality.
Vector images are a collection of lines and curves created by mathematical formulas. This means that users can change their size indefinitely and the file size is usually very small. Vectors have a very important role in graphic design work, including logo and logo design.
A vector artwork includes many objects. Each object is a straight line or shape with an edge defined by a path (path is a straight line that can be customized). In Photoshop, path is displayed as a thin blue line (however, it is not technically visible).
You can apply two colors for each object:
- Stroke is a straight line along the path.
- Fill a color or texture into the space surrounded by path.
Users can set both of these in the options bar at the top of the screen. Users can also set both to No Color if they want to leave them blank. Alternatively, choose the thickness (in pixels) and the type for Stroke. Solid line is the default option.
In Photoshop, vector images can be made up of shapes, lines and text.
Draw shapes and vector lines
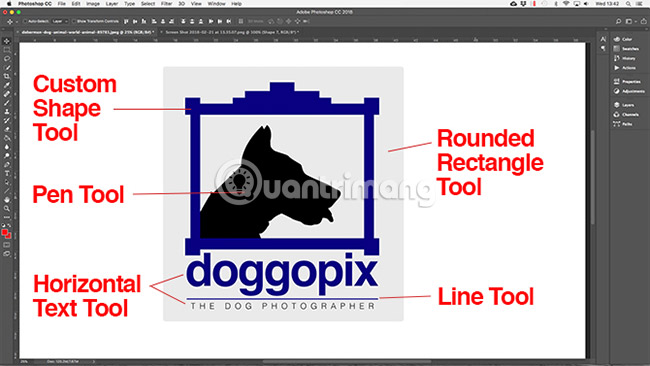
Photoshop comes with tools to draw some common shapes. By default, the Rectangle Tool is highlighted. Click and hold on that icon to display the full set of tools:
- Rectangle Tool (Rectangle)
- Rounded Rectangle Tool (Rounded Rectangle Tool)
- Ellipse Tool (Ellipse)
- Polygon Tool (Polygon Tool)
- Line Tool (Straight line)
- Custom Shape Tool (Custom shape)
You can always choose any tool by pressing the U key on the keyboard. Or, press Shift + U to browse through the tools until you find what you want. Shortcuts are a good way to quickly navigate Photoshop.
Draw basic vector shapes
Select the tool that brings the shape you want to draw, then add the Fill and Stroke colors .
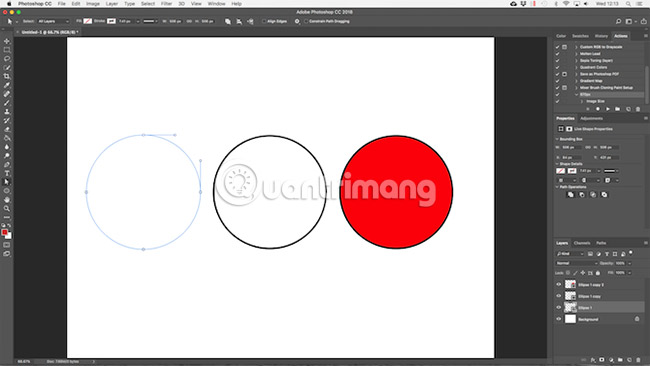
Now click and drag in the canvas (canvas). The shape drawn will follow the way you hover. To create symmetrical shapes, such as circles or squares, hold down the Shift key .
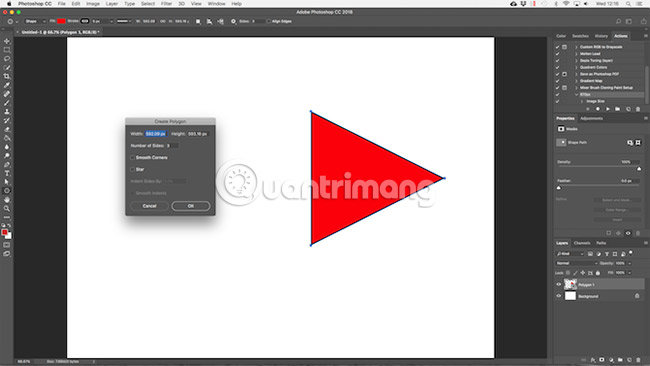
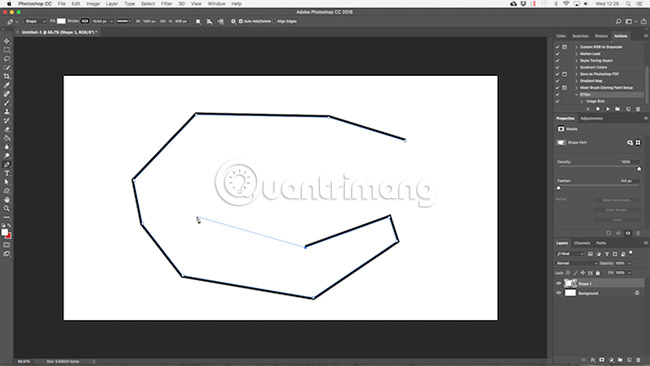
To draw a triangle, select the Polygon Tool. Click one on the canvas to open the Create Polygon settings box . Set the Number of Sides to 3.
Modify and edit vector shapes
Basic shapes when creating vector graphics in unlimited Photoshop. They can be modified very quickly.
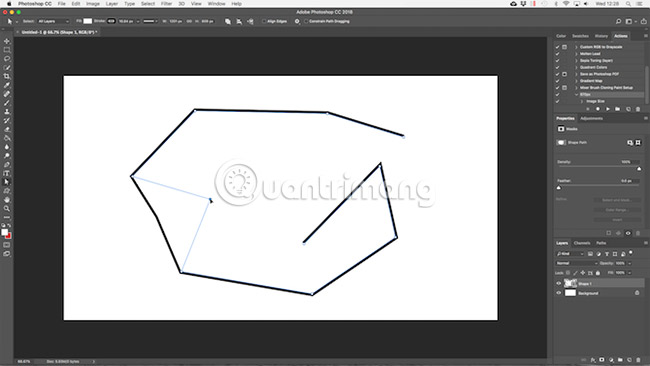
First, select the shape. This will highlight the shape, and display the anchor points along its path. Anchor points are points placed at the corners or curves of the image.
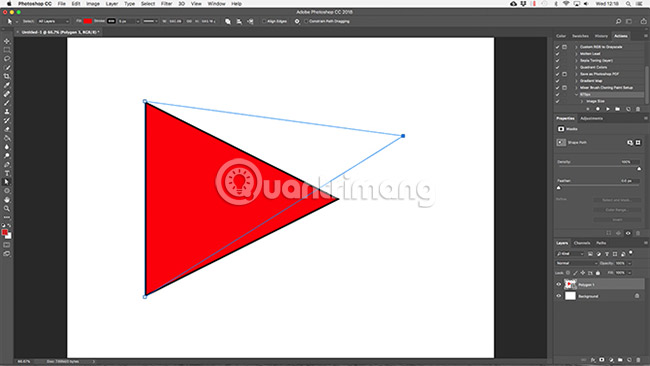
Select the Direct Selection Tool from the toolbar (click and hold on the Path Selection Tool icon to find it). Click on one of the anchor points and drag it in any direction to change the shape as you like.
If you want to edit more advanced, move two or more anchor points at the same time. Click an anchor point to highlight it, then hold Shift + click on another anchor point. Now use the arrow keys on the keyboard to move both points at once.
Merge and combine vector shapes
For more complex shapes, you can use Path Operations. This allows combining multiple shapes into a new one.
Start by drawing an image on the canvas. Next, click the Path Operations button in the options bar at the top of the screen. Normally, each new path or shape will be placed on its own layer. Change that by clicking Combine Shapes.
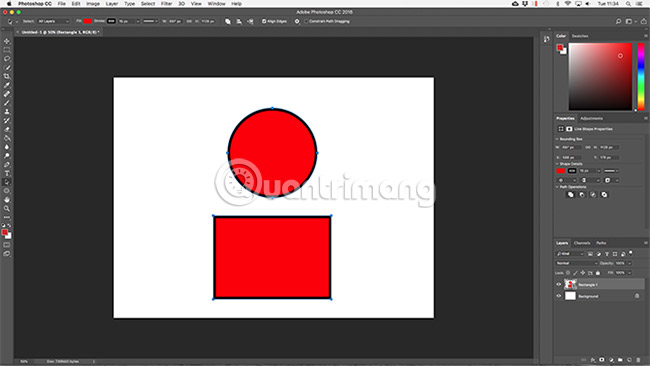
Now draw another shape. It will be placed on the same layer as the first image. When you need to move individual objects, use the Path Selection Tool .
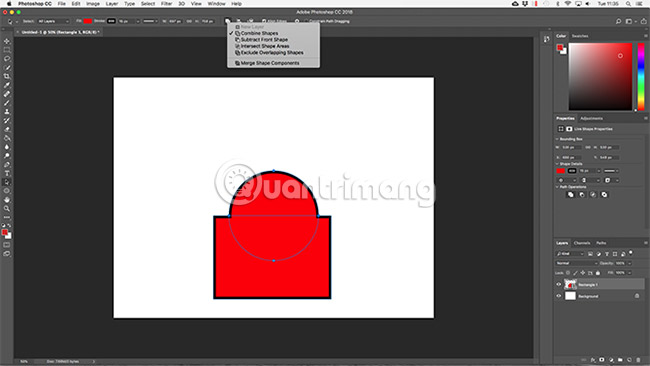
Drag the second image onto the first image. Both shapes will merge into a single shape, although they are still separate objects. Click Merge Shape Components in Path Operations to combine them into a single object.
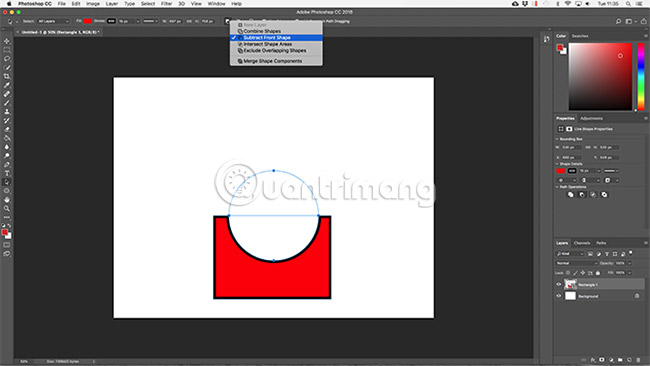
Use the Path Selection Tool to select the second drawn image. Now, in Path Operations , select Subtract Front Shape. The entire second and the area where the second image overlaps with the first one will be deleted.
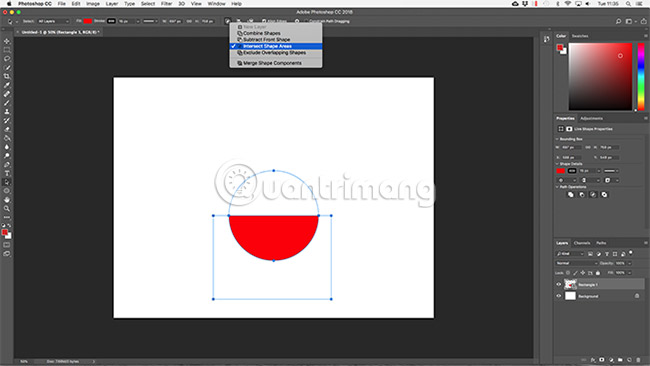
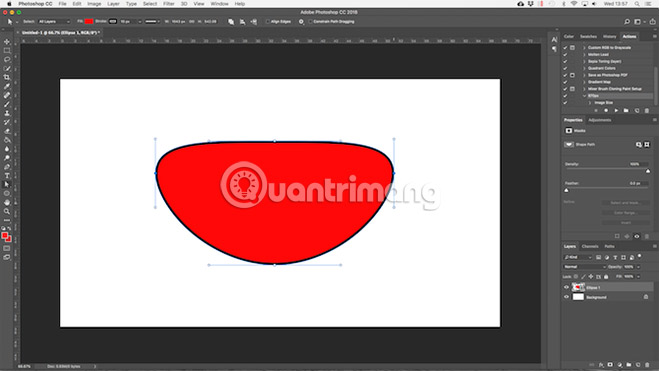
Highlight both images. In Path Operations, select Intersect Shape Area . Areas where two overlapping images will be retained, others are deleted. This option is often used to create a semicircle.
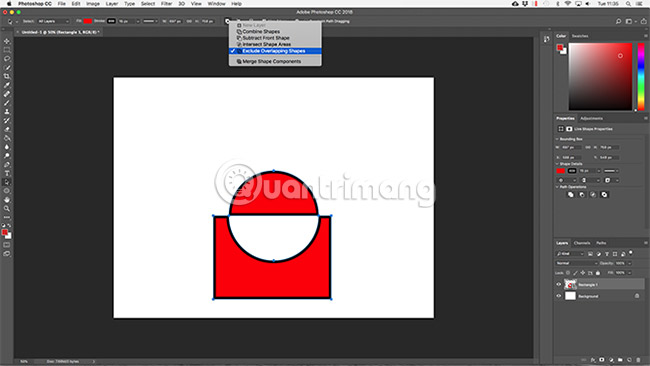
Finally, highlight both images and select Exclude Overlapping Shapes . This option removes the area where the two images overlap and retain the rest.
These tools are an effective way to create new shapes, or to separate a part from an existing shape. They also work with Pen Tool and Text tools.
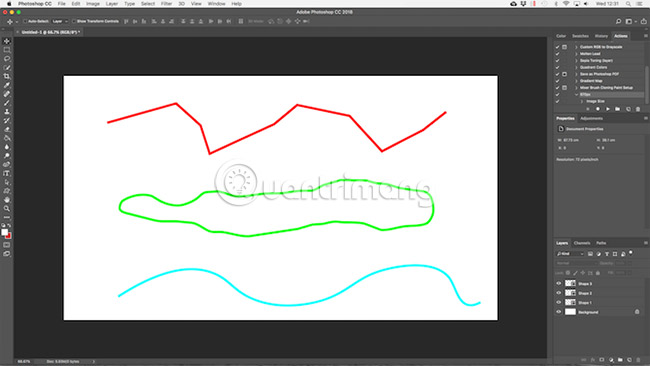
Draw vector lines
There are two other shape-related tools that users need to know. The first is the Line Tool.
Select the tool and set the Height (the thickness of the drawn line) in the options bar. Then click and drag in the canvas to create it. Hold Shift to set the horizontal or vertical line.
This tool has several hidden features, but for most users it will use it to draw a straight line.
Draw custom vector shapes
Finally, learn about the Custom Shape Tool . Set the Fill and Stroke, then click Shape in the options bar. Here, you can choose one of the numerous custom shapes available that Photoshop provides.
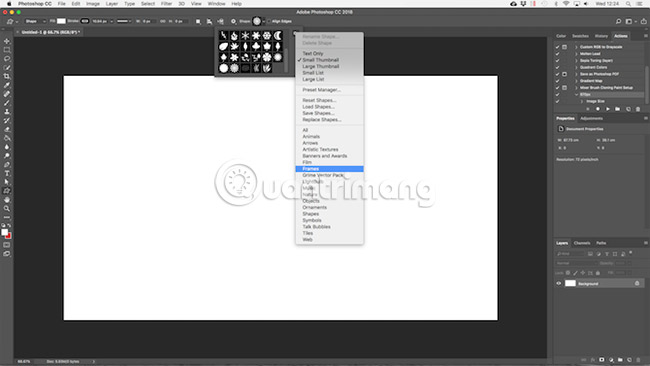
To add more shapes, click Settings and select the category to add. There are shapes for all different uses such as speech bubbles, arrows, vignettes, etc. You can also load the shape of a third party here.
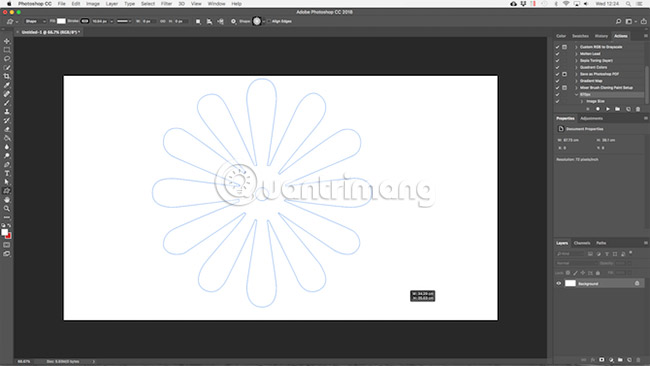
Click and drag to add the shape to the original image. You can also click on the canvas to specify the correct width and height.
Draw vector with Pen Tool
If you've ever used Illustrator, you definitely know how to use the Paintbrush Tool to paint freely. Photoshop has a similar Brush Tool . But in Photoshop, this tool is not vector based, so you should not use it for drawing. You should use Pen Tool instead.
Pen Tool is one of the most powerful features of Photoshop. You will use it a lot to edit photos in Photoshop, as it allows for very accurate options. It is also suitable for freehand drawing and manipulation of vector images.
Start with Pen Tool
Pen Tool works by drawing a path between the anchor points you create when clicking on the canvas. Add a stroke to the path to draw an outline. Add a fill to draw a fixed object.
Here is a quick guide to help readers get started:
1. Select Pen Tool (P) . Click on the canvas to drop the anchor point.
2. Move the cursor a few millimeters and click again to release another anchor point. A path will be created to connect the two anchor points together. Set the Stroke to 5px, black, to see more clearly.
3. Click a few more times to expand the path. Click and drag to create a curve. This will also add the handlebar to the anchor points. Drag them to control the angle and depth of the curve.
4. Press Enter to create an open path (straight line) or click on the first anchor point to create a closed path (shape).
What makes Pen Tool useful is that you can go back and edit your shape at any time:
- Select the Direct Selection Tool (A) . Select an anchor point on the path and drag it to a new location. Use this tool with a handlebar of anchor point points to edit the curve.
- Select Add Anchor Point Tool by clicking and holding the Pen Tool. Click somewhere on the path to add new anchor points manually, then drag it to the position. This allows you to tweak the shape as you like.
3 Pen Tool different
Photoshop provides three different Pen to draw:
Pen Tool is the default and most flexible option. For beginners, use this tool primarily to draw straight lines. When more advanced, users can use it for many other purposes.
Freeform Pen Tool allows you to draw freely, similar to the Brush Tool. It still creates an editable path later. Anchor points will be created automatically when drawing. This is a great tool if you use a graphics tablet.
Curvature Pen Tool makes it easy to draw curves without using the handlebar as with Pen Tool.
Draw a vector image in Photoshop
Once you've learned how to use different pen tools, you can use them to redraw the images. This is how you turn a scanned sketch or an object in the image into a vector image.
Open the image in Photoshop and enlarge it. Now select the Pen Tool and set the first anchor point on the outline of the object you want to redraw. The new drawing will automatically be placed on its own layer. Continue clicking around the edges to create a path.
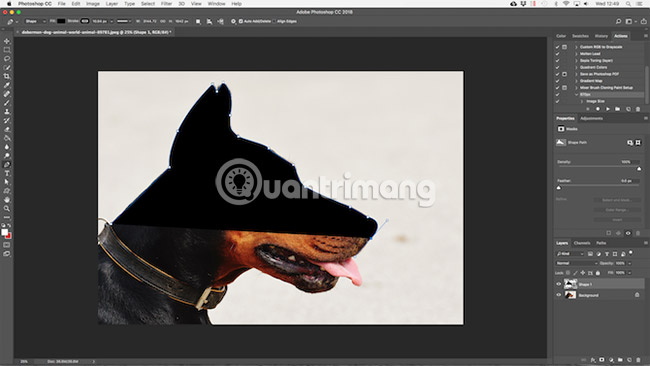
If the object you redraw is placed on a simple background, try Freeform Pen Tool with Magnetic option enabled in the options bar. This will attach the path to the edge of the object.
Work with vector text in Photoshop
Using text in Photoshop is also quite common. Select the Horizontal Text Tool (T) , click on the canvas to create a text box, then enter the text. You can adjust fonts, sizes and everything else, just like in any other application.
For normal text, set the fill but don't set the stroke. Apply only strokes to text formatted in an elaborate format.
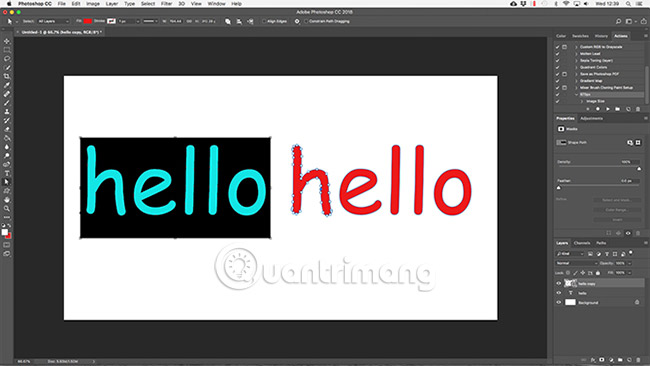
When done, you can convert the text into a vector object. Select text and go to Type > Convert to Shape. This allows you to access anchor points on each character, so you can adjust them individually. This is very suitable to change the color of a letter or adjust the look of the font.
After conversion, the text is no longer editable. You can copy and then hide the original text layer, in case you make a mistake and need to use the backup to restore the original image.
Vector object management
To create the final work, you need all the objects in the right position and the right size. Here's how to do it:
- Move objects by selecting them through the Path Selection Tool (A) and dragging them into place.
- Resize objects by selecting them through the Path Selection Tool , then press Ctrl + T on Windows or Cmd + T on the Mac. This makes the box around the object appear. Select a handlebar along the edge and drag to resize. Hold Shift to maintain the original frame rate.
- Rotate an object by holding the mouse outside one of the handlebar until the pointer changes to a rotating icon. Now just click and drag.
- Rearrange objects by clicking on a layer and dragging it up or down another layer.
- Align the objects by selecting them all with the Move Tool (V) (or hold Shift and click on many layers), then use alignment options in the options bar.
Now that you know how to use all the tools, you can combine them together to create your own vector works.
Photoshop is a reliable alternative to Illustrator and is suitable for anyone who is serious about graphic design. For simple things like logos, logos or a small image that you want to use in other documents, Photoshop will meet your needs well.
Good luck!
See more:
- How to sharpen images in Photoshop in 2 ways
- How to combine photos in Photoshop from 2 different images
- 15 common problems in Photoshop and basic remedies