Connect your Windows 7 computer to the hidden Wifi network
In this article we will learn how to connect Windows 7 computers to hidden Wifi networks - Hidden Wireless Network.
Hidden Wireless Network are networks that do not allocate their network ID (SSID). While not many users choose to use these networks, it is clear that they are more secure because they help hide home Wi-Fi networks from Wifi users. Here are the steps to take to connect to these hidden Wifi networks.
This is a detailed guide to connecting to the hidden Wifi network on Windows 10 if you are using this operating system.
- Learn SSID and wireless network
1. Get the information of Hidden Wireless Network
First of all, we need to know all the verification information and connection information of the Hidden Wireless Network to connect to. Therefore, we will have to open the Router's configuration page and then go to the Wireless configuration menu. Record the values of the Network ID (SSID) and Security fields. Depending on the security method applied to the Wifi network, we need to record the value of some other schools, including:
- With WEP Security , notice the value of the WEP Key field.
- With WPA-PSK and WPA2-PSK (AES) Security , note the value of the Preshare Key field.
Note: If the Wi-Fi network is not enabled for security, we only need to record the value of the Network ID (SSID) field. 802.1X, WPA and WPA2 (AES) security methods are commonly applied in enterprise networks, and most laptops are pre-configured to connect to this Wifi network. Therefore this article will not cover industry networks.
Once we have all the necessary values, we will move on to the next step.
2. How to connect a Windows 7 computer to a hidden WiFi network
To do this we will launch the Set Up a Connection or Network wizard.
- First we will access the Start menu Control Panel | Network and Internet | Network and Sharing Center .
- In the Network and Sharing Center window, we will see many installation options. Please select Set up a new connection or network .

- Then the Set up a Connection or Network wizard will appear. In the list of available options, select the option Manually connect to a wireless network (manually connected to the Wifi network) and then click Next .

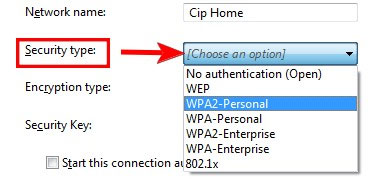
- Enter hidden Wifi network information: After clicking Next in the previous step, we will switch to the Enter information page for the wireless network you want to add (Enter information for the wifi network you want to add ) of the Wizard Manually connect to a wireless network . On this page we will have to enter the network name in the Network name field, which will correspond to the value of the Network ID (SSID) field in the Router's WiFi configuration menu.

The next information that we need to enter is the security type used by the Wifi network. We can choose one of three methods:
- With WEP Security , select WEP .
- With WPA-PSK Security , select WPA-Personal .
- With WPA2-PSK (AES) Security , select WPA2-Personal .
Note: If Wifi network is not activated security, please select No Authentication (Open) .

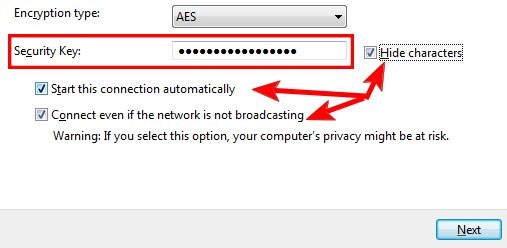
We will then select the appropriate encryption method. If using WPA2-PSK (AES) security method , we will choose AES . If not, leave the default value provided by Windows 7.

If you use WEP , WPA2 Personal and WPA Personal we will have to enter the Security Key .
With WEP Security , we must enter the value of the WEP Key field.
With WPA-PSK , WPA2-PSK (AES) Security , enter the value of the Preshare Key field.

It is best to select the Hide characters check box to enhance security. Also, we should select both of the remaining check boxes, including Start this connection automatically , and Connect even if the network is not broadcasting (connect even if the network does not signal). These two options allow us to automatically connect to the Hidden Wireless Network. Now click Next .
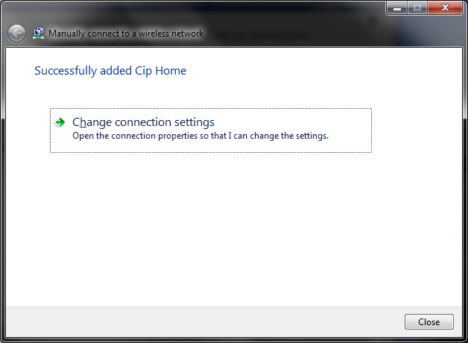
We will then see a message stating that the process of adding Hidden Wireless Network to the computer has been successfully performed. If you want to check all the settings you have installed, just click the Change connection settings link .

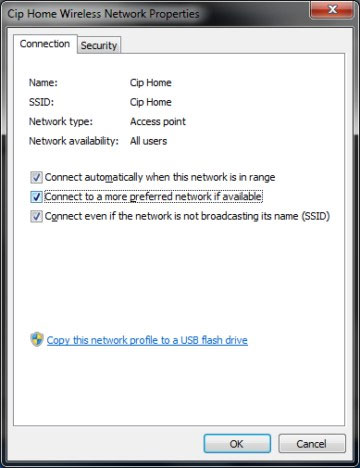
Then we will see the Cip Home Wireless Network Properties dialog box appear. Here we can make changes to the settings if desired.

In addition, we can open this dialog by going to Control Panel | Network and Internet | Network and Sharing Center | Manage Wireless Networks and then double-click this Wifi network.
Then Windows 7 will automatically connect to the Hidden Wireless Network, and the Wifi network icon on the Taskbar will also change.

See more:
- Tips to increase Wifi signal to the highest level
- Instructions for fixing Wifi errors with yellow exclamation
- How to turn on and turn off Wifi on laptop very fast
- Play WiFi on super simple computers with MyPubicWiFi