The most effective way to fix errors in computers and laptops that cannot connect to wifi
If your device is having problems with the internet and cannot work, study, watch movies, or listen to music, let's see the causes and how to fix the corresponding error when computers and laptops cannot connect to wifi or internet below.
Article Table of Contents:
I. Reasons why laptops cannot connect to Wi-Fi.
II. How to fix Windows laptop error that cannot connect to Wi-Fi.
1. Wi-Fi transmitter error.
2. Hardware error.
3. System installation error.
3.1. Check if Wi-Fi is turned off and airplane mode is turned on.
3.2. Restart Your Computer.
3.3. Reconnect to WiFi Network.
3.4. Computer Infected With Virus.
3.5. Turn off Battery saving mode.
3.6. Check network settings in Control Panel.
3.7. Renew IP Address.
3.8. Setting Up Static IP on Computers and Laptops.
3.9. Reinstall WiFi Driver.
3.10. Disable VPN and other software.
3.11. Reactivate WiFi On/Off Mode on Laptop.
3.12. Reinstall Windows on the computer.
III. Some suggestions for a more stable and faster Wi-Fi connection.
How to fix computer error that cannot connect to wifi
I. Reasons why the laptop cannot connect to Wifi
Some common causes of Laptop not being able to connect to Wifi error include:
+ Wifi source is faulty, Router has no signal.
+ Computer operating system error
+ Computer hardware error
+ Due to some settings, Wifi cannot connect
II. How to fix Windows Laptop that cannot connect to Wifi
Just like on a computer, a Modem or WiFi Router for some reason has a conflict that causes the computer to not be able to connect to WiFi or because the device has been operating for a long time, causing it to hang. Very simple, you just need to turn off and turn on the Modem, WiFi Router or unplug the power source and plug it back in, then the device will automatically "fix" the conflicts and your computer can connect to WiFi again normally. often.
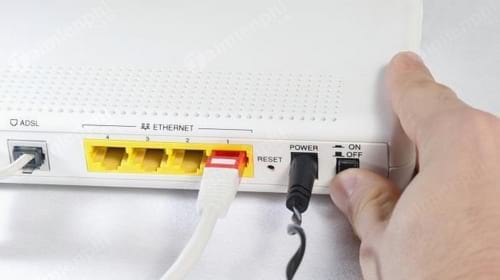
You also need to consider whether the Modem or WiFi Router device is broken. In this case, the easiest thing you can do is call the network's technical staff to check for you. This method is quite convenient and extremely good for those who are not familiar with computers or networks.
Internet trouble support hotline:
Viettel: 1800.8119
VNPT: 1800.1166
FPT: 1900.6600 branch 2
The case of a broken WiFi chipset is no exception, but the rate of failure of this part is quite rare. At that time, you can't do anything more than take the device to a reputable warranty and repair center to have it checked and replaced.

In addition, the wifi symbol with an exclamation mark may also be due to a network device such as a modem or wifi router that cannot allocate an IP address for the device. Therefore, to fix this error, readers can refer to the instructions for fixing the yellow exclamation point Wifi error that we previously shared.
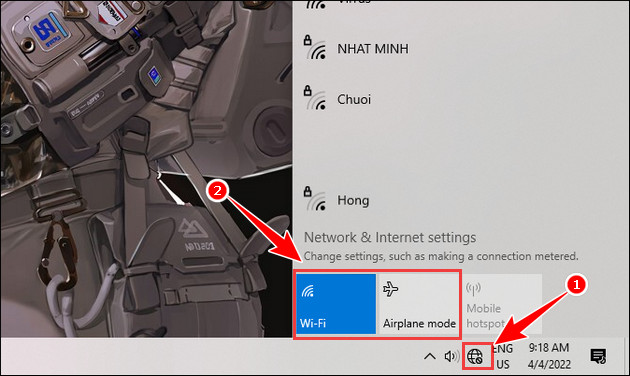
First, to check if Wifi is turned off, go to the network connection icon on your computer to check if Wifi is turned on and whether airplane mode is on or not.
Restarting your computer is a simple way to handle all problems, not just WiFi errors, but many other minor errors as well. The reason could be that the computer has been operating for a long time, leading to errors, or during the process of using Windows, there was an accidental software conflict, a corrupted file.
Or if you are using a laptop and encounter an error of not being able to connect to Wifi and don't know how to fix it, readers can also refer to the detailed instructions in the article below and follow the steps to fix the error as quickly as possible. the most effective.
Sometimes, for some reason, your WiFi Modem or Router fails and causes a situation where the WiFi network cannot be detected, cannot be accessed, or can be accessed but cannot access the network. You can try deleting WiFi and reconnecting to that WiFi. Please refer to the instructions for deleting WiFi connected on your computer that we shared previously.
Having a virus-infected computer that causes you to not be able to access WiFi is also quite a common reason, mainly because you use software of unknown origin or do not have anti-virus software to protect you. The solution for you now is to reinstall Windows and use free and copyrighted anti-virus software to install suitable software on your computer.
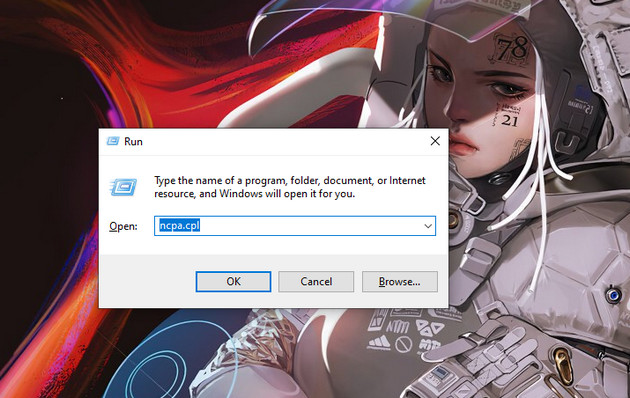
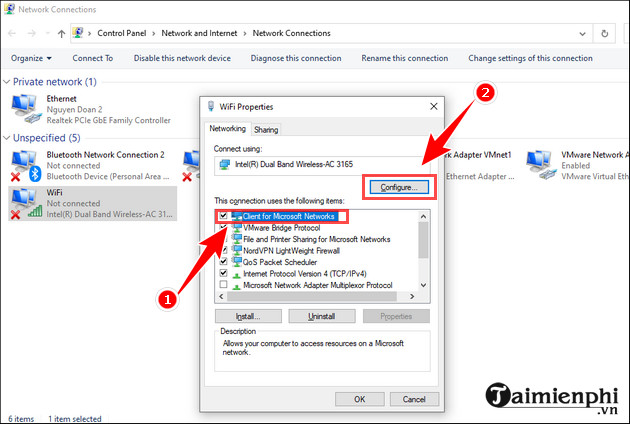
Step 1: Open the Run dialog box by using the key combination Windows + R => Enter ncpa.cpl in the search box => Select OK .
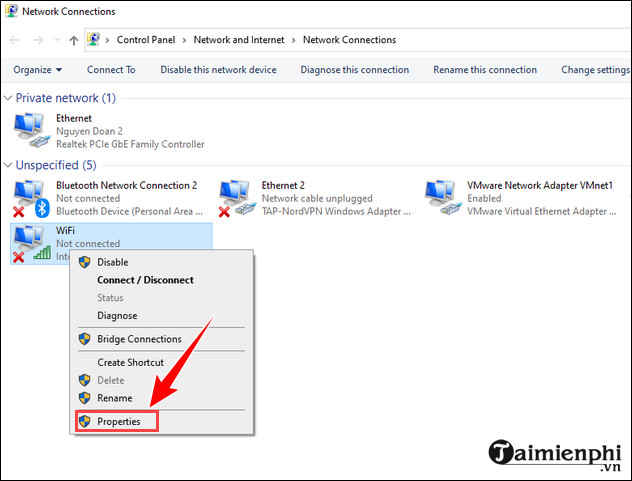
Step 2: Right click on Wifi => Select Properties .
Step 3: Click on the line Client for Microsoft Networks => Click Configure
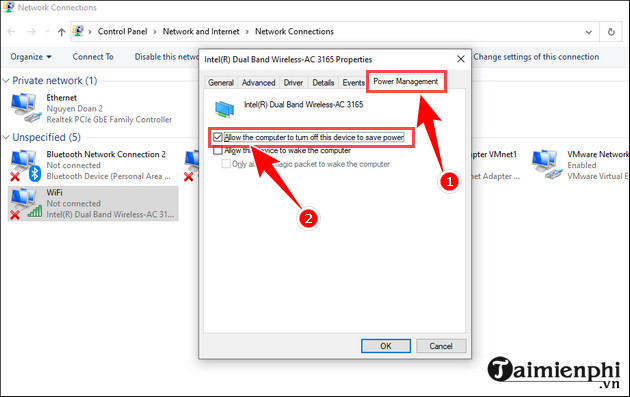
Step 4: Here you select Power Management => uncheck Allow the computer to turn off this device to save power => Click OK .
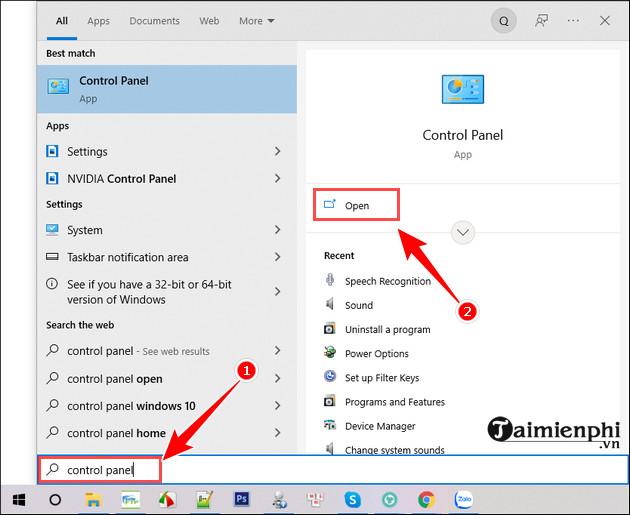
Step 1: Go to the search box on the taskbar, type Control Panel => Select Open to open.
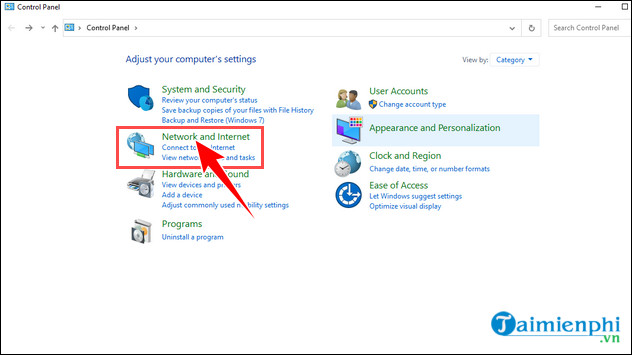
Step 2: Here you select Network and Internet .
Step 3: Here, select Network and Sharing Center .
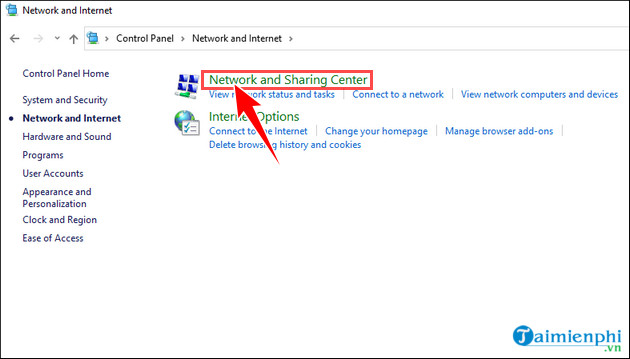
Step 4: Select Change adapter settings .
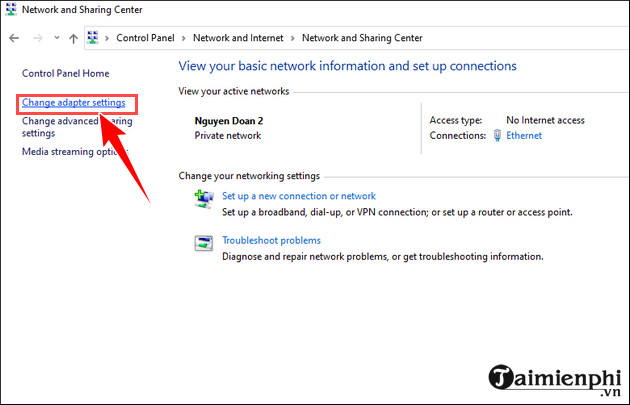
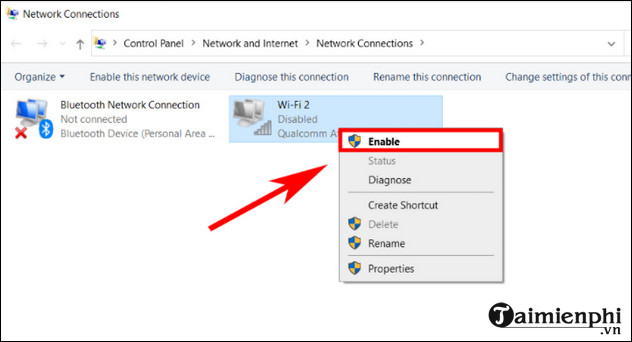
Step 5: If the Wi-Fi icon is grayed out , right-click on the icon => Click Enable .
When you access a router, your computer will be given an IP address by the router and this address can change from time to time and is not always a fixed number, which is why people call it. is dynamic IP. However, in some cases the router grants the same IP range to two different devices, leading to a conflict and one or both computers cannot access the network.
The solution for you now is to "renew" your computer's IP address by pressing the Windows + R key combination to open the Run dialog box and typing cmd then pressing Enter or OK.
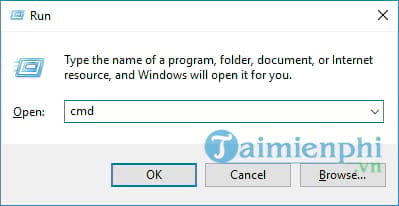
The Command Prompt dialog box appears, enter the following command lines and press Enter after each command line.
ipconfig /release
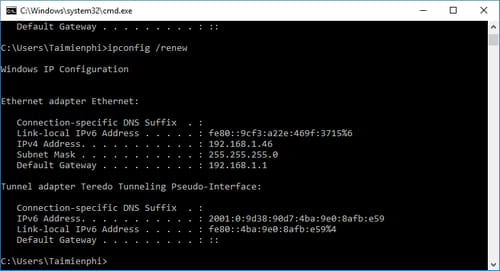
ipconfig /renew
After completing and receiving the results as shown below, try reconnecting to the internet.
Sometimes because there are too many devices or because the Wifi system itself is overlapping in your network system, Wifi cannot provide IP to computers and laptops. That is also a quite common cause that many people encounter, so choosing to set a static IP is also a good solution to help you temporarily overcome the above problem.
Step 1: Open the Run dialog box by pressing Windows Key + R => enter ncpa.cpl in the search box => Select Ok .
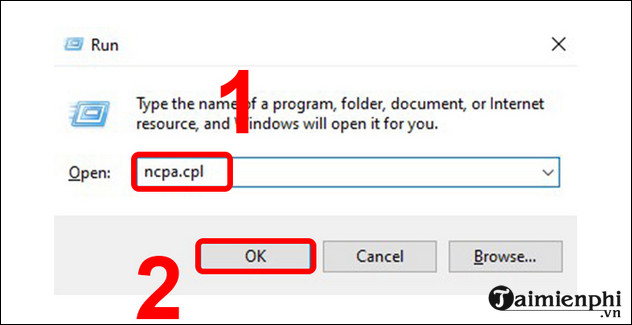
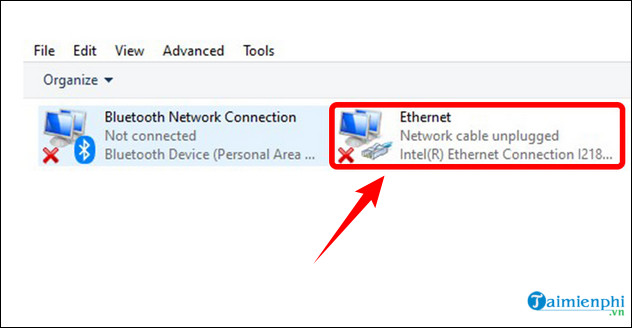
Step 2: Here you click on the Wifi network you are accessing to change the IP address.
Note: Whatever your Wifi network name is, it will appear in the Connections section the same way.
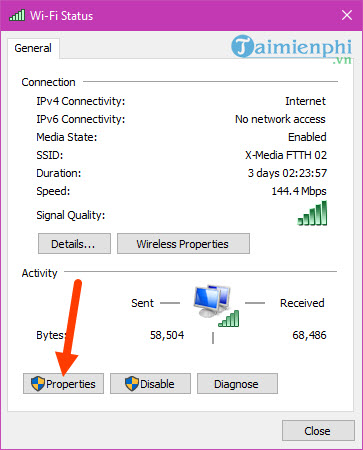
Step 3: In the Wifi Status interface , click on the Properties section with a shield image next to it. This section allows you to customize more parameters related to the network.
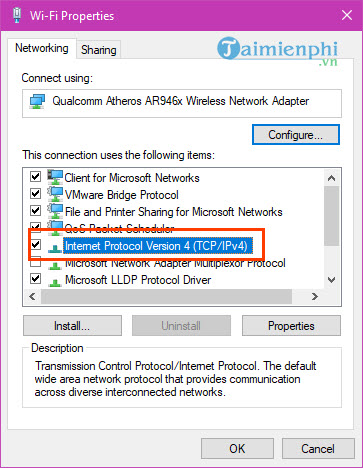
Step 4: The Wifi Properties interface appears, search for the line named Internet Protocol Version 4 , also known as IPv4 , and double click on it for deeper settings.
Step 5: In this section there are 2 parts: Change IP and change DNS, in the change IP section is the first section you pay attention to select Use the Following IP addresses and change the numbers as shown in the picture to 1 92.168.1.x ( with x being from 2 -> 254) , as shown in the picture is 192.168.1.96 .
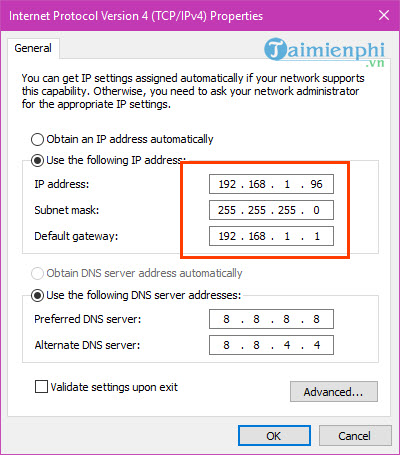
Note that in the IP address line 192.168.1.96, the value 96 can be changed from 2 to 254 as long as you can access the network, however you should avoid numbers from 1 to 10 and avoid 255 to avoid being infected. error as well as the error of the computer not being able to connect to wifi again due to duplication.
Below you can set DNS to 8.8.8.8 and 8.8.4.4 as well. After editing is complete, just click OK to confirm.
It is not uncommon for users to reinstall Windows themselves and not know how to install the driver, or even install the wrong driver for that device. To check whether your computer has installed and updated the driver or not, you can do the following:
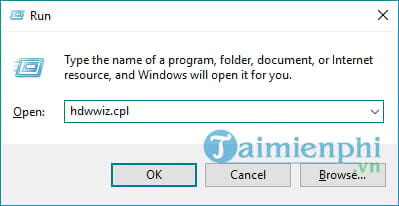
Step 1: From the user interface, press the Windows + R key combination and enter the command hdwwiz.cpl and press Enter or OK .
Step 2: The Device Manager interface opens, double-click Network adapters to check if there is a yellow exclamation mark icon or not. If there is a yellow icon, the WiFi Driver is likely not installed or the device receives the wrong Driver.
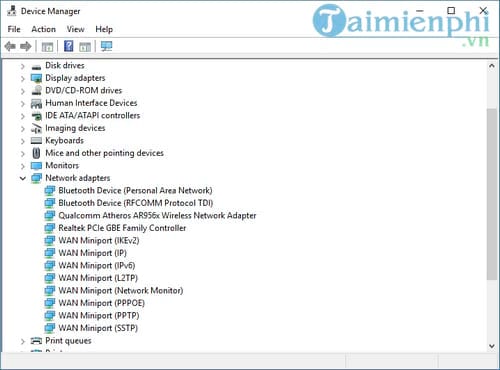
To fix this, you need to visit the company's support website, find the driver list for the model you are using and download the WiFi Driver package to your device to install. It sounds easy, but if you do it, you will find it difficult to use the DriverEasy tool to quickly update computer drivers. For details, readers can refer to the instructions for quickly updating computer drivers that we have previously shared.
VPN software on your computer helps you change your IP address automatically and access blocked websites easily. However, changing IP leads to Wifi connection errors, so turning off the VPN is the best way to prevent it. Wifi connection is guaranteed.
Besides, you can also disable firewalls and anti-virus software to fix the problem if you turn off the VPN but still cannot access it.
This is considered one of the common reasons why your computer cannot access WiFi. The main cause may be due to your negligence or someone using your laptop and accidentally turning off the WiFi detector on the laptop, resulting in the computer not being able to connect to the internet.
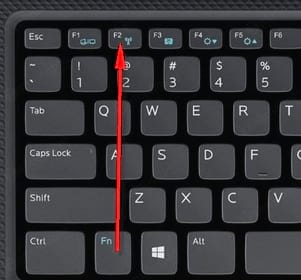
To fix it, you just need to use the shortcut key combination to turn the WiFi detector back on. Normally, you will use the shortcut key combination Fn + Fx (where x can be a series of numbers from 1 to 9 depending on the laptop brand you are using). However, each type of computer will have a different location for shortcut keys. Some types use hard keys, so pay attention.
Dell laptop: Fn + F2 or PrtScr
Asus laptop: Fn + F2
Lenovo laptop: Fn + F5 or Fn + F7
Acer laptop: Fn + F5 or Fn + F2
HP laptop: Fn + F12
Toshiba laptop: Fn + F12
With Sony Vaio or some other devices, there will be a separate button to turn on and off the laptop's WiFi detector. See more about how to turn on and off wifi on windows laptops.
Finally, if you have applied all of the above methods but cannot fix the error, you need to reinstall Windows from scratch to fix it. Installing Windows is also quite simple and you can do it at home.
III. Some suggestions for a more stable and faster Wifi connection
For Wifi to have a better connection, you need to keep it in a well-ventilated place with few obstacles. Do not place the Wifi transmitter near other electronic devices and mirrors to avoid interfering with the transmission line.
For public Wifi hotspots, to have a better connection and ensure connection speed, you should stay close to the Wifi transmitters to limit slow or unconnected Wifi.
When there are too many people using Wifi at the same time, the connected devices will have the same frequency and the transmission capacity will be poor, so the network connection will be most optimal when you use Wi-Fi in areas. No people, few devices around
So, above are some causes and ways to fix the error of the computer not connecting to Wifi that readers can apply and share with friends who are experiencing these situations. In addition to the above situations, readers also need to pay attention to the input language, especially when the Wifi password is easily typed into Vietnamese. Above are instructions on how to fix the error of a computer not being able to connect to wifi mainly on Windows operating systems, but for Mac operating systems, to fix the error of not being able to connect to wifi is quite simple, through the tutorial article. With previous instructions on fixing Wifi connection errors on Mac , readers can quickly continue using the computer to complete their current work.
There are many reasons why WiFi cannot access the network, however users can also do it themselves in basic ways such as restarting WiFi, plugging it in again or calling the switchboard to ask for help with the problem. wifi cannot access the network . However, thanks to the help of the call center, we do not always get the desired results and we cannot convey all the problems. Therefore, you must have certain knowledge when encountering a situation where WiFi cannot access the network.