How to use the old router to increase the coverage for Wi-Fi
To use Wi-Fi, you only need one router. That means when you upgrade, replace the old router with a new router with a higher speed, the old router will become redundant. However, if you know how, can you turn it into an external Access Point (AP)? Placing this AP at the far corners of the house and connecting it to the new router (via a network cable), you can increase the coverage for Wi-Fi waves in places where only one router cannot reach. The instructions below will help you create this homemade AP.
Your home Wi-Fi router usually has an embedded AP (or even 2 and 3 embedded APs - with dual-band or 3-band routers), next to its function as a router. The AP helps broadcast Wi-Fi so that wireless clients such as smartphones and tablets . can connect to it. In this article, we'll name the router Router A, and the old router you want to turn into AP is Router B. The goal here is to turn Router B into an external AP for Router A to increase the coverage area of the router. WIFI.
Note : Some Wi-Fi routers have Access Point mode (check this information in their list of features). If your Router B supports this mode, you just need to turn it on and it will act as an AP and doesn't need too much effort to set up. The instructions below are for routers that do not have the above feature (or yes but you do not know how to activate) and are only suitable for web-based routers - a site from which you can view, manage and Control router features and settings. Fortunately, most routers on the market have this interface, so you don't have to worry about it being impossible.

Step 1: Ignore the WAN (internet) port of router B
If your router does not have an AP feature, you will need to take note to ignore its WAN port. Using this port will cause the router to automatically act as a regular Wi-Fi router - simply because it is the function that people originally designed for it. It will not "know" me being used as an Access Point to increase coverage as the purpose of the article. If you are careful, you should stick a piece of tape to this port to avoid confusion.
Note that if the router has an AP mode, you can use the WAN port, because when the AP mode is enabled, the WAN port will have the function of the LAN port to (in some cases) allow you to connect the device. New to the network via cable.
Step 2: Determine the IP range of Router A
This step has 2 parts to do. First, you need to specify the Router A IP address . You connect a computer with Router A over Wi-Fi or a network cable through one of its LAN ports. If your computer is running Windows, follow these steps:
Run the command prompt . With Windows 10 you just need to search with the cmd keyword in the Start menu to show the command prompt, or with Windows 8 you just need to type cmd while in Metro Start menu and press Enter . Simply, run Command Prompt by opening the Run dialog (Windows + R shortcut), typing cmd and pressing Enter .
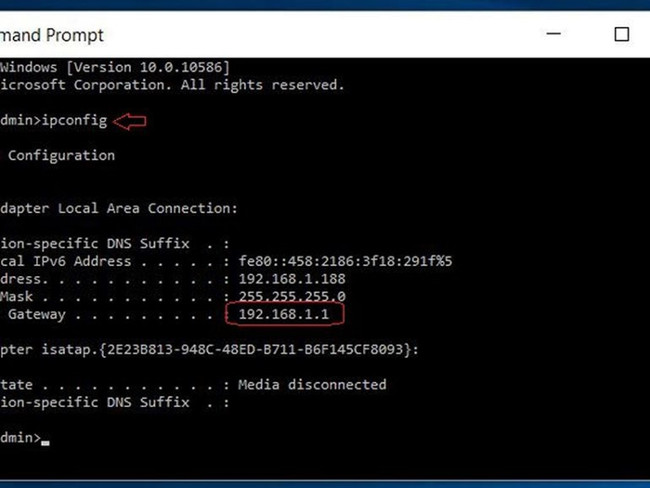
In the Command Prompt window, type ipconfig and press Enter . You will get the result that the words and numbers are very "messy", however, finding IP addresses is not too difficult. Look to the " Default Gateway " line and look to the right. That's the IP address of the router you are looking for.

If you use a Mac computer, go to System Preferences> Network . Next, select the network you are connecting to (the blue dot network), click Advanced. At the TCP / IP tab, go to the "Router" section, and the router's IP address will show up next to it.
After having the router's IP address (there are always 4 numbers and separated by a dot between groups), you use it to determine its IP range. The number range you can choose to use will match the numbers in the first 3 groups, with the fourth group ranging from 1 to 254. You will not be able to select the IP address that Router A is using.
For example, if the router's IP address is 192.168.1.1, you can choose from the IP range of 192.168.1.2 to 192.168.1.254. If the router's IP address is 192.168.1.254, the IP range will be 192.168.1.1 to 192.168.1.253. When a device is connected to Router A and has an IP address belonging to the IP range, it will be accepted as part of the network.
In this article, let's assume 192.168.1.1 is Router A.'s IP address. For home routers, this is probably the same IP address of the router you're using - by many manufacturers. , from Netgear, Asus, D-Link . all use this IP address as the default for their router.
Step 3: Set the IP address for router B by taking an unused address into Router A's IP range
Connect the computer to Router B via Wi-Fi or via a network cable (use the LAN port of router B) to determine what the current IP of the router is (repeat the first part of step 2 above to do this).
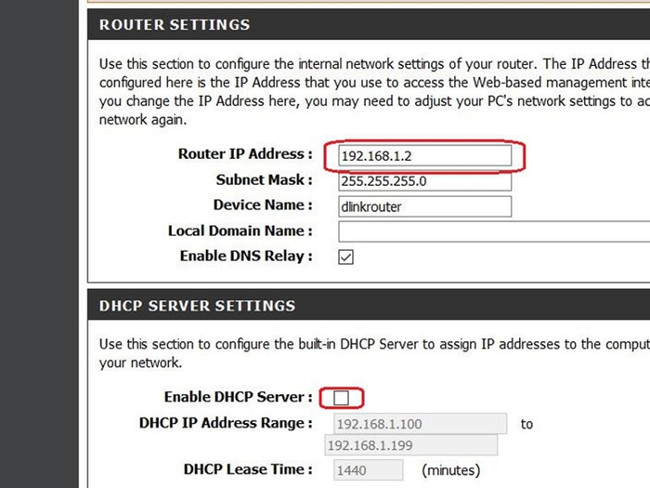
You log into the router's web interface by opening a browser and entering the IP address into the address bar. Inside the interface, you navigate to the section that allows you to change the default IP address of the router. Depending on the model, this item may be named Network, LAN, or Setup. You change this IP address to an address in the IP range that you defined in part 2 of step 2. For example, if Router A's IP is 192.168.1.1, you can change the IP of Router B to 192.168.1.2 . You must ensure this IP has not been assigned to any other device, otherwise you will have to choose another available IP. After selecting, click Save to save the changes. Router B will now restart and you have to wait for a few minutes.
Step 4: Turn off Router B's DHCP Server

You log back into the web interface of Router B by pointing the web browser to the new IP address that you set manually in step 3 (in the above example, 192.168.1.2) and then navigating to the LAN entry. , Network, or Setup. Here you can disable the HDCP server function and click Save to save the changes.
Now, Router B - when connected to Router A with a network cable - will have the function of a switch (allowing you to use its LAN port to connect devices to the network with cables) and an AP. You can log into the router's web interface with its IP address (in this case 192.168.1.1 of Router A and 192.168.1.2 of Router B) to make changes to the settings.
If you do not change anything, Router B (now acts as an AP) will have the same name as the name it was set to be used as a router. You can change its name to Router A if you want the device to automatically connect to any router; or put another name to identify the device you're using to connect to Router A or Router B. In any way, all devices connected to Router A or Router B will be part of the network.