Claude API: How to get the key and use the API
The Claude API allows you to integrate Claude's artificial intelligence (AI) capabilities into your internal applications and tools.
- What is the Claude API?
- Instructions for setting up a Claude API connection.
- Enhance your application with the Claude API.
- Step 1: Before you begin
- Step 2: Create an Anthropic account
- Step 3: Add credit to your account.
- Step 4: How to get the Claude API key
- Step 5: Open the API documentation and reference materials.
- Step 6: Paste the endpoint
- Step 7: Processing authentication
- Step 8: Set up HTTP methods
- Step 9: Troubleshoot and learn from mistakes
- Step 10: Set up the request body.
- Step 11: Call the AI model
- Step 12: Submit your questions.
- Step 13: Customize the response
- Step 14: Design new features with the Claude API
- Step 15: From testing to production: Integrate Claude into your application
Long documents can be confusing to read. The writing style is formulaic. The code doesn't run. If your AI application suffers from any of these issues, you don't need to create a better prompt, you need Claude. With its expansive context window, refined and easy-to-guide writing style, and powerful reasoning capabilities for technical challenges, it's like a friendly assistant trained to collaborate.
What is the Claude API?
The Claude API allows you to integrate Claude's artificial intelligence (AI) capabilities into your internal applications and tools. Send Claude a request via an API call, and it will return a response that you can use in any way you need—whether it's answering customer questions, analyzing documents, creating content, or supporting complex decision-making logic—all without the user having to access Claude.ai.
Instructions for setting up a Claude API connection.
Make yourself a cup of coffee, turn off all distractions, and let's create some magic together. You can complete this guide in about 30 minutes. Don't worry if you can't finish it all at once: Each step is numbered so you can easily go back and complete it.
Step 1: Before you begin
Before you begin, here's what you need to have and know to get started quickly:
- What is the basic understanding of APIs?
- Understanding the basics of JSON. JSON is used to format the content of API calls. If you encounter difficulties, ChatGPT can help you detect or fix formatting errors.
- 15 to 30 minutes of focused concentration.
- Credit card required to purchase Claude API credit (minimum $5).
- Optional: Postman account (free) to follow instructions and make your first calls.
Step 2: Create an Anthropic account
(2.1) First, go to the Anthropic dashboard and create a developer account.
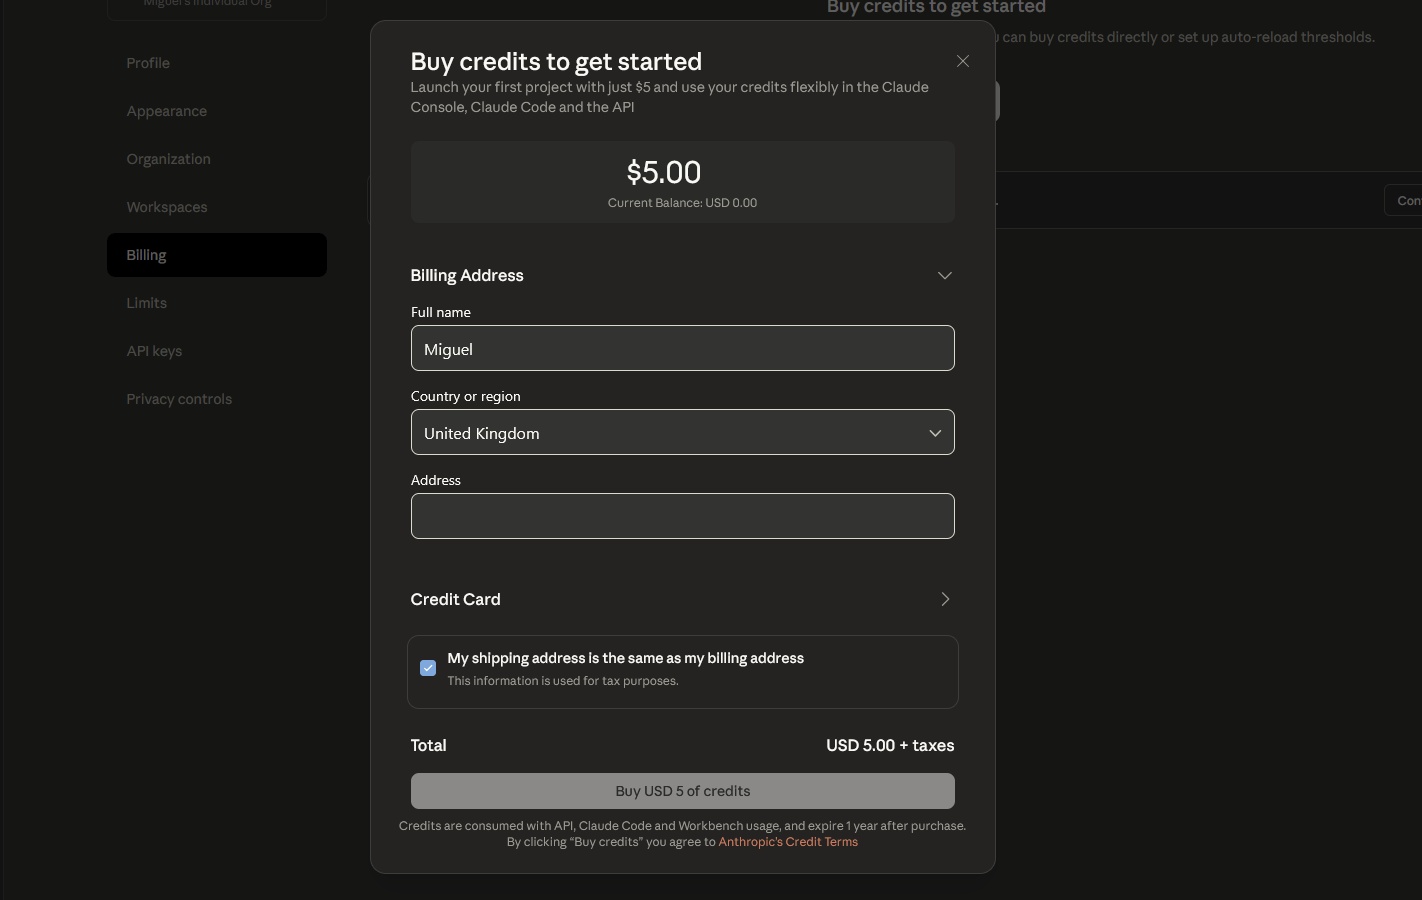
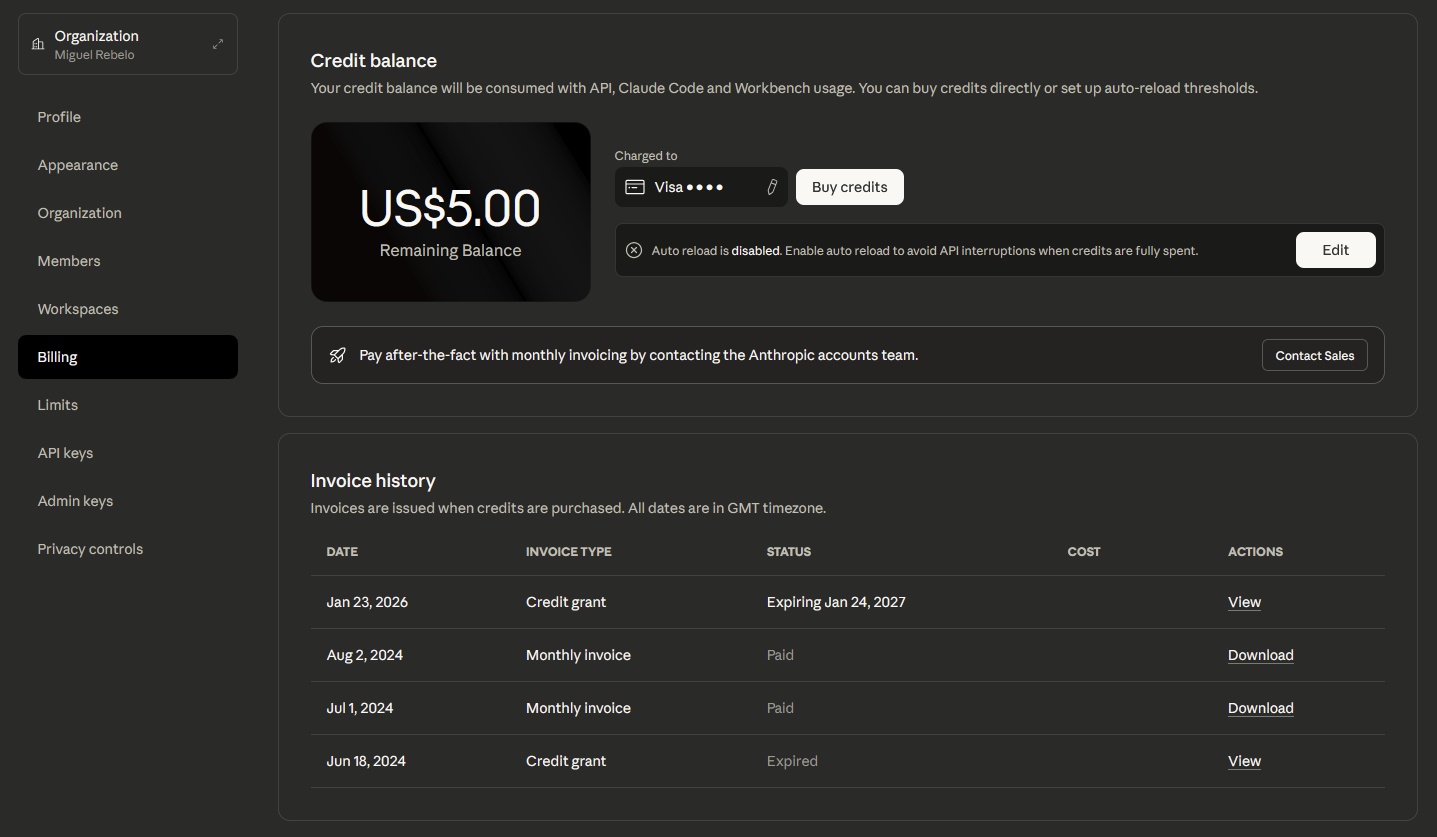
Step 3: Add credit to your account.
(3.1) Click the Buy credits button at the top of the screen. If you don't see it, expand the left-hand menu and go to Settings > Billing .

(3.2) Add your address and credit card information to purchase $5 credit.
(3.3) After the transaction is complete, you will see your credit balance on the Billing page.
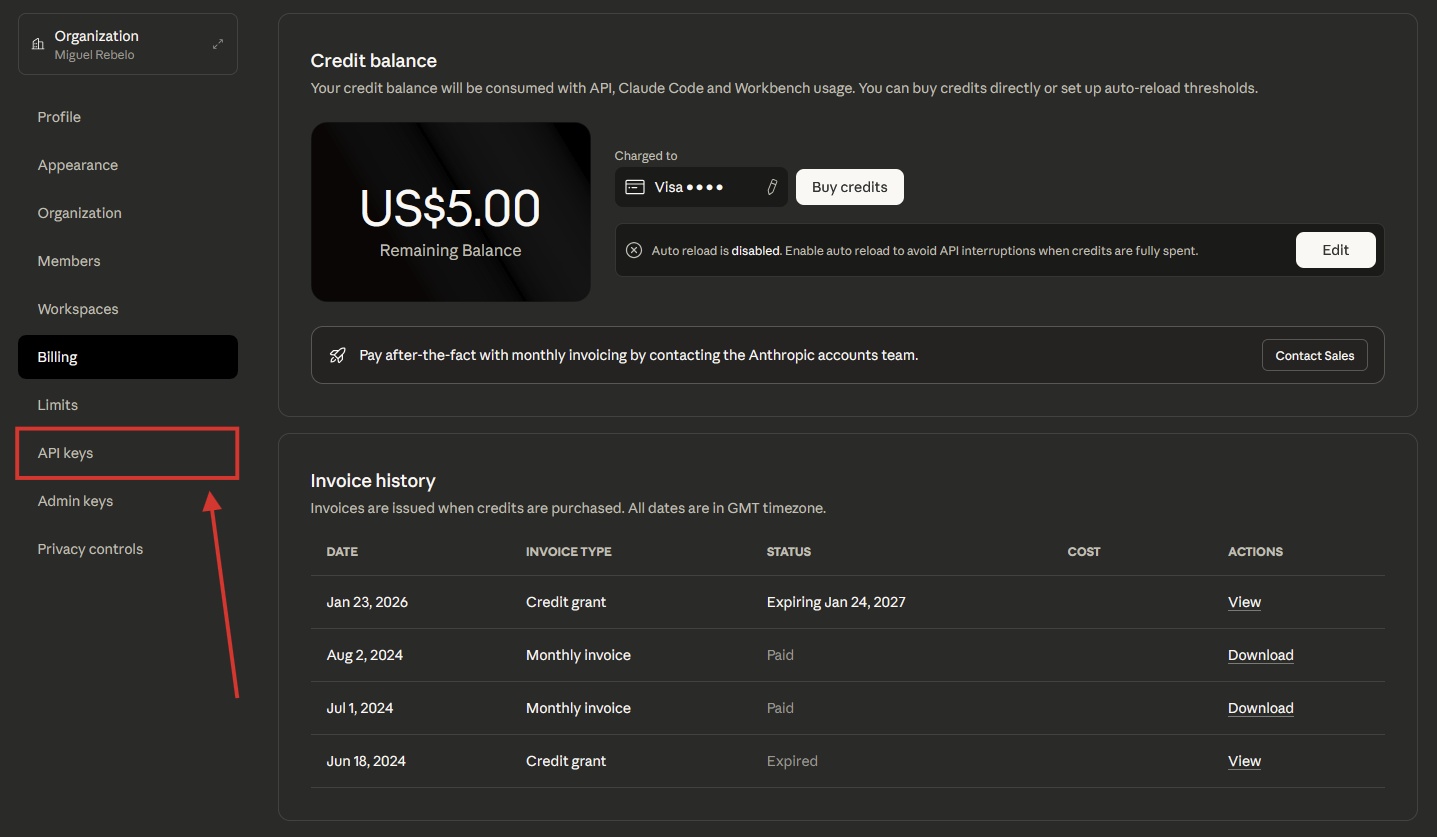
Step 4: How to get the Claude API key
(4.1) In account settings, click on API keys.
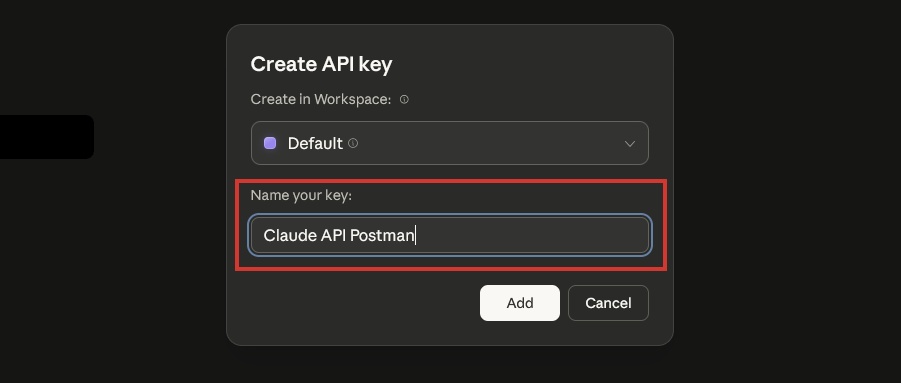
(4.2) Click on Create Key .

(4.3) Name your API key. This guide will name it "Claude API Postman". Click Add when finished. Optional: You can assign this key to a workspace, useful for organizing your keys across projects or use cases.
(4.4) Copy the entire key to a safe place - you will not be able to see it again after closing the pop-up window.
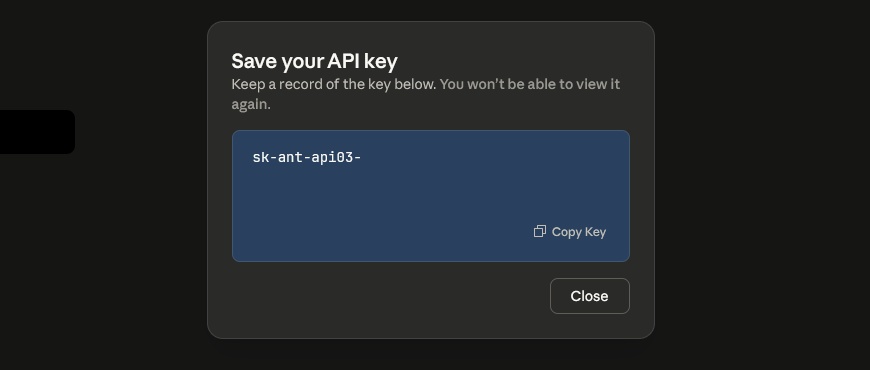
Important note : You need to keep this API key safe at all times. If someone finds your key, they can use it, costing credits in the process. Do not share this key with anyone who doesn't need it, and if you are publishing your application to the public web, be sure to learn about best practices for API security.
(4.5) After closing the pop-up window, you will see a list of all API keys generated so far. If needed, you can disable or delete them by clicking the three-dot icon on the right.

Step 5: Open the API documentation and reference materials.
(5.1) Anthropic has rules about how you should make API calls: You need to follow the structure and guidelines to get results without causing any errors. There are two important sources of documentation that you need to familiarize yourself with:
- The API documentation, known as User Guides , provides general information about the API, what it can do, and how you can implement it in your projects.
- An API Reference is a technical document that helps you set up calls, structure requests, and see expected responses.
(5.2) This instruction will require a text creation job.
Step 6: Paste the endpoint
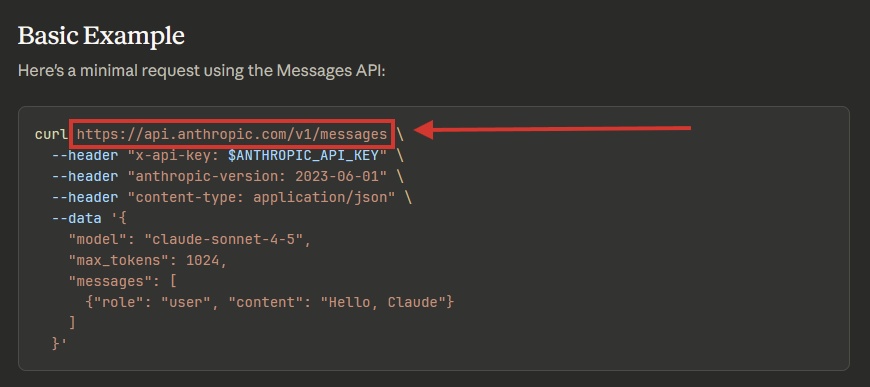
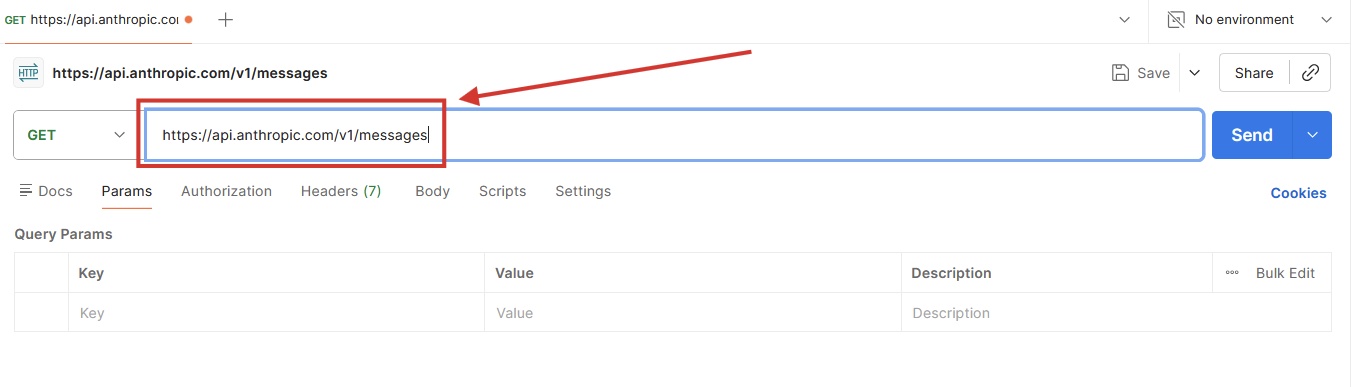
(6.1) To call the Anthropic API, we need to point Postman to its URL: The documentation shows this in the basic example section .
Copy the endpoint URL ( https://api.anthropic.com/v1/messages ).
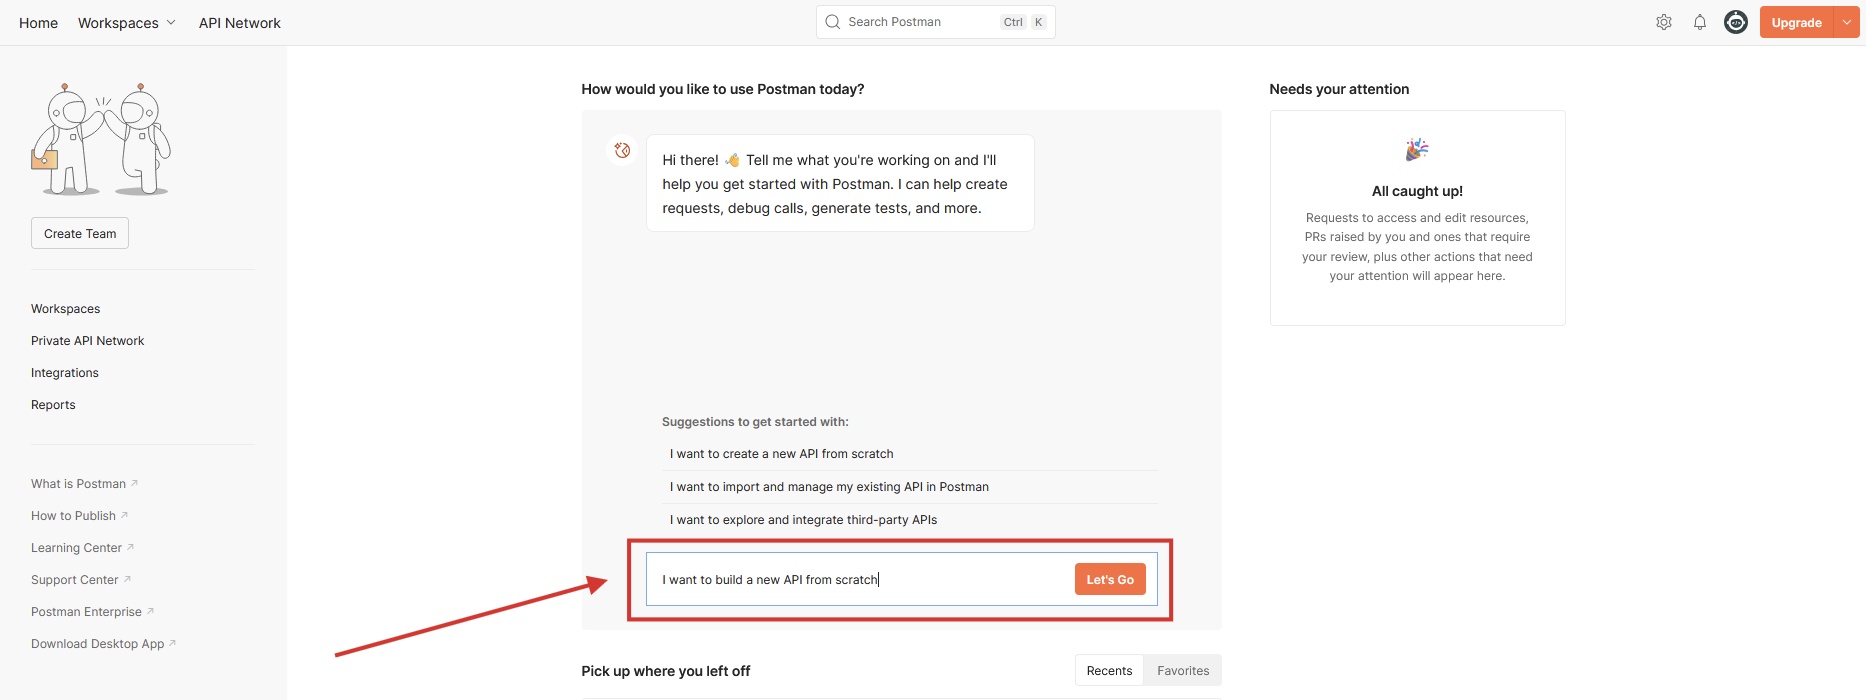
(6.2) Optional: If you are following along, open the Postman home screen and write in the chat with the AI assistant that you want to create a new API from scratch. However, if you are starting with your own tool, you can use ChatGPT for programming support or refer to the API connection documentation of your internal build tool or no-code application build tool.
(6.3) In the Postman workspace screen, click New in the upper left.
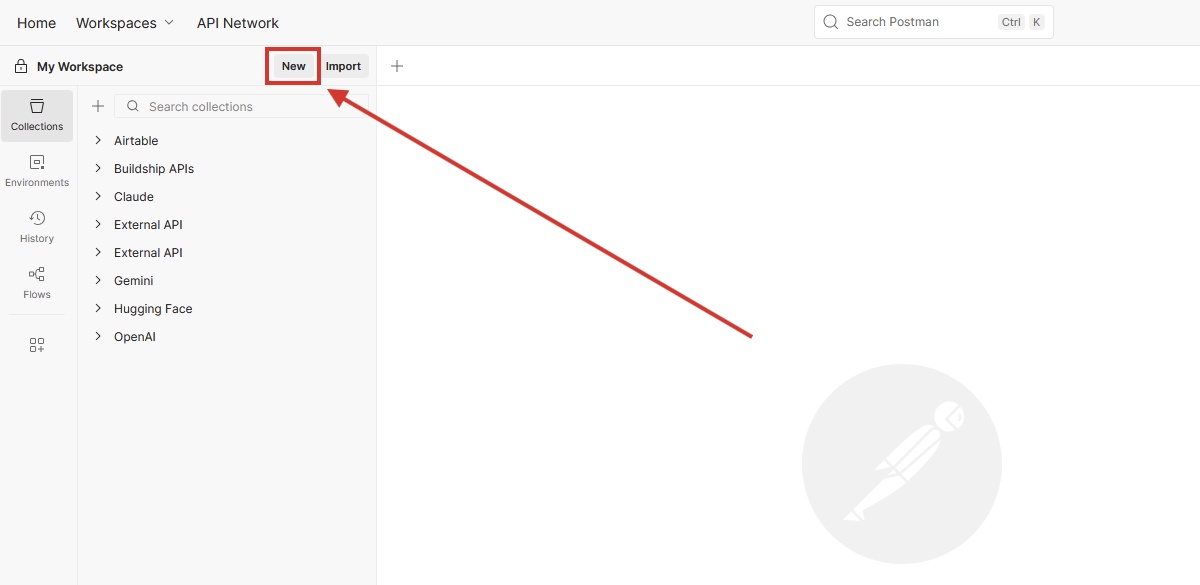
(6.4) Still in Postman, select HTTP.
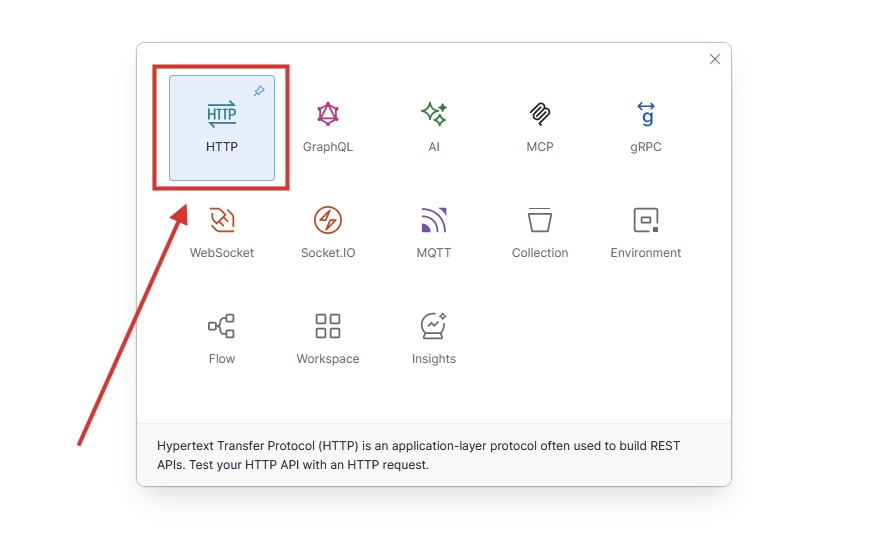
(6.5) Finally, paste the URL into the request input field. The platform may suggest a quick setup for the Anthropic API, but you should skip this step: Doing it slowly now will help you understand how it works faster.
Step 7: Processing authentication
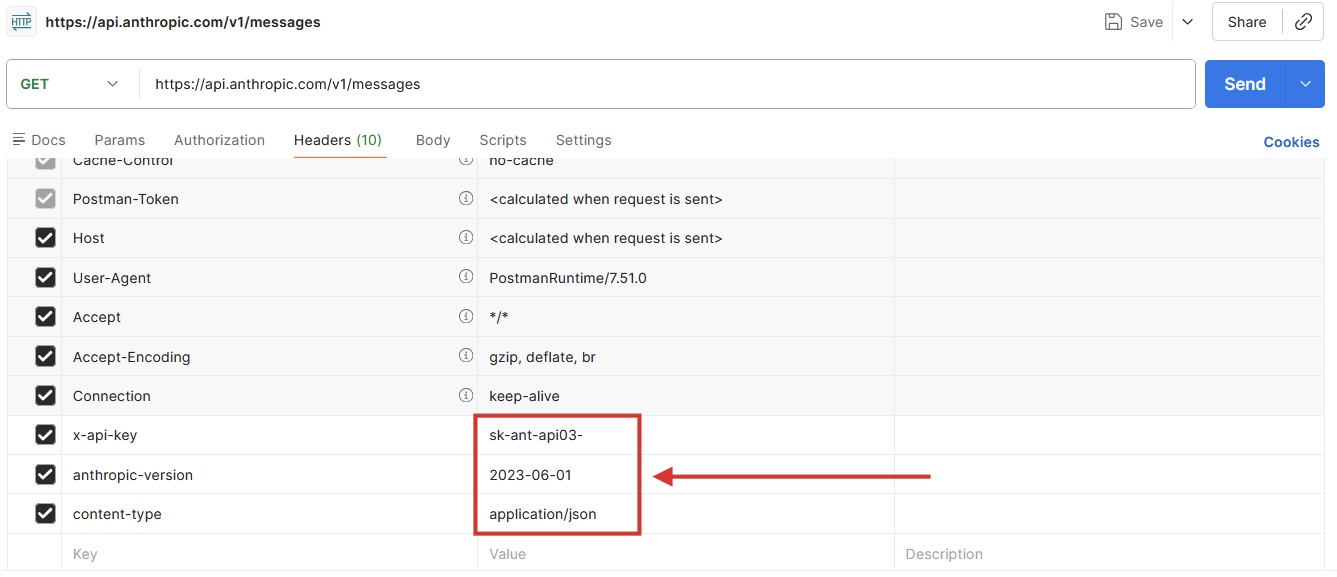
The API won't accept requests if it doesn't know who's making them. That's why we created the API key associated with the Claude account earlier: It will be used to authenticate requests and bill jobs correctly. The documentation states that it requires the key in the header with the x-api-key parameter , along with anthropic-version and content-type.

(7.1) In Postman, click the Headers tab.
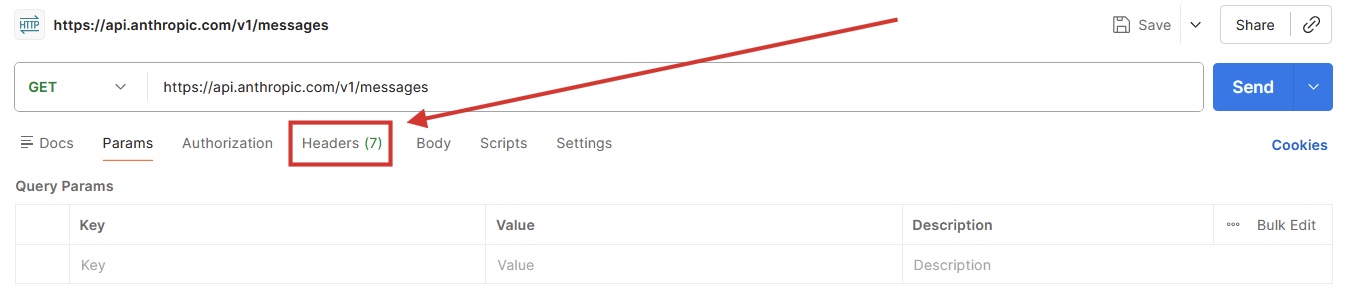
(7.2) At the end of the list, add the following parameters to the request header: x-api-key, anthropic-version , and content-type.
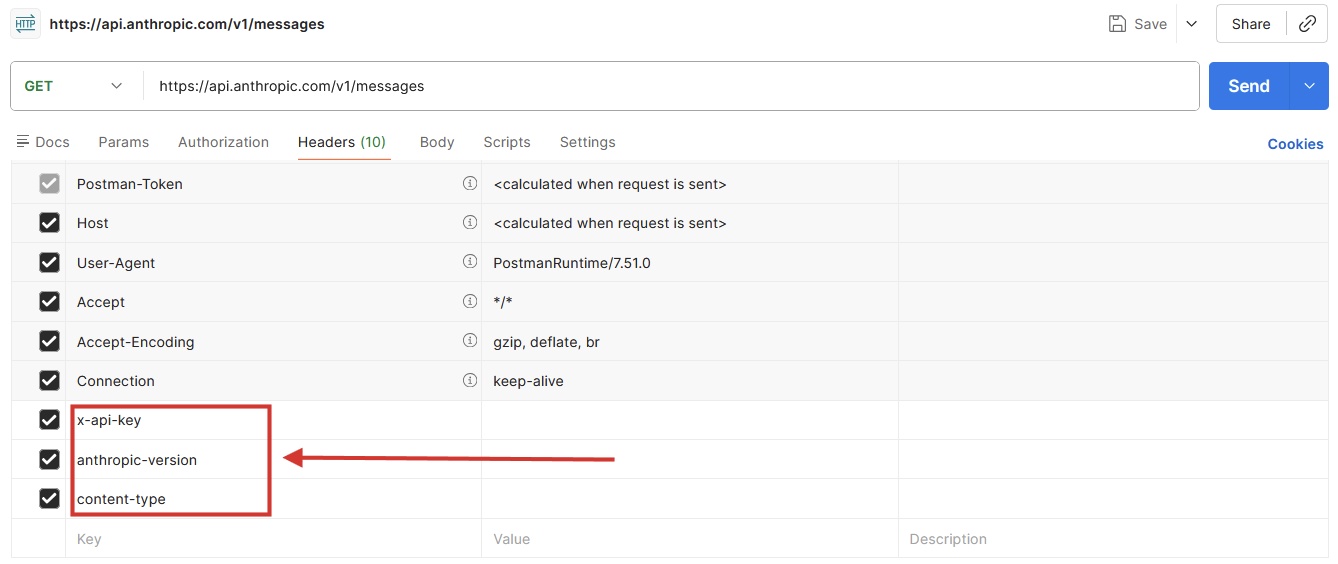
(7.3) Fill in the x-api-key value with the API key you previously generated, anthropic-version with 2023-06-01 (or any new date you see in the Claude API documentation), and content-type with application/json.
Step 8: Set up HTTP methods
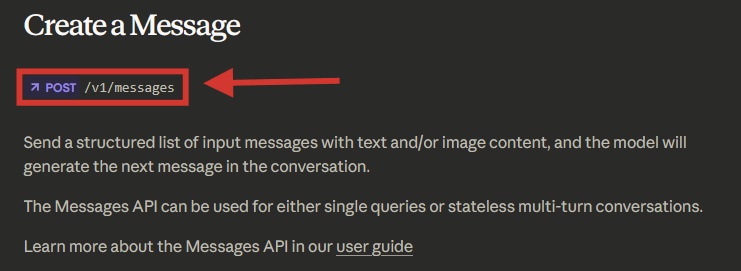
(8.1) Open the reference article if you haven't already. At the beginning of the article, please note:
- HTTP method: In this case, it's POST.
- And the URL suffix after the POST method. Different API features may be provided in different URLs or URL suffixes, so always ensure you are connecting to the correct endpoint.
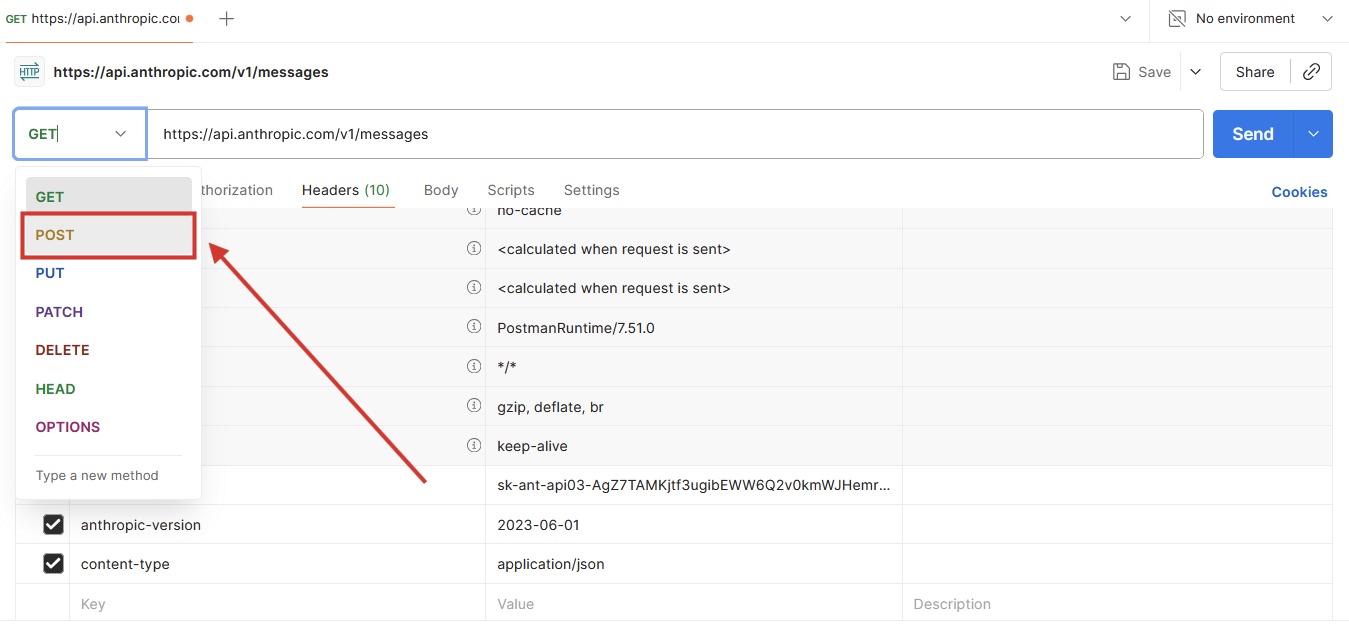
(8.2) In Postman, click on the GET method and change it to POST.
Step 9: Troubleshoot and learn from mistakes
Configuring a new API requires patience and troubleshooting skills. It's normal to encounter difficulties: Don't be discouraged if you see errors or if the system doesn't work as expected. Let's intentionally create some errors together to understand what to look for when things go wrong – and how to get back on track.
(9.1) In Postman, click the Send button .
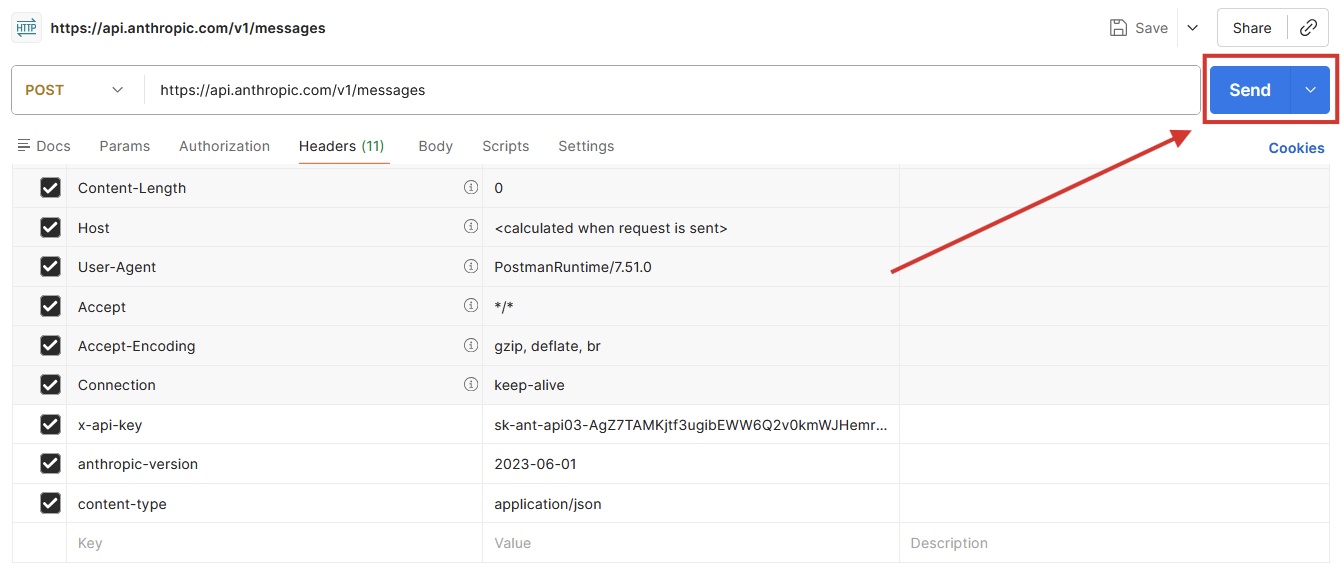
(9.2) The response appears at the end of the request interface. The Anthropic API returns an HTTP 400 Bad Request error, along with a message that it does not accept an empty request body. The API is correct: We have only set up the endpoint and authorization header, but not the body.
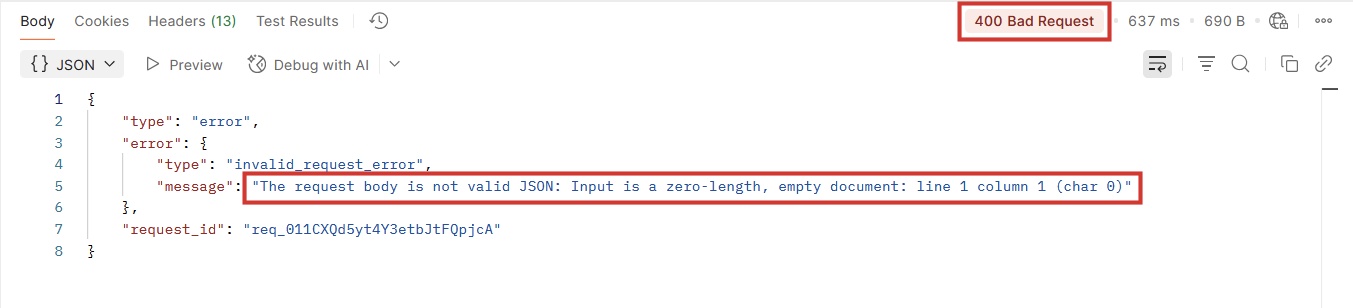
Reading and understanding errors is crucial for building successful API calls. If anything goes wrong:
- Check all syntax. A small error, such as an extra or missing comma or parentheses, can easily break the request.
- Refer back to the API documentation to find out the requirements for the call you are configuring.
- Be sure to test every call when you make even small changes, so you can easily spot the cause of the problem when you continue.
Step 10: Set up the request body.
(10.1) Go back to the API reference documentation to create the message. See the box to the right of the introduction.
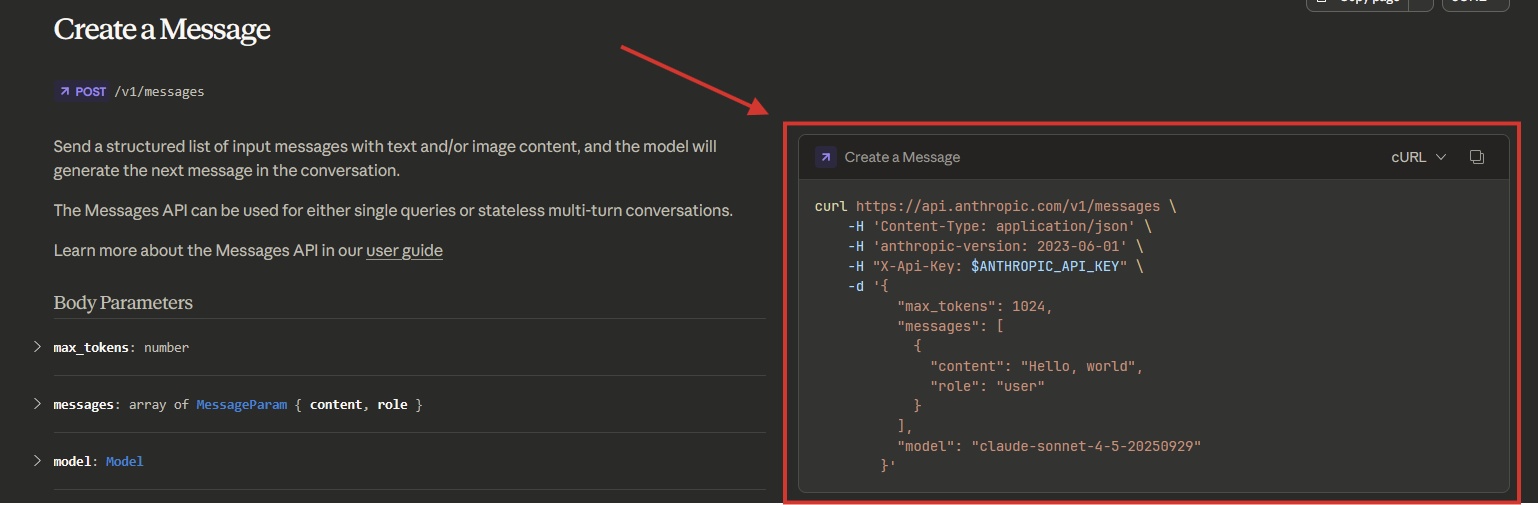
This requirement includes the cURL command for those using the command line to interact with the API. We won't need it since we're using Postman. However, here's what each part means:
curl
The cURL command tells the system to contact the endpoint URL. The backslash at the end is a line break for cURL, used to improve readability—they serve no other purpose.
-header "x-api-key: $ANTHROPIC_API_KEY" -header "anthropic-version: 2023-06-01" -header "content-type: application/json" Request to transmit 3 headers:
- "x-api-key": This is followed by your API key for authentication. We have configured this in Postman.
- "anthropic-version: 2023-06-01" indicates the appropriate system version.
- "content-type: application/json" sets the content type of the request body so the system knows how to process it.
Everything after the -d flag is the request data, also known as the body or payload.
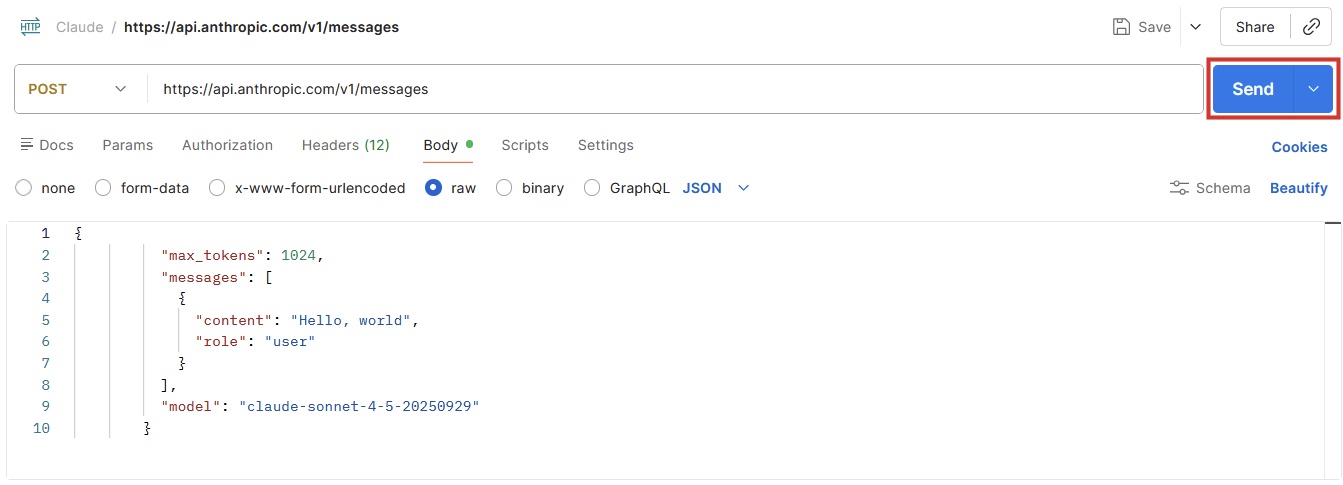
-d '{ "max_tokens": 1024, "messages": [ { "content": "Hello, world", "role": "user" } ], "model": "claude-sonnet-4-5-20250929" }'- "max_tokens": 1024, sets the maximum output length for each AI response. In this case, it will not exceed approximately 1024 tokens (about 768 words).
- "Messages": Contains the type of message along with its content.
- "role": "user" labels this message type as a standard user prompt.
- "content": "Hello, world" is the actual content of the user's message.
- "model": "claude-sonnet-4-5-20250929", points to the model you want to call. In this case, it is set to Claude Sonnet 4.5, version September 29.
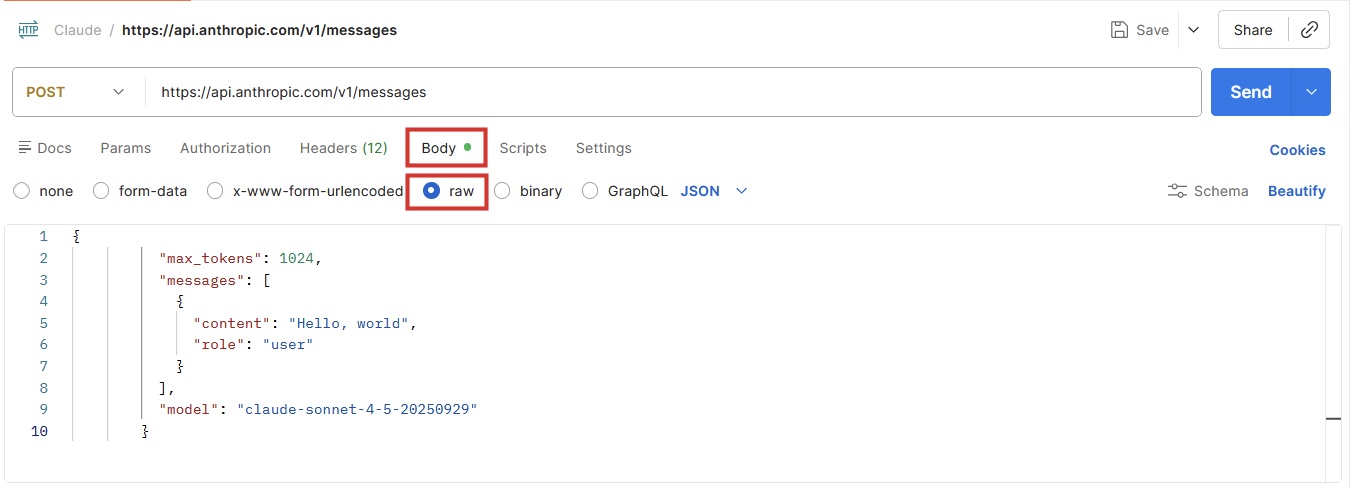
(10.2) Copy the entire JSON example in the request body without the -d flag or parentheses at the beginning or end.
(10.3) Return to Postman, click on Body and select raw below the endpoint input field. Then, click on line 1 and paste the required body there.
Step 11: Call the AI model
(11.1) Click the Send button and see what happens.
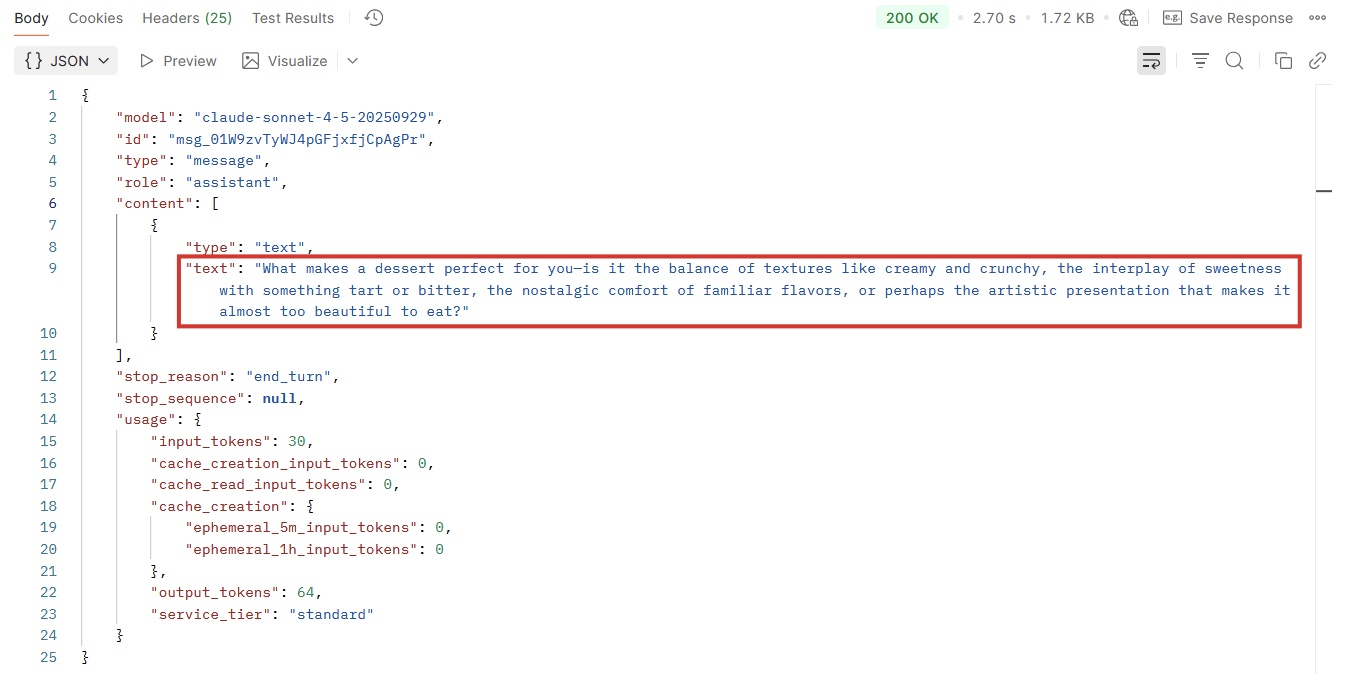
(11.2) If you have followed all instructions so far, you will receive an HTTP 200 OK status code, along with a response from Claude, both of which are highlighted in the image below.
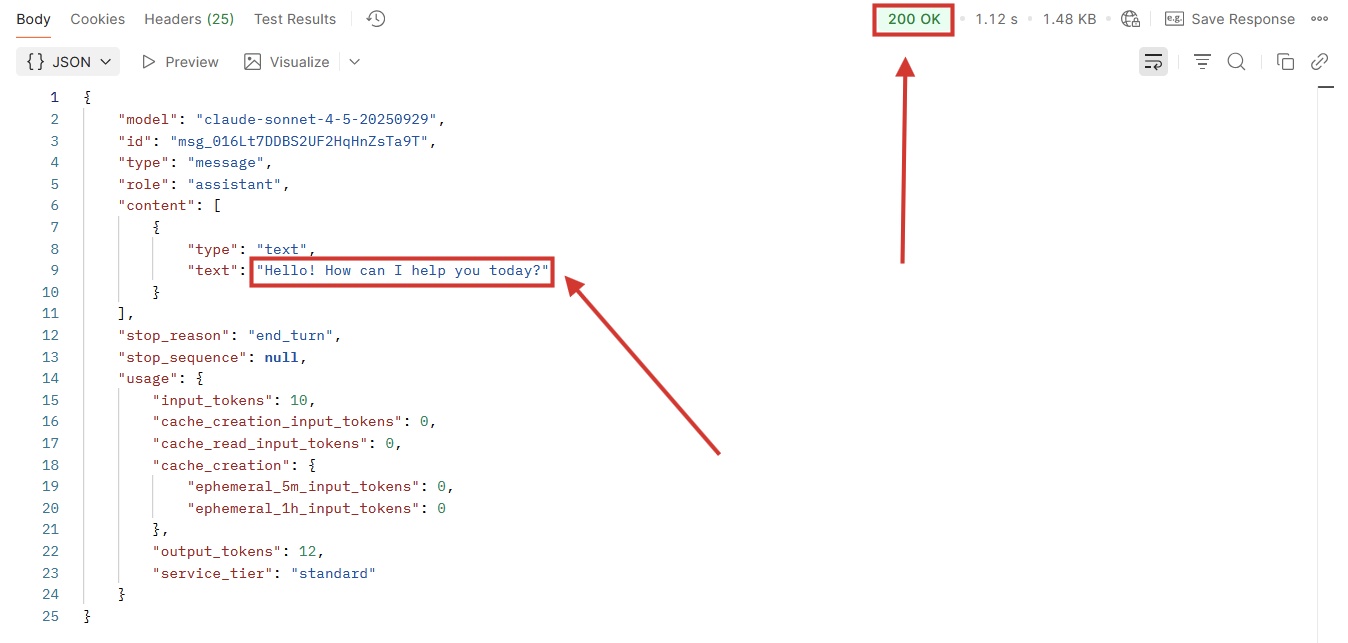
Note : Each time you click submit and receive a response from the Claude API, Anthropic will deduct the corresponding cost from your account balance based on the price of the selected model.
Step 12: Submit your questions.
The API call is ready, but it won't be useful if we just send "Hello, world". Let's explore how to change both the question we send to Claude and the system instructions that control how it responds.
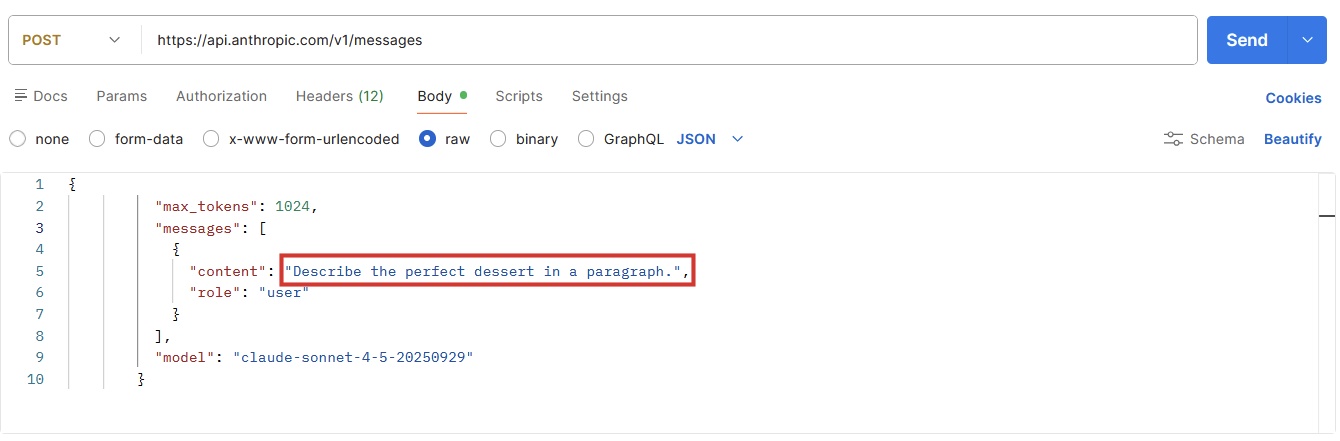
(12.1) In Postman, change the text of the content key to something else, such as "Describe the perfect dessert in one paragraph". Only change the text in quotation marks and keep the rest of the syntax the same.
(12.2) Claude answers the question in the section below.
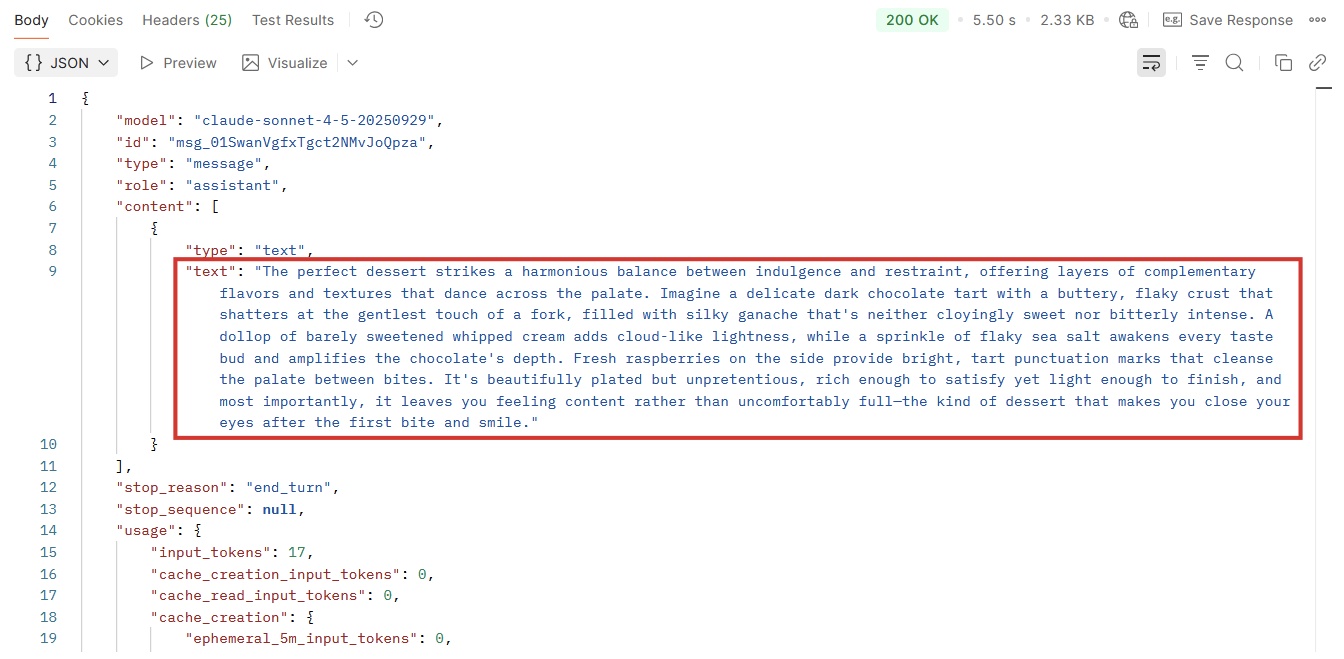
Tip: Changing the user's message content is equivalent to writing a question and sending it to Claude via the Claude.ai website.
(12.3) Expand the API call with system instructions, telling the model how it should interpret user prompts. Continue reading the API reference article, focusing on the request body parameters until you find the system parameter. Click on the row to expand.
This snippet contains important information:
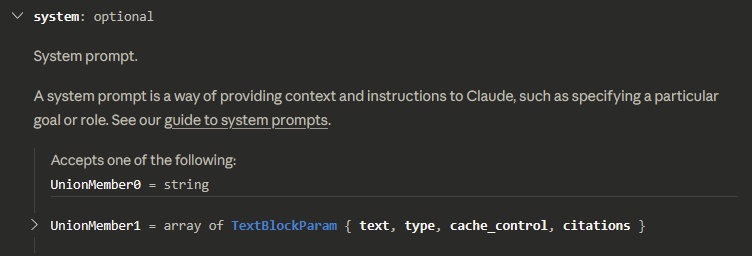
- "system" is the name of the parameter. This parameter is optional: the API will not return an error if it is missing, but if we add it, we can customize the output with it.
- It accepts a string, meaning the accepted value can be any combination of text, letters, or characters enclosed in quotation marks.
- The description text shows how this parameter works. In this case, there's a whole tutorial on the system prompt. (Note: The examples on that page are structured in Python, not JSON. If you can't guess the correct syntax, paste the example into ChatGPT and ask them to recreate it as JSON content.)
(12.4) In Postman, add the following parameter to the max_tokens entry:
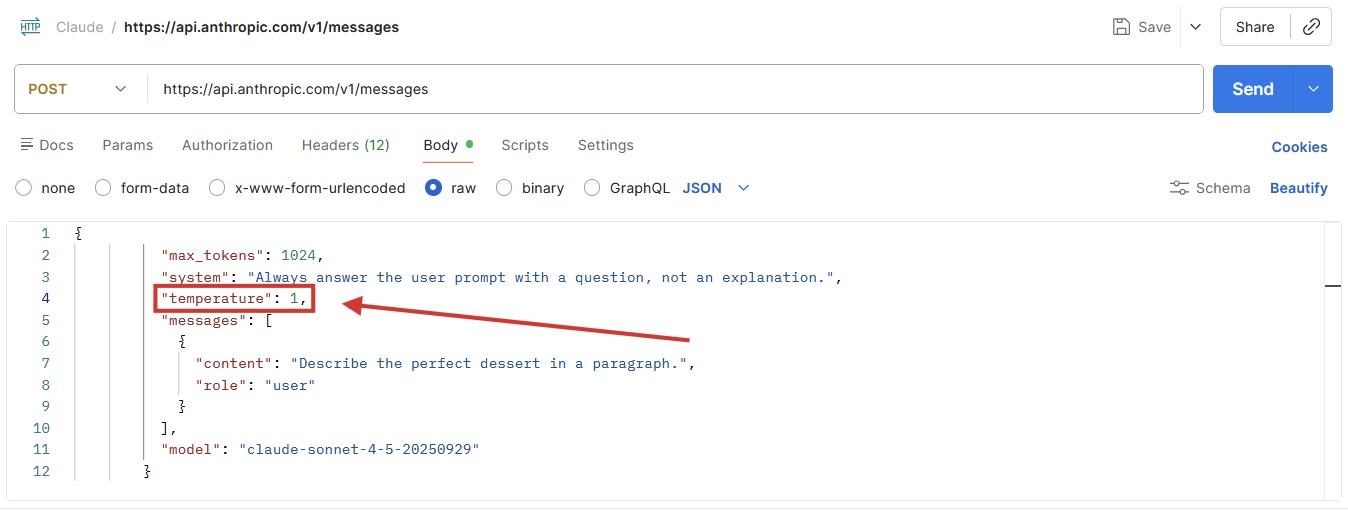
"system": "Always respond to the user's prompt with a question, not an explanation."
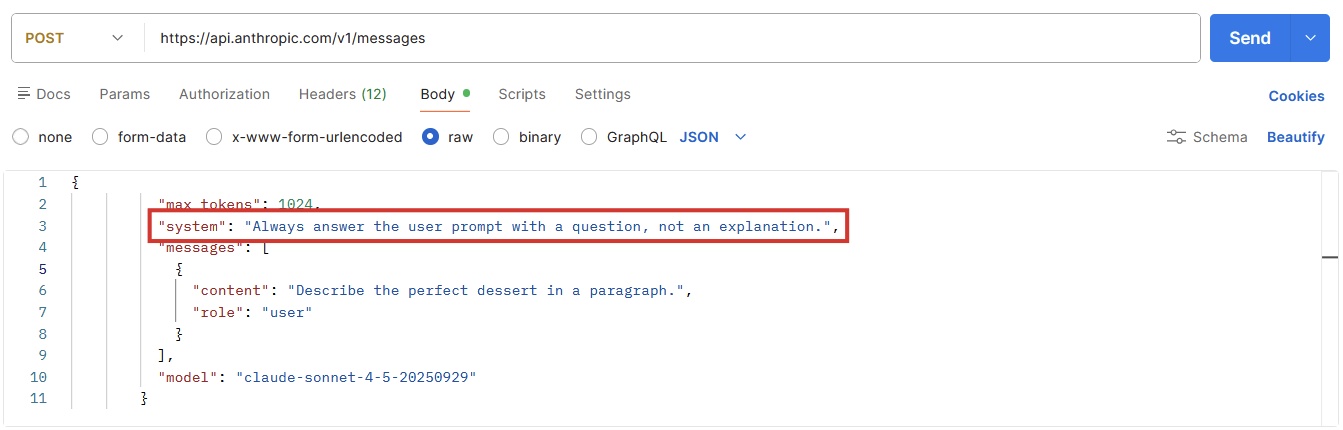
You can replace the text in bold here with your system instructions. Be sure to check the syntax: The line must end with a comma after the closing quotation mark.
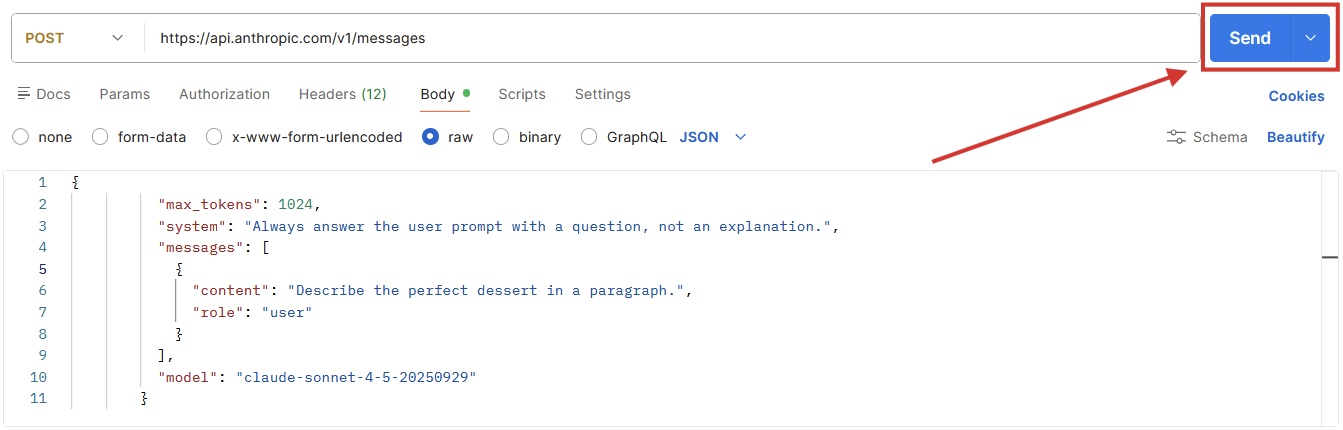
(12.5) Click Send .
(12.6) The content of Claude's response changes immediately after we issue system instructions, even when using the same user prompt.
Step 13: Customize the response
Add other parameters to the call to customize the response following the same process as the previous step.
(13.1) Learn more about the temperature parameter in the message creation API reference page.
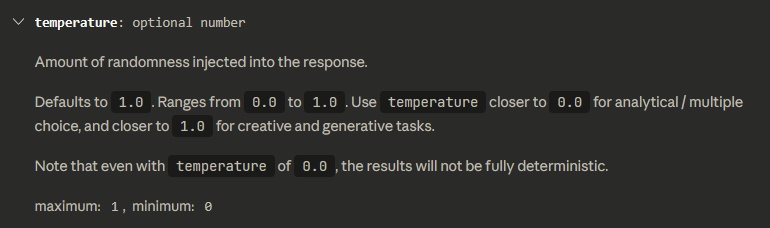
(13.2) Add the temperature to the API call, right below the system. Remember to put the parameter name in double quotes, but do not do the same with numbers. End the line with a comma.
For example: "temperature": 1,
(13.3) Click the Send button a few times to see how the response changes with the maximum temperature setting.
Step 14: Design new features with the Claude API
Postman is great for testing what APIs can do and building calls ready to integrate into your application. You can continue experimenting by adding more request body parameters, adjusting values, and exploring the responses you receive.
Over time, you'll find that the API call you're working on is the perfect solution for your use case—for example, it writes a good response to an email message you pass as input. When that happens, save the call in Postman, create a new one, and move on to the next problem.
While Postman serves as a platform for designing pre-integration calls, Claude Workbench is better for working on quick engineering and output optimization. The user interface visually displays the core API controls, so you can focus on how the responses change as you adjust settings. It also includes evaluation tools that help you assess how effective the output is in solving a task, which is very helpful for confidently launching a new feature.
Step 15: From testing to production: Integrate Claude into your application
Once you've set up all the API calls and prompts to your liking, it's time to integrate them into your internal application or tool. This will allow you to:
- Pass dynamic values through variables. You can build a user interface to replace any value of the API call, such as changing the user prompt, system instructions, or temperature.
- Link API calls to buttons, database operations, visual elements, or triggers such as "when a page loads." This is the most visible part of integrating the Claude API into your application, as you'll be able to see the information generated by Claude within the user interface you've built.
To complete this integration process, refer to the documentation of your no-code/minimum-code platform or internal build tool. These often have external API connectors that you can use to make calls from within the platform.
Enhance your application with the Claude API.
Setting up your first API call requires patience and persistence, but it will quickly become familiar once you master the basics. After getting past the initial learning phase, you will have an intuitive feel for how parameter values change the response and how you can integrate them into your product or tool.
- What is the Claude Code?
- What is Claude AI?
- Why do developers always choose Claude over other AIs?
- What is Claude Pro? How does Claude Pro compare to ChatGPT Plus?
- Which is more suitable for you: Claude Pro or API?
- Tips for using Project in Claude effectively to create a personal AI space.
- Claude AI User Guide: A Comprehensive Guide for 2026
- Comparing Claude vs ChatGPT: Which is the better AI chatbot?
- Instructions on using the Connectors feature in Claude AI.
- When should you not use Claude Code?
- Which is better: Claude, ChatGPT, or Gemini for building an ad blocker for Chrome?
- Which is more suitable for you: Claude Pro or API?
- What are Claude Artifacts?
- How to use Claude Artifacts to visualize data
- What is Claude Cowork?
- The difference between Claude and ChatGPT
- How to use Claude Cowork to run your business with AI.
- How to organize files on your desktop with Claude
- How to retain ChatGPT memory when switching to Claude
- A guide to using the Claude API to build AI applications.
-
 How to use Gemini API
-
How to create API Key Perplexity
-
How to use the ChatGPT API: A complete guide from A to Z.
-
Automate agent evaluation using the Power Platform API.
-
Detailed instructions on how to create ChatGPT API Keys to connect n8n and automation platforms.
-
A guide to using the Claude API to build AI applications.
 How to use Gemini API
 How to create API Key Perplexity
 How to use the ChatGPT API: A complete guide from A to Z.
 Automate agent evaluation using the Power Platform API.
 Detailed instructions on how to create ChatGPT API Keys to connect n8n and automation platforms.
 A guide to using the Claude API to build AI applications.