Automatic color adjustment feature in Photoshop
There are many options that are often overlooked. Hiding in the settings menu is the algorithm that users want Photoshop to apply automatically on Curves and Levels layers.
You can take the time to learn about Photoshop's new features every day, but you'll never discover this particular tool. That's why Photoshop has become such a powerful program. It is considered a standard for all commercial works. Photoshop is a good photo editing software that helps to change the workflow in a more positive way, regardless of how long it takes to use it.
Today, we will learn quick and easy color correction tips in Photoshop. There are many options that are often overlooked. Hiding in the settings menu is the algorithm that users want Photoshop to apply automatically on Curves and Levels layers .

Here are the steps to master this useful feature:
1. Open the image you want to edit in Photoshop.
2. Create a Curves or Levels layer .
3. In the control panel, navigate to the menu at the top right (indicated by a small icon with four stacked lines).
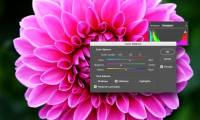
4. Once you have entered the menu, select ' Auto Options . '
5. Users will see 4 algorithm choices. ' Find Dark And Light Colors ' and ' Snap Neutral Midtones ' are 2 recommended options. This will apply the selected algorithm to the image.

6. To use this algorithm by default on future layers, check the ' Save as defaults ' box.
7. If the image is still not as expected, in the Curves layer , use the eyedropper icon (found in the left panel) to sample a location in the neutral gray image.
Users can access the Auto Options screen faster by holding the Alt / Option key while clicking the 'Auto' button in the control panel.
Refer to the video tutorial below if necessary.
Hope you are succesful.
Was this article helpful?
Your feedback helps us improve.
Related Articles
 10 Photoshop beginner skills need to know16 minutes read
 How to color images in Photoshop3 minutes read
 How to turn off the feature automatically adjusts screen brightness on iPhone3 minutes read
 How to change hair color in Photoshop3 minutes read
 Instructions on how to color in Photoshop2 minutes read
 How to fix common color problems in Photoshop8 minutes read
Reader Comments 0
Sign in with email or Google to join the discussion.