Table of Contents
This practical guide walks through how to enable / disable security and maintenance, explains the main requirements, and highlights common issues that may appear along the way.
You can enable or disable Security and Maintenance notifications in Windows 10 by using:
- Applet Control Panel Security and Maintenance
- Group Policy Editor
- Registry Editor
Find out in detail how to do this through the article below!
1. Use the Control Panel Security and Maintenance applet
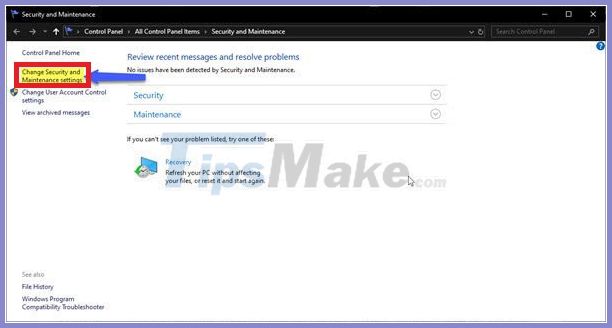
To open the Security and Maintenance window, type Security and Maintenance in the Search box on the Windows taskbar and select it from the results.
Click the Change Security and Maintenance settings link on the left side.
Select (to enable) or uncheck (to disable) the security and maintenance messages you want, and then press OK.
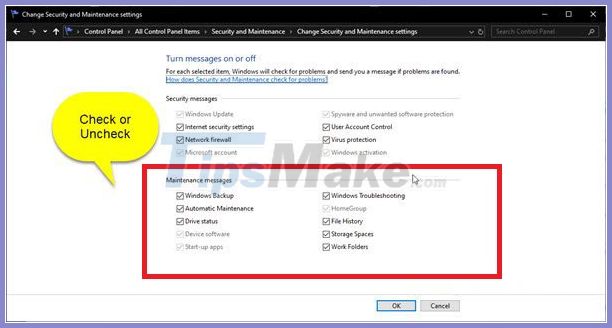
Now you can exit the Security and Maintenance window.
2. Turn off the Security and Maintenance notification using the GPO
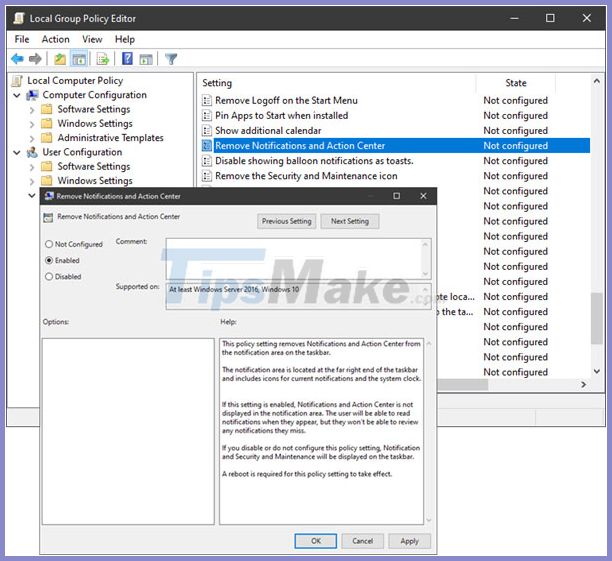
Run gpedit.msc to open the Group Policy Editor and navigate to the following settings:
User Configuration> Administrative Templates> Start Menu and Taskbar
Double-click on Remove Notifications and Action Center and set it to Enabled.
This policy setting removes Notifications and Action Center from the taskbar notification area. The notification area is at the far right of the taskbar, including icons for current notifications and the system clock.
If this setting is enabled, Notifications and Action Center will not be displayed in the notification area. Users will be able to read notifications as they appear, but will not be able to review any notifications they miss. If you disable or do not configure this policy setting, Notification and Action Center will be displayed on the taskbar. Restart is required for the policy to take effect.
3. Turn off the Security and Maintenance message using Registry Editor
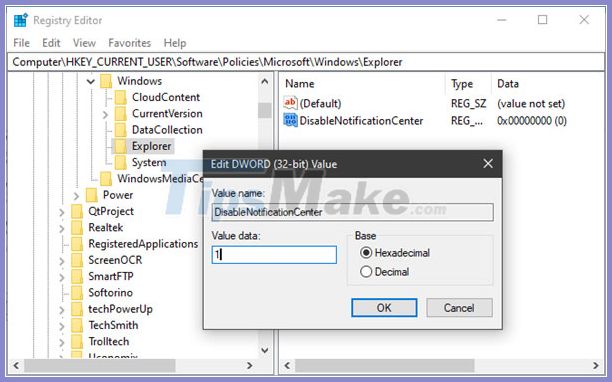
Run regedit to open Registry Editor and navigate to the following key:
HKEY_CURRENT_USERSOFTWAREPoliciesMicrosoftWindowsExplorer
Right-click on Windows, choose New> Key. Name it Explorer.
Now, right-click on Explorer, choose New> DWORD (32-bit) Value.
Name it DisableNotificationCenter. Next, double-click on it and set its value to 1.
If Explorer doesn't exist, you need to create it.
Key Takeaways
Use the information above as a practical reference for how to enable / disable security and maintenance. Review each step carefully, confirm any requirements, and choose the option that best fits your situation.
FAQ
What does this guide explain about Enable / Disable Security and Maintenance?
It explains the main concepts, practical considerations, and useful steps related to enable / disable security and maintenance without requiring advanced knowledge.
Who can benefit from learning about Enable / Disable Security and Maintenance?
This information is useful for readers who want a clear overview, practical guidance, and reliable steps related to enable / disable security and maintenance.
What should I check before applying this information?
Review the requirements, confirm that your device, software, or situation matches the instructions, and back up important data before making major changes.
Related Articles
 How to Enable / Disable Notifications from Windows Security5 minutes read
 How to Enable Security Notifications on Whatsapp2 minutes read
 How to Disable Automatic Maintenance on Windows 103 minutes read
 How to Enable // Disable the Security Tab of Files and Folders on6 minutes read
 How to Enable / Disable App Badging Option for Unread4 minutes read
 What Is Windows Security?8 minutes read
Reader Comments 0
Sign in with email or Google to join the discussion.