Word 2016 full guide (Part 23): How to check spelling and grammar
Whenever you use Word, you often worry about typing incorrectly or writing in the wrong language (if you use English or other languages), however, don't worry because Word provides some testing features - including grammar and spelling checker - help you create documents professionally and do not make mistakes.
Table of Contents
Whenever you use Word, you often worry about typing incorrectly or writing in the wrong language (if you use English or other languages), however, don't worry because Word provides some testing features - including grammar and spelling checker - help you create documents professionally and do not make mistakes.
Running a spell and grammar checker (Spelling and Grammar check)
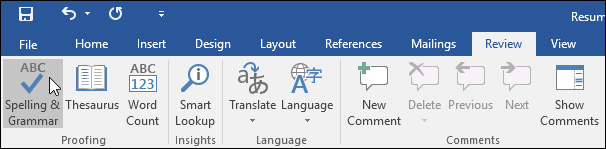
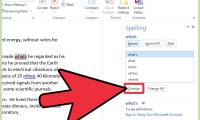
Step 1: In the Review tab, click Spelling & Grammar.
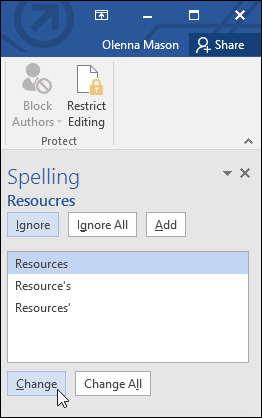
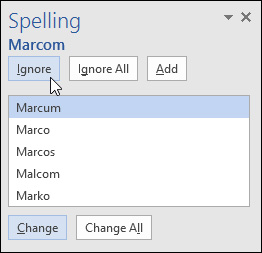
Step 2: The Spelling and Grammar panel will appear on the right. For each error in the document, Word will give one or more suggestions. You can choose one of the suggestions or click Change to fix the error.
Step 3: Word will move through each error until you review them all. After the last error is viewed, a dialog box will appear confirming that the spelling and grammar checking is complete. Click OK.
Ignore the error
In fact, Word's spelling and grammar check is not always accurate, especially for grammar, there are many Word errors that will not notify the user or report an error. If Word reports an error, you can choose not to change.
For spelling errors
Meaning of options:
- Ignore: This option will skip the word without changing the original word.
- Ignore All: This option will skip the word without changing the original word and it will also ignore all other cases in your document.
- Add: This option will add words to the dictionary so it will not appear the same error next time. You need to make sure the word is written correctly before selecting Add.
For grammar errors
- Ignore: This option will ignore the word or phrase of the error without changing the original word.
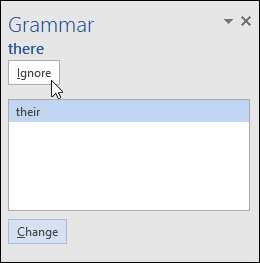
For some grammatical errors, Word explains why it errors that word, phrase or sentence. This helps you determine whether to change or ignore the error.
Automatically check spelling and grammar
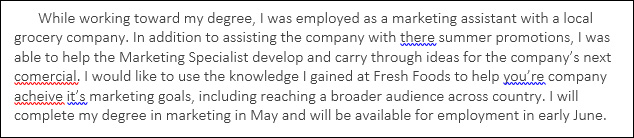
By default, Word will automatically check for grammatical and spelling errors in your documents, so you don't need to run a specialized test. These errors are indicated by wavy lines at the feet of the words.
- The red line indicates a word that is misspelled.
- The blue line indicates grammatical errors, including misused words (contextual spelling errors).
How to correct spelling errors
Right-click on the underlined word, then select the word highlighted in the suggested list.
After that, the corrected word will appear instead of the wrong word in the text.
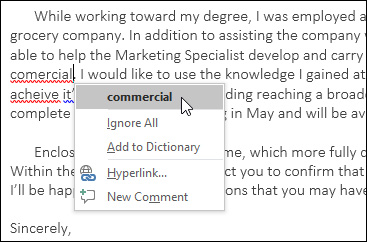
How to check grammatical errors
- Right-click on the underlined word or phrase, then select the appropriate suggested phrase in the list.
- The corrected phrase will appear in the text.
Change automatic spell and grammar check settings
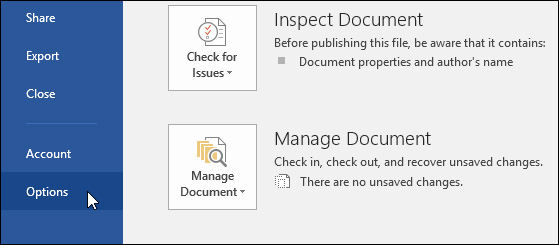
Click the File tab, then select Options.
A dialog box will appear. On the left side of the dialog box, click Proofing. There are a few options here. For example: If you do not want Word to mark spelling errors, grammatical errors, or words that are frequently mistakenly automatically, simply uncheck the options you want.

Instructions to hide spelling and grammar errors in the text
If you share documents with others, you probably won't want your text to show glitzy red and blue lines. However, you can easily hide those spelling and grammar errors.
Step 1: Click the File tab, then select Options.
Step 2: A dialog box will appear, click Proofing, then tick the box next to Hide spelling errors in this document only and Hide grammar errors in this document only. Finally, click OK.
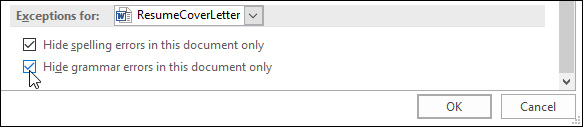
As a result, lines marked with errors will be hidden when you send documents to others.
Good luck!
You can consult:
- Complete Word 2016 tutorial (Part 22): How to create a chart
- Word 2016 Complete Guide (Part 21): How to insert and create tables
Was this article helpful?
Your feedback helps us improve.
Related Articles
 10 useful tools to help 'check' English spelling and grammar best 201811 minutes read
 How to Check Punctuation in Microsoft Word9 minutes read
 MS Word - Lesson 10: Read and check proofs for documents3 minutes read
 How to turn off spell checking in Word3 minutes read
 PowerPoint 2016: Check spelling and grammar4 minutes read
 Check spelling and grammar in PowerPoint 20164 minutes read
Reader Comments 0
Sign in with email or Google to join the discussion.