Turn off Update Win 10 permanently, quickly and effectively, new update 2024
If you want to control updates on Windows 10, turn off Update Win 10 is a detailed guide with simple steps. Take advantage of customization options to manage updates with flexibility and convenience.
Ways to turn off Windows 10 Update permanently
1. Turn off Update Win 10 with software
For those who are not tech savvy or know anything about computers, using software to turn off automatic Windows 10 updates is most appropriate, with just one simple click everything is completely resolved. to. This tool can also turn off Update Windows 11 and other operating systems.
Step 1: First you need to download the tool called Windows Update Blocker new version here
Step 2: Unzip and open the software, select Disable Update => click Apply Now
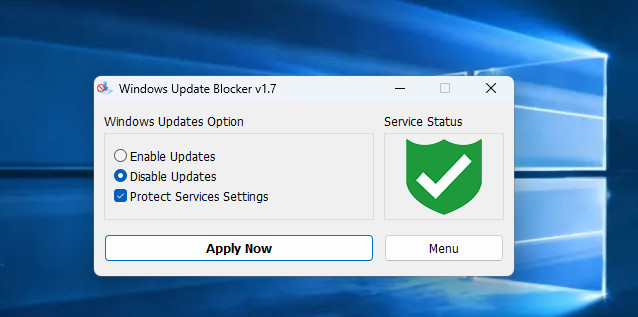
Blue Service Status means Windows 10 update has not been turned off
- When the Service Status notification turns red, it means you have successfully turned off Windows 10 update on your computer or laptop.
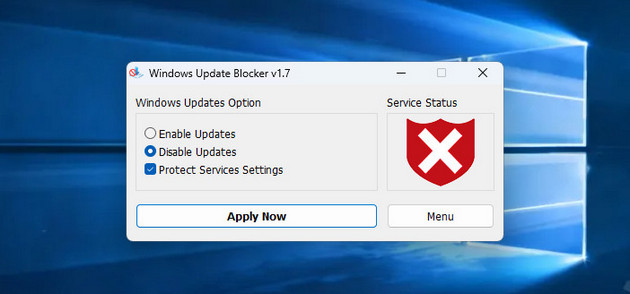
Turning off Update Win 10 will cause the Service Status to turn red
2. Turn off Windows 10 updates by disabling them in services
In services, you can disable the feature of automatically downloading and installing Windows 10 updates on your computer or laptop. This method is used by many people at the present time because of its effectiveness and operation. easy.
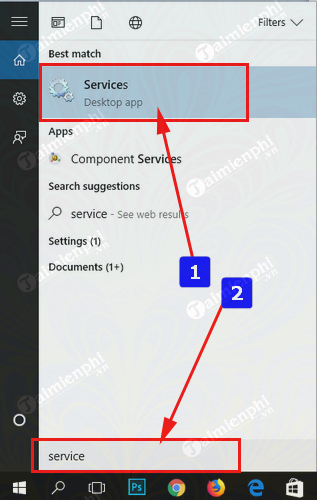
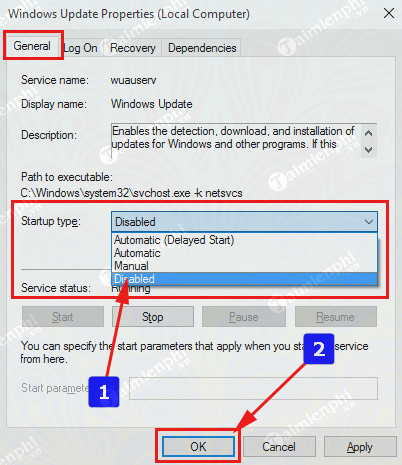
Step 1: From the Search box on the Taskbar => Enter the word " services " => Select Services
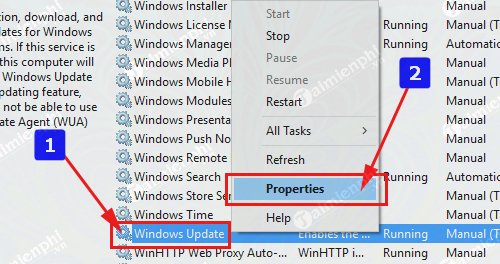
Step 2: Scroll down and select Windows Update => select Properties
Step 3: At Garenal tab => Startup type section => select Disabled => select Apply => select OK
3. Turn off Update Win 10 in Windows Update Settings
This setting does not turn off Windows 10 from automatically updating completely, but it will send a notification to the user before updating, giving you time to prepare so as not to affect other activities on the computer.
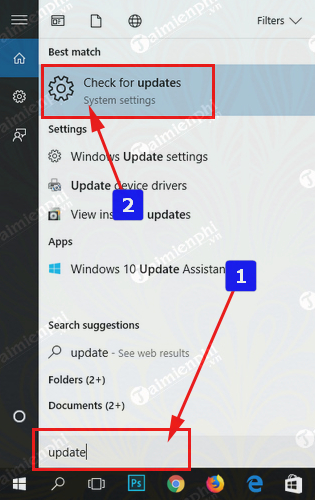
Step 1: In the Seach box in the Taskbar => Enter update => click on Check for updates
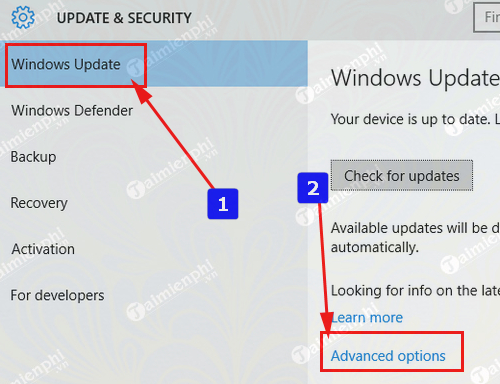
Step 2: In Windows Update => Select Advanced options
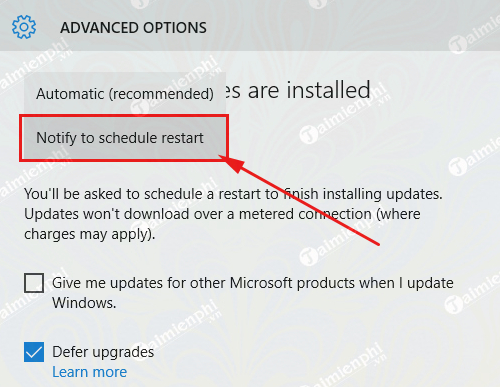
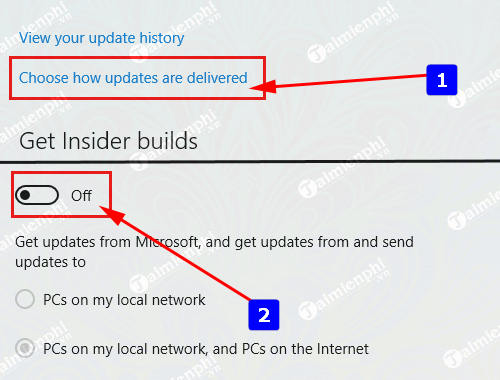
Step 3: At Choose how update are installed => select Notify to scheldule restart (default is Automatic (recommended)) * If using Win 10 Pro => Check the Defer upgrades option * Next Besides, you can also select Choose how updates are delivered to choose how to update from the system
Besides, you should turn off the Windows Update Delivery Optimization feature to reduce bandwidth during use because this is the cause of slow and network lag => Select Choose how updates are delivered => Select Off
4. Turn off Windows 10 updates using Group Policy Editor
This method of turning off updates does not apply to Windows 10 Home and Windows 10 Single Language versions, because they do not allow you to make adjustments in the gpedit section, you can apply the method of using software to turn off auto updates.
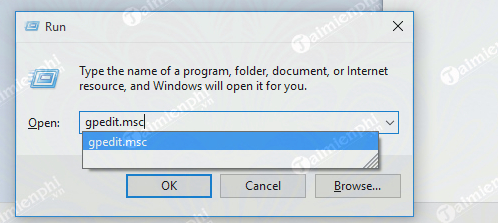
Step 1: Press the Windows + R key combination to open the Run window. Here, type gpedit.msc and press Enter to open Local Group Policy Editor
Step 2: On the Group Policy Editor window, search for the Windows Update key with the path Computer Configuration => Administrative Templates => Windows Components => Windows Update
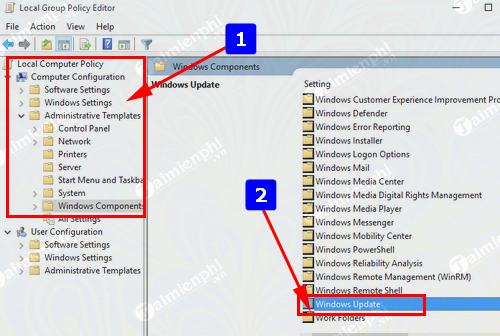
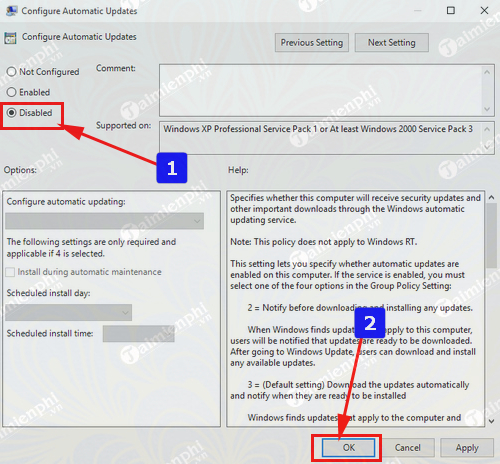
Step 3: In the right pane, double-click Configure Automatic Update

and customize this mode to Disable then click OK to save the settings.
5. Turn off Update Win 10 when connecting to Wifi
To enable the Set as metered connection option, follow these steps:
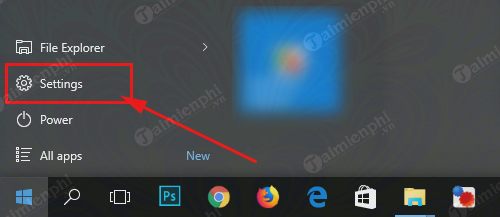
Step 1: Launch the Start Menu on the desktop, select Settings
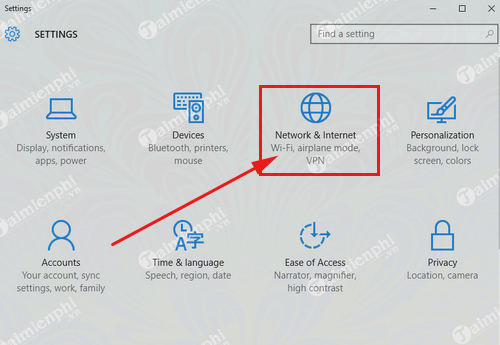
Step 2: Continue clicking on Network & Internet
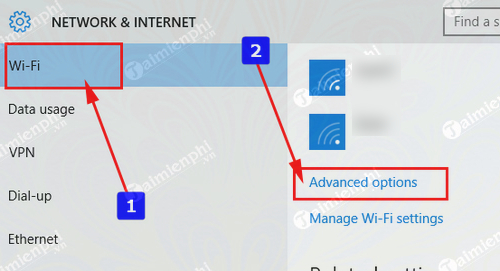
Step 3: Then you click on Wifi on the left side, then continue to click on Advanced options
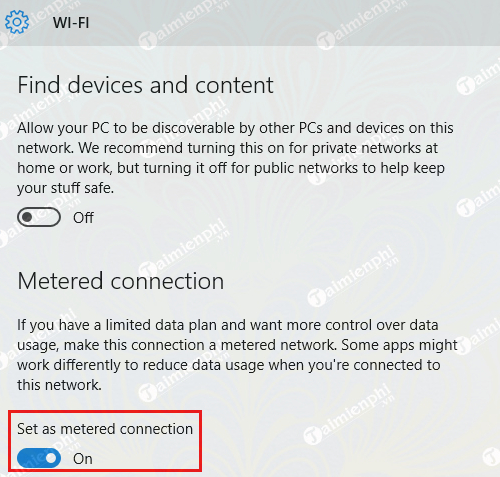
Step 4: Click on the Wifi connection name, then select Properties, scroll down to find Metered Connection, finally click to turn on Set as Metered Connection => On
Note: - This method only applies to Wifi connections because Windows 10 will not recognize any other type of Ethernet as Metered Connection - This method will help you use Wifi by traffic, you can pause Windows 10 updates for a period of time if you run out of Wifi traffic.
6. Turn off Windows 10 updates by tweaking the Registry
Note: Faulty Registry tweaks can cause a variety of problems on the system, even causing the system to not work. Therefore, TipsMake recommends that you back up your system before performing the steps.
Step 1: Press Windows + R to open the Run window, then enter regedit there and press Enter to open Registry Editor.
Step 2: On the Registry Editor window, navigate to the path below:
HKEY_LOCAL_MACHINESOFTWAREPoliciesMicrosoftWindows
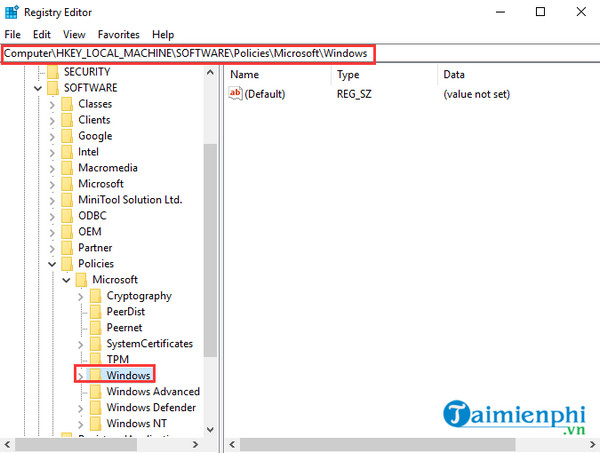
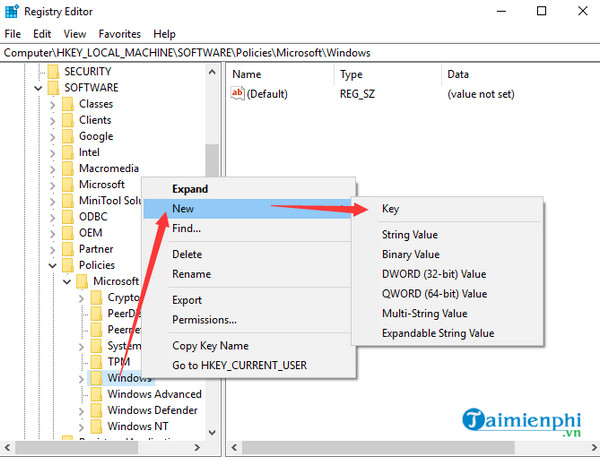
Step 3: Find and right-click the Windows key => New => Key and name this key AU.
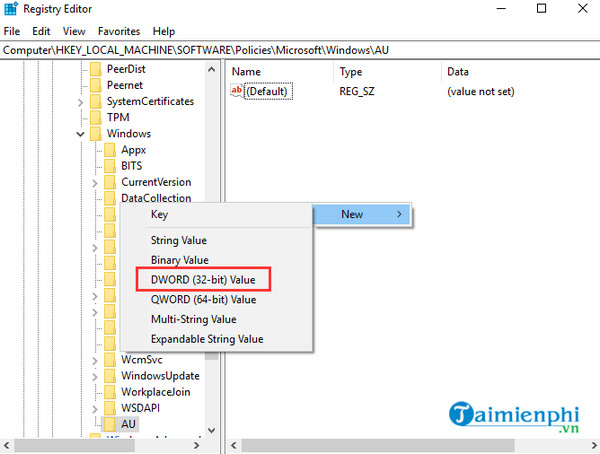
Step 4: Right-click on the AU key, select New => DWORD (32-bit) Value => name it AUOptions.
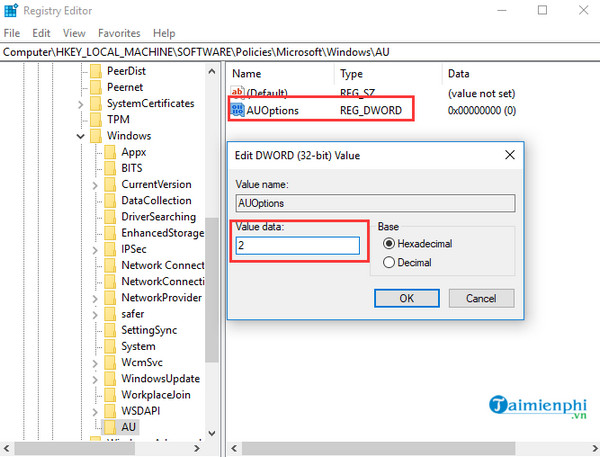
Step 5: Double click on AUOptions, in the window displayed on the screen set the value in the Value data frame to 2 and then click OK.
Step 6: Finally restart your computer to apply the changes. From now on, Windows 10 will no longer automatically update.
7. Turn off Windows 10 Update within 35 days
To temporarily turn off Windows 10 updates, you can set the system to stop updating within 35 days.
Step 1: Right-click the Start button, select Settings to open the Settings window.
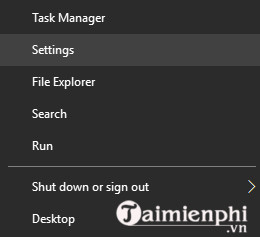
On the Settings window, find and click Update & Security
Step 2: On the Update & Security window, find and click Windows Update in the left pane, then find and click Advanced Options in the right pane.
On the Advanced Options window, find and activate the Pause Updates item by toggle the slider.
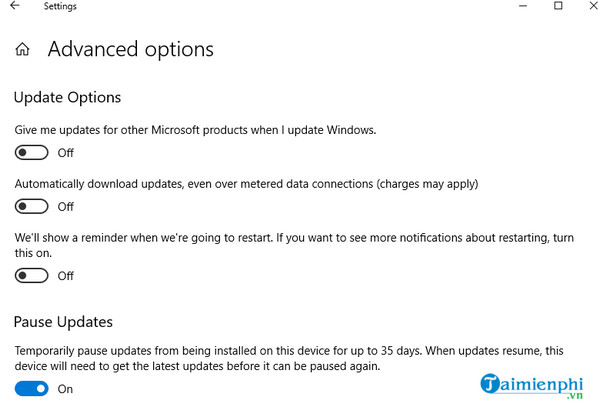
Doing this will cause Windows 10 to pause updates for 35 days.
Note: On versions of Windows 10 1903, Windows 10 Pro 1809 and Windows 10 Enterprise 1809 only allow users to pause updates within 7 days.
8. Block Windows 10 updates by restoring to the previous version
The last available solution to turn off Windows 10 updates and block Windows 10 updates is to restore to the previous version. However, to apply this method, you must have an image backup available.
To learn in detail how to restore Windows 10 to a previous version, readers can refer to how to use System Restore on Windows 10 here.
So TipsMake has just introduced to you how to turn off Windows 10 updates. However, according to the information that TipsMake has, Microsoft will have a policy of 'forcing' users to update to Windows 10, so this option is only only temporary.
Why does Windows 10 automatically update and update new versions?
Microsoft manages all computers running the Windows operating system on the same platform to facilitate the release of security patches, updates to improve performance and stability across global systems.
Undeniably, updating new versions of Windows 10 helps fix many known errors, as well as giving users the experience of new features, . . However, the update process takes quite a long time, requires restarting the device many times, and even in some cases if the update process fails, . can cause a series of problems for users. uncomfortable. And that is also the reason why we should turn off Windows 10 updates and block Windows 10 updates.
Also, please refer to how to fix Windows 10 black screen error when starting to improve your knowledge.
 Ways to fix auto click errors when working or playing online games
 Instructions for installing SPSS on your computer are simple and easy to follow
 How to download SPSS on Android phones, iPhone/iPad for free
 Install Windows 10 with USB BOOT quickly, with detailed standards from A to Z
 Log in to your computer when you forget your password or break your Windows password
 What's new in the realityOS operating system? When will it launch?