Windows Update crashes, this is what you need to do
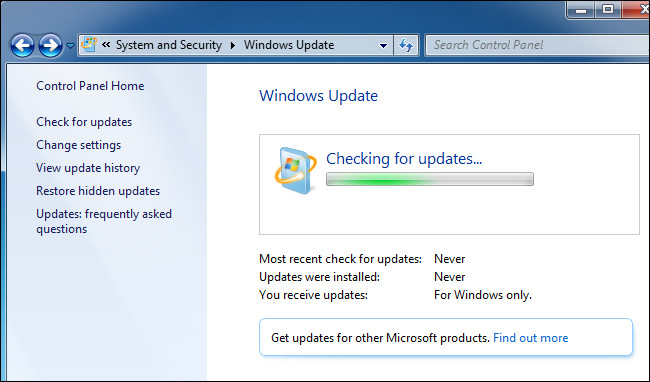
In some cases Windows Update may " refuse " if it cannot install individual updates. This can happen on Windows 7, 8 and 10, but especially happens on Windows 7.
Sometimes the update process (update) fails or Windows Update may be suspended during the update search process. To fix this error, please refer to the following article of Network Administrator.
1. Run Windows Update Troubleshooter on Windows 7,8 and 10
The Windows Update Troubleshooter is a Windows built-in tool to detect and fix errors that occur with Windows Update.
The Troubleshooter tool will perform the following actions:
1. Turn off Windows Services Update.
2. Rename the folder C: WindowsSoftwareDistribution to C: WindowsSoftwareDistribution.old , basically delete the Windows Update cache and start downloading again.
3. Restart Windows Update Services.
The Troubleshooter tool is available on Windows 7, 8 and 10.
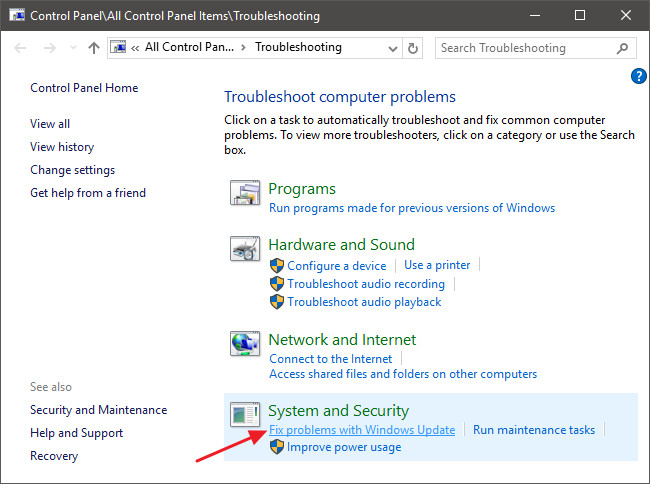
To run the Troubleshooter, first click on Start , then enter the " troubleshooting " keyword in the Search frame and then click Troubleshooting on the search results list.

On the Troubleshoot computer problems window, in the System and Security section, find and click " Fix problems with Windows Update ".
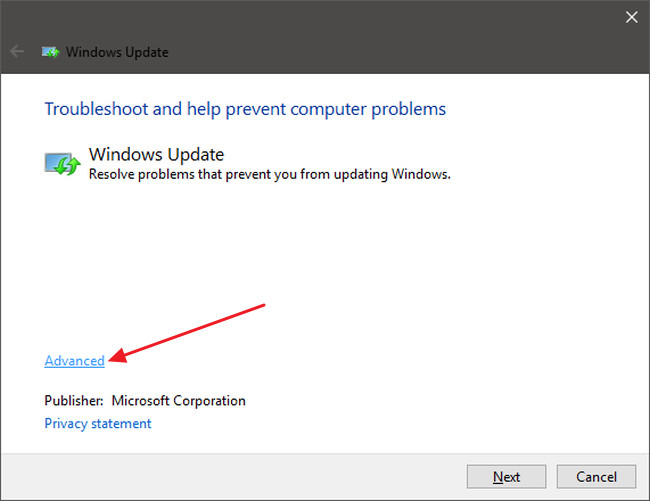
On the Windows Update troubleshooting window, click Advanced .
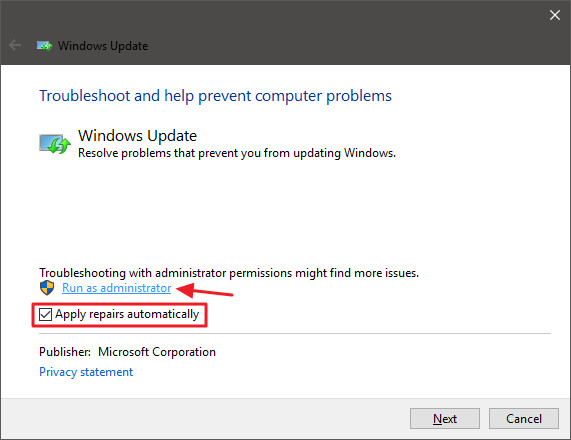
A new window appears on the screen, here make sure that you have selected Apply repairs automatically , then click Run as administrator then click Next . Provides Admin permissions for the tool to make sure the cache files can be deleted.
After the Troubleshooter completes the process, close the Troubleshooter window again, restart your computer, and run Windows Update to check if the error has been fixed.
2. Fix Windows Update error by clearing Windows Update cache manually
First start Windows in Safe Mode . On Windows 7, restart your computer and then press F8 during the boot process to access the Boot Options Menu .
On Windows 8 and Windows 10, press and hold Shift and click Restart on Windows and navigate to Troubleshoot => Advanced Options => Windows Startup Settings => Restart => Safe Mode .
In addition, you can refer to the steps to access Safe Mode on Windows here.
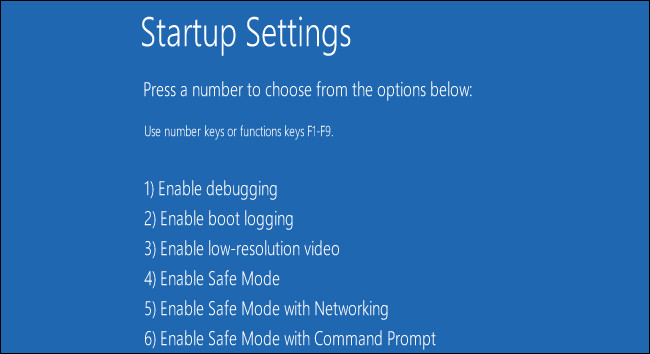
After starting Windows in Safe Mode, the next step is to proceed to turn off Windows Update service , and the easiest way to turn off Windows Update service is to use Command Prompt .
To open Command Prompt on Windows 7, first open the Start Menu , then enter the Command Prompt keyword in the Search box and press Enter to open the Command Prompt. Or alternatively access Start => All Programs => Accessories => Command Prompt .
On Windows 8 or Windows 10, right-click the Start button (or press the Windows + X key combination) to open Power User Menu, here you click ' Command Prompt (Admin) ' then click Yes to enable Command run Prompt under Admin.

On the Command Prompt window, enter the following command and press Enter to turn off Windows service Update : net stop wuauserv
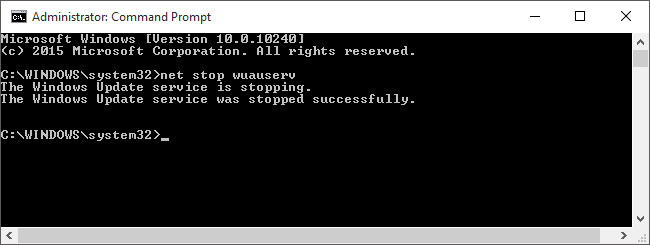
After the command completes, minimize the Command Prompt window, absolutely not closing the Command Prompt .
Next open the File Explorer window and navigate to C: WindowsSoftwareDistribution . Here find and delete all files and folders. And you can rest assured that none of these files and folders are important. Windows Update will recreate the necessary files and folders the next time you run Windows Update.
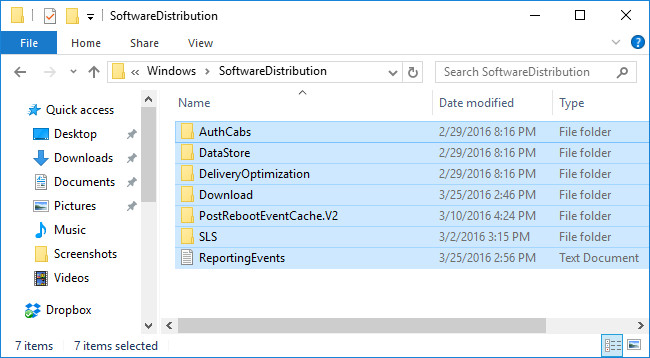
You will now have to restart the Windows Update service. Go back to the Command Prompt window and enter the command below and press Enter:
net start wuauserv
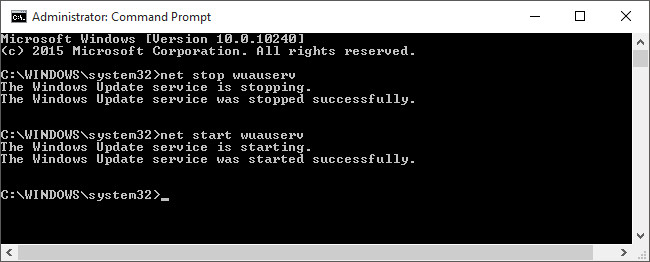
After the service has restarted, close the Command Prompt window and start your Windows computer in normal mode. Then test Windows Update to check if the error has been fixed.
3. Update Service Windows Update on Windows 7
First open Windows Update. Access Control Panel => System and Security => Windows Update . Click on link Change Settings on the sidebar. Next click the Never Check For Updates (Not Recommended) option from the dropdown menu and then click OK.
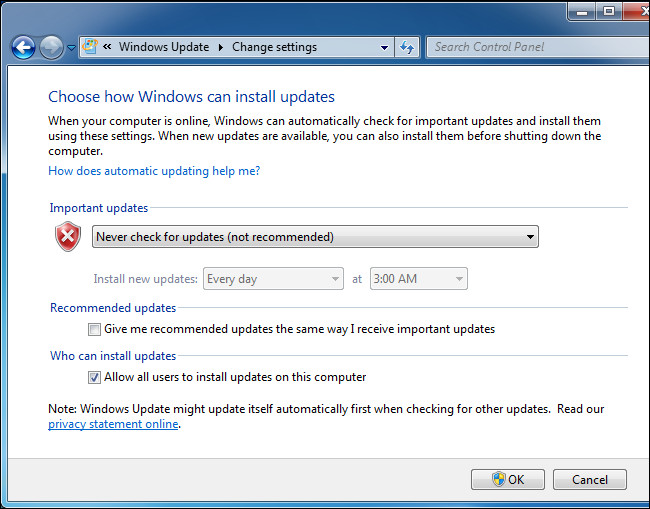
Restart your computer after changing settings.
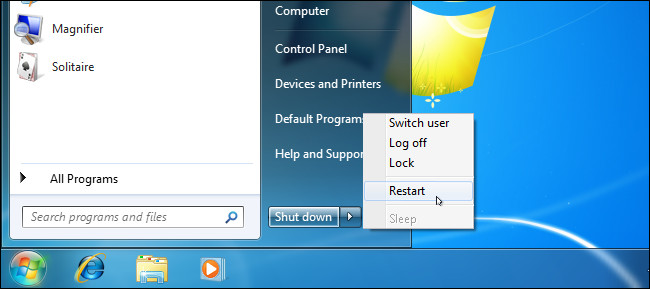
After your computer has finished booting, the next step is to manually download and install 2 updates for Windows 7. However, you will have to check the version you are using is 32-bit or 64-bit to Download the update accordingly.
With 64-bit versions of Windows 7 , download the updates:
- KB3020369, April 2015 servicing stack update for Windows 7 (64-bit version)
- KB3172605, July 2016 update rollup for Windows 7 SP1 (64-bit version)
With 32-bit versions of Windows 7 , you download the updates:
- KB3020369, April 2015 servicing stack update for Windows 7 (32-bit version)
- KB3172605, July 2016 update rollup for Windows 7 SP1 (32-bit version)
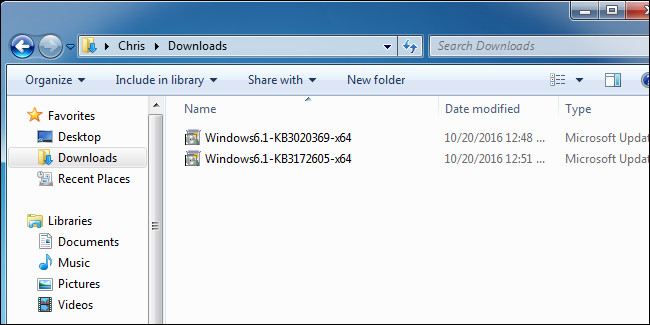
Double-click update ' KB3020369 ' to install.
After completing the first update installation, double-click update KB3172605 to install.
You will be asked to restart your computer to complete part of the process. After your computer has finished booting, Microsoft will announce that you wait about 10-12 minutes for the process to complete.
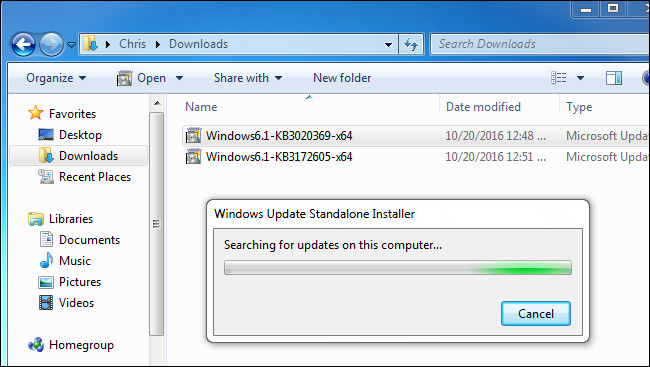
The process is complete, return to the Windows Update dialog box by accessing Control Panel => System and Security => Windows Update . Click Change Settings and set to Automatic (or choose the setting you want).
Click the Check for Updates option to have Windows check and install the updates. And according to Microsoft, this solution will fix Windows Update crashes.
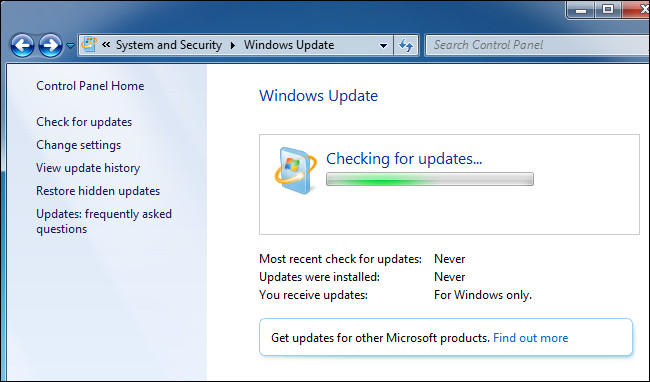
4. Download WSUS Offline Update ready to edit (on Windows 7, 8 and 10)
If you do not have an official solution to fix the problem, you can apply the solution by using the 3rd tool. The third tool that the Network Administrator mentioned here is WSUS Offline Update .
This tool will download available Windows Update packages from Microsoft and install these packages. After successfully downloading and installing WSUS Offline Update, the next step is to run the tool and WSUS Offline Update will download, install the updates, and then of course Windows Update will work again.
Download WSUS Offline Update to your computer here.
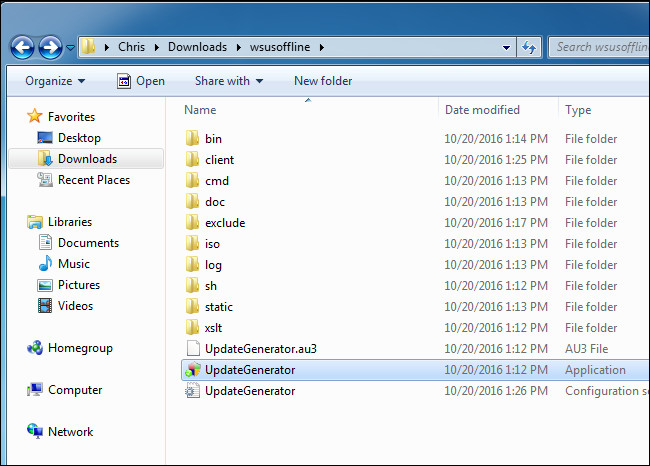
When downloading is complete WSUS Offline Update, proceed to extract the Zip file into a folder and run the UpdateGenerator.exe file.
Select the version of Windows you are using, if you are using a 64-bit version, select x64 Global or x86 Global if you are using a 32-bit version.
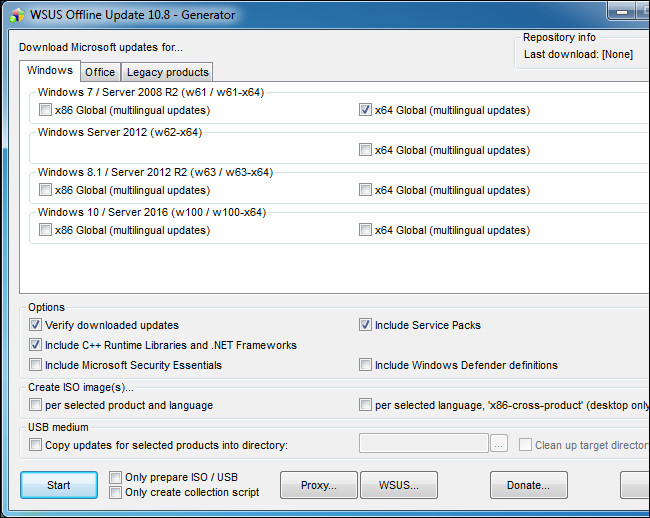
After selecting, click Start and WSUS Offline Update will download the updates.
Wait for the download process to complete. If you refresh the Windows 7 installation, it will take some time to do it because there are many updates. Depends on the speed of Internet connection and the speed of fast or slow downloads on Microsoft server download.

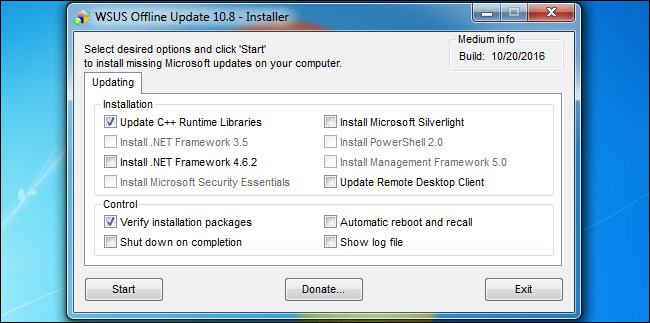
After downloading the updates, open the client folder located in the WSUS Offline folder and run UpdateInstaller.exe.
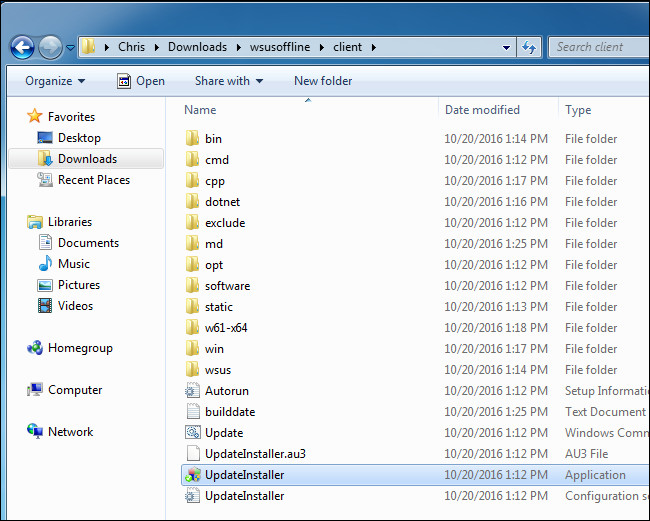
Click Start to install the downloaded updates. After the tool completes the update installation process, Windows Update will resume normal operation.
Refer to some of the following articles:
- What to do when Windows Update crashes 0% on Windows 7/8/10?
- Turn off driver update on Windows Update Windows 10
- Trick to enable / disable Windows Updates on Windows 10 quickly and easily
Good luck!
You should read it
- ★ Microsoft rolls out update KB5007253 that fixes network printing errors 0x000006e4, 0x0000007c, or 0x00000709
- ★ How to fix Windows Update error 0x80190001
- ★ What to do when Windows Update crashes 0% on Windows 7/8/10?
- ★ How to fix Windows Update error
- ★ What's special about the final Windows 11 update of 2021?