Steps to turn off the Windows 10 screen brightness auto-adjust feature
You want to set the computer screen to a certain brightness, but the computer constantly changing brightness annoys you. Click to see how to turn off the Windows screen brightness adjustment feature!.
The auto-brightness feature on Windows 10 makes your computer consume a lot of energy. If you want to save more battery, you can turn off the automatic screen brightness adjustment feature on Windows laptops . Let's consult now!
What is Adaptive Brightness?
This is a feature that helps the computer detect how much light is in the environment to adjust to suit the user. Similar to the phone , when you go out in the morning, the screen will light up and when you go in the dark, the computer screen will also darken.
When to turn off auto-brightness?
- When you need to work in low light conditions, the screen automatically adjusts too dark, affecting the observation.
- When your computer only has a little battery left, but the adjustment makes the light too bright, which consumes a lot of battery.
1. Turn off auto-brightness on Windows 10 via Service
Step 1: Press Windows + R key combination > Enter 'services.msc' > Select OK.

Step 2: Double click on Sensor Monitoring Service.

Step 3: Select Stop > In the Startup type section, click to open the drop-down window > Select Disabled > Select Apply.

2. Turn off auto-brightness from Windows Settings
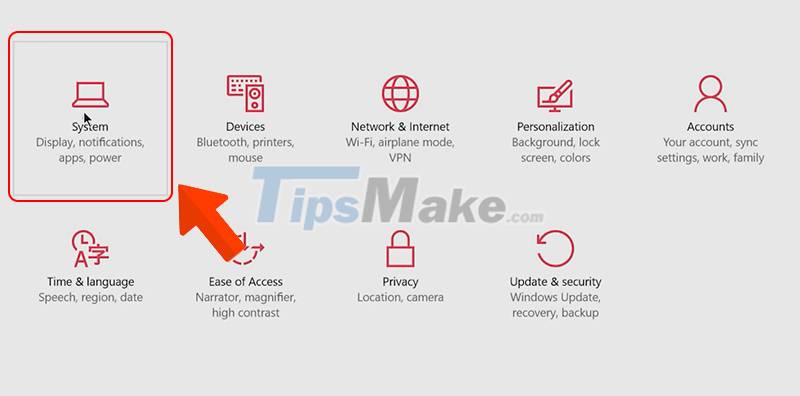
Step 1: Select the Windows logo > Select Settings.

Step 2: Select System.
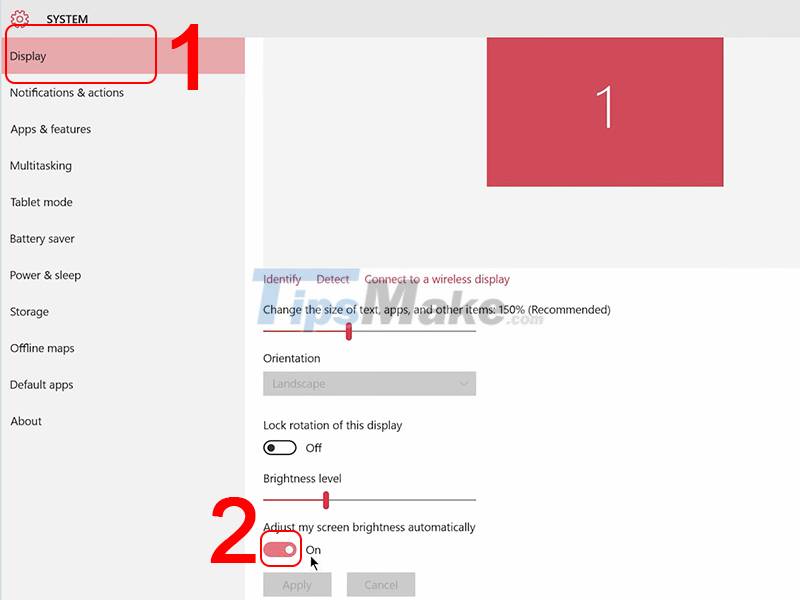
Step 3: Select Display > Under Adjust my screen brightness automatically, move the button to the left to turn off automatic screen brightness adjustment.
3. Turn off the Windows screen brightness adjustment feature using Control Panel
This method can be applied to turn off the automatic screen brightness adjustment feature on Windows 10/8/8.1/7.
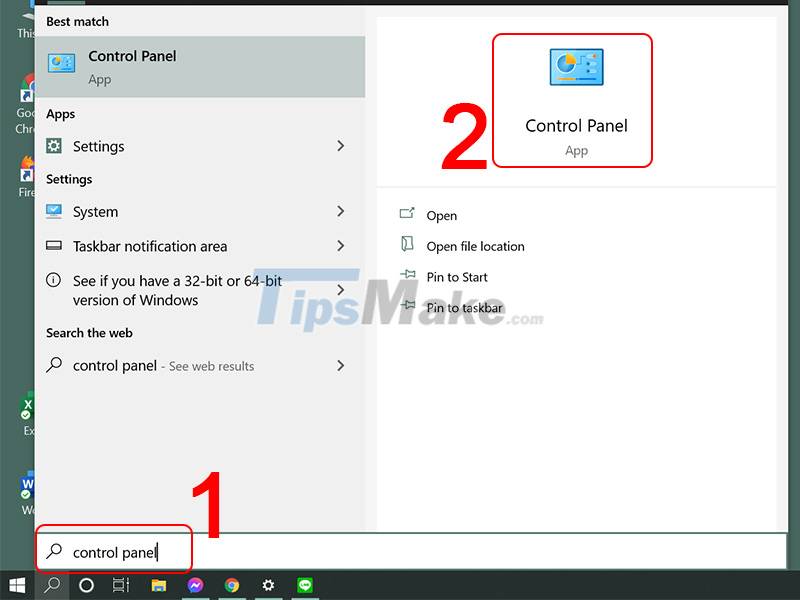
Step 1: Click the Search icon > Type 'control panel' > Select the Control Panel application.
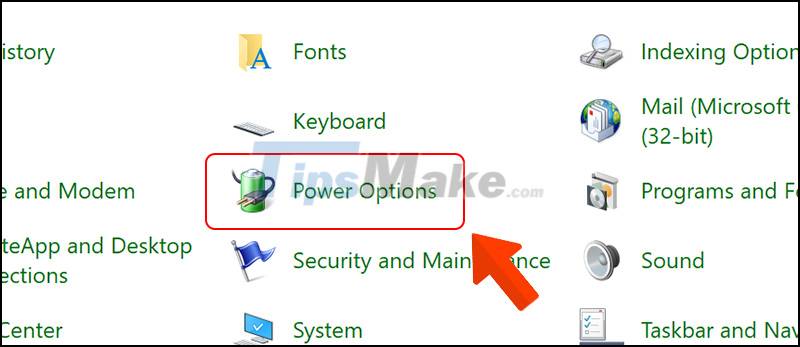
Step 2: Click on Power Options.
Step 3: Select Change plan settings.

Step 4: Select Change advanced power settings.

Step 5: Select Display > Select Enable adaptive brightness > Select Off under On battery and Plugged in.

4. Turn off auto-brightness from Command Prompt
This method can be applied to turn off the automatic screen brightness adjustment feature on Windows 7 and Windows 10.
Step 1: Select Search icon > Type 'command prompt' > Select Command Prompt application.
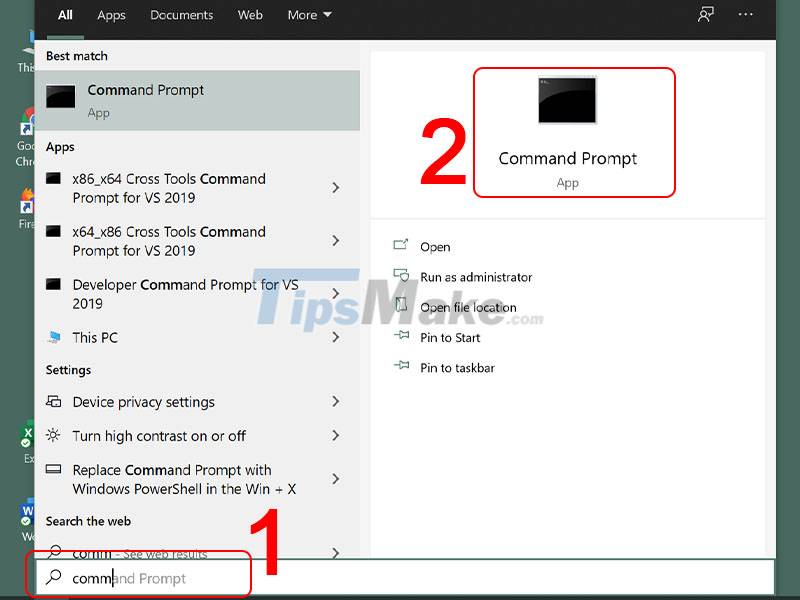
Step 2: Enter the following commands to turn off the screen light auto-off mode > Press Enter.
Code to disable screen auto-brightness:
- Turn off auto-brightness on battery: powercfg -setdcvalueindex SCHEME_CURRENT 7516b95f-f776-4464-8c53-06167f40cc99 FBD9AA66-9553-4097-BA44-ED6E9D65EAB8 0
- Turn off screen brightness automatically when plugged in: powercfg -setacvalueindex SCHEME_CURRENT 7516b95f-f776-4464-8c53-06167f40cc99 FBD9AA66-9553-4097-BA44-ED6E9D65EAB8 0
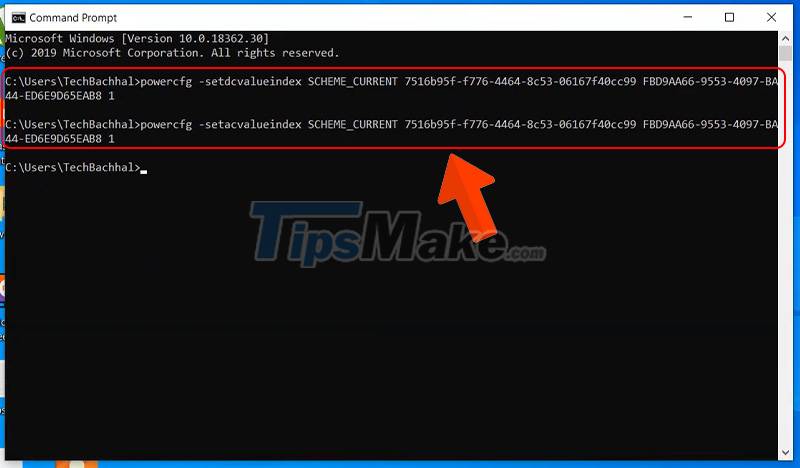
Besides, if you want to re-enable this mode, just enter the command again:
- Enable auto-brightness on battery: powercfg -setdcvalueindex SCHEME_CURRENT 7516b95f-f776-4464-8c53-06167f40cc99 FBD9AA66-9553-4097-BA44-ED6E9D65EAB8 1
- Turn on automatic screen brightness when plugged in: powercfg -setacvalueindex SCHEME_CURRENT 7516b95f-f776-4464-8c53-06167f40cc99 FBD9AA66-9553-4097-BA44-ED6E9D65EAB8 1
5. Turn off automatic screen brightness adjustment using Power plan settings in Command Prompt
Step 1: Go to Command Prompt.
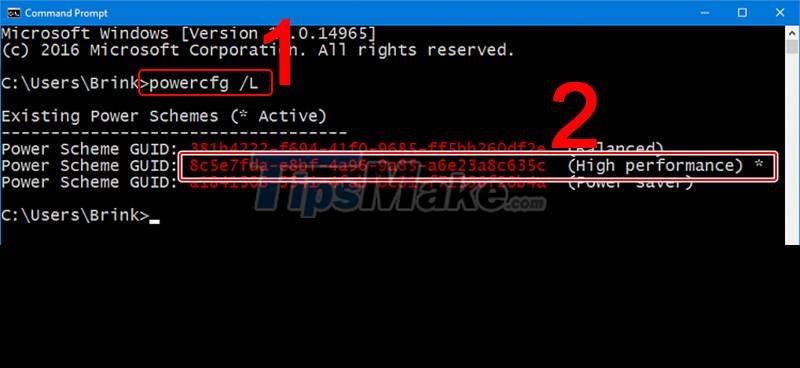
Step 2: Type 'powercfg /L' > Press Enter > Copy the GUID code of the High performance section as shown.
Note: When you turn on High performance mode, you will be able to turn off automatic screen brightness.
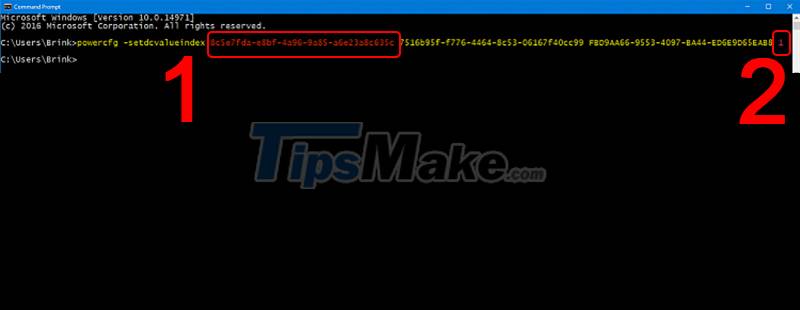
Step 3: Proceed to turn on High performance mode according to the following steps. Enter the code > Press Enter.
- Enable High performance on battery: powercfg -setdcvalueindex GUID 7516b95f-f776-4464-8c53-06167f40cc99 FBD9AA66-9553-4097-BA44-ED6E9D65EAB8Index
- Enable High performance when charging: powercfg -setacvalueindex GUID 7516b95f-f776-4464-8c53-06167f40cc99 FBD9AA66-9553-4097-BA44-ED6E9D65EAB8 Index
Inside:
- The GUID you will replace with the code you copied in step 2.
- Index is the part of the code, number 0 is off mode, number 1 is turn on mode again.
For example: In my post, my GUID code is 8c5e7fda-e8bf-4a96-9a85-a6e23a8c635c and I want to enable High performance, then I will enter the following line: powercfg -setdcvalueindex 8c5e7fda-e8bf-4a96-9a85-a6e23a8c635c 7516b9544f 8c53-06167f40cc99 FBD9AA66-9553-4097-BA44-ED6E9D65EAB8 1
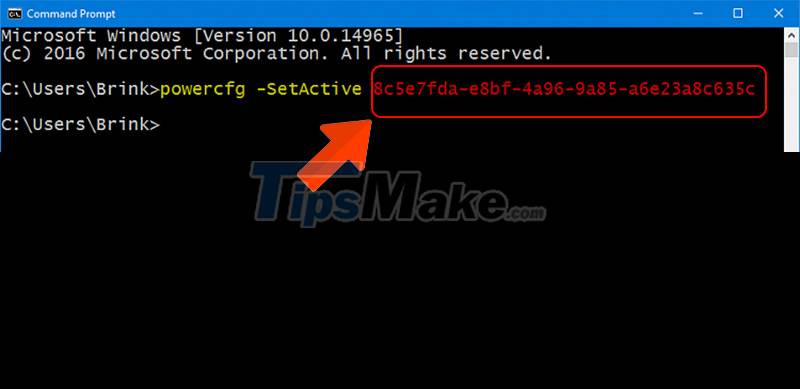
Step 4: Confirm the change by entering the command below > Press Enter.
- Command: powercfg -SetActive GUID
- Where GUID is the code you copied in step 2.
Note: This command will set the Power plan for GUID as your activity map (as in the article, High performance). If you don't want to set this Power plan as your activity map, you can restart your computer to apply the changes instead of doing this step.
6. Turn off battery saver technology to disable auto-brightness
For Intel cards
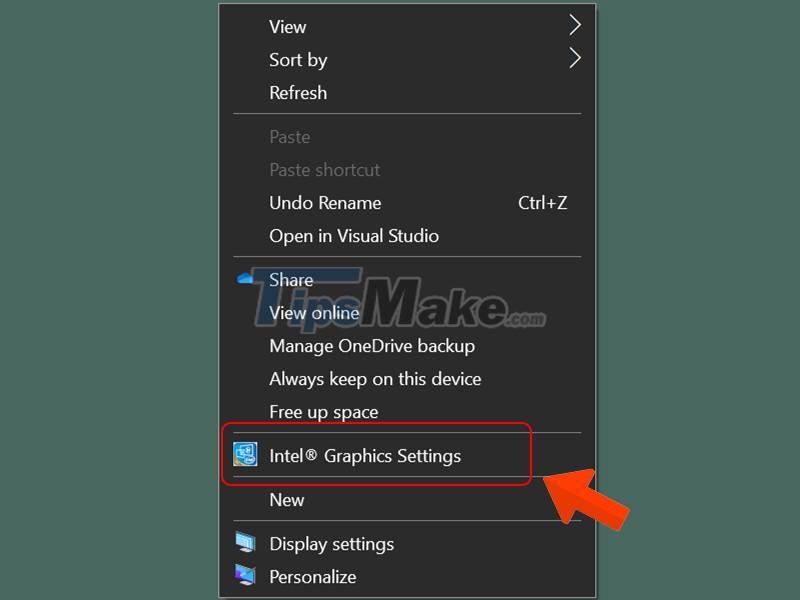
Step 1: Right-click on the desktop > Select Intel Graphics Settings.
Step 2: Select Power.

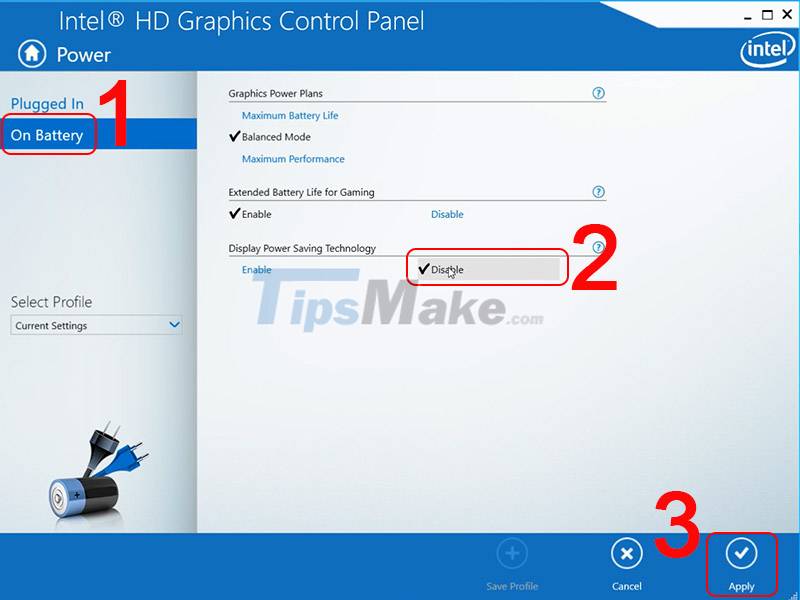
Step 3: Select On Battery or Plugged > Display Power Saving Technology, select Disable > Select Apply.
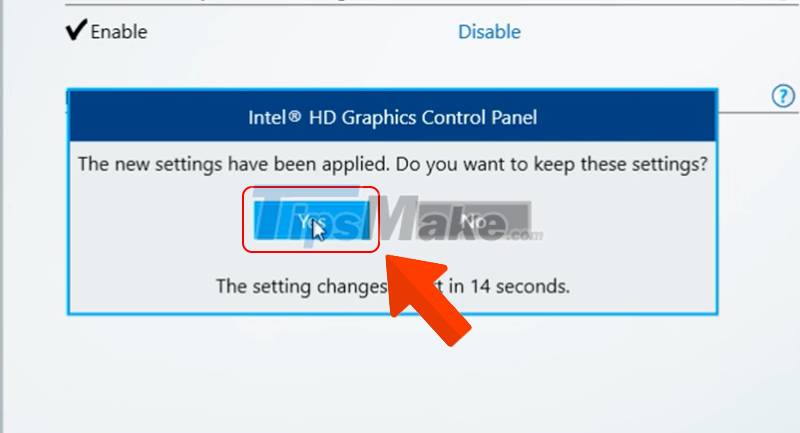
Step 4: Select Yes.
For AMD cards
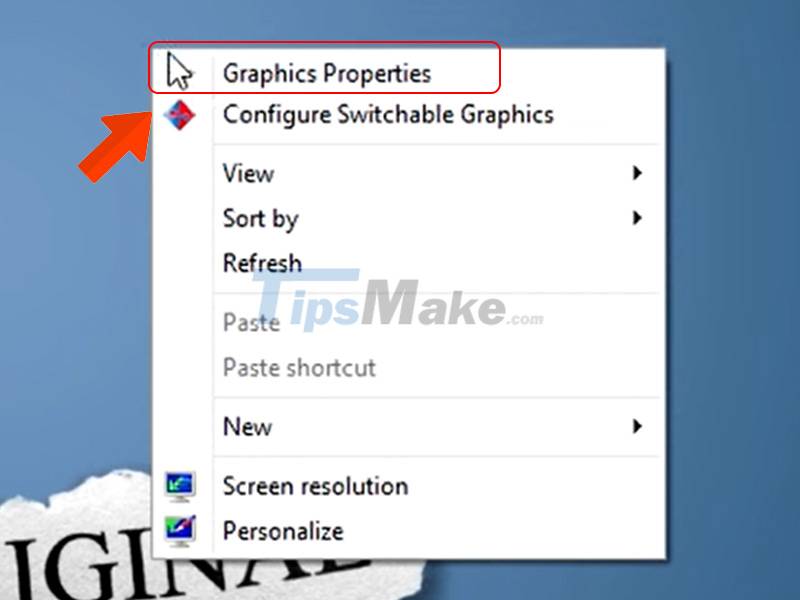
Step 1: Right-click > Select Graphics Properties.
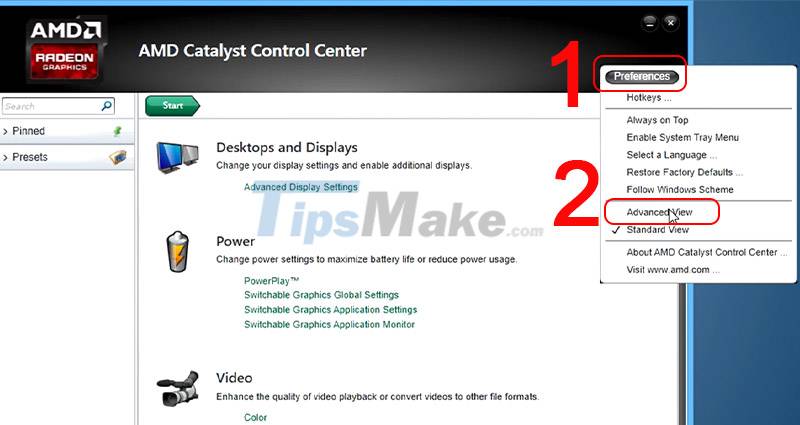
Step 2: Select Preferences > Select Advanced View.
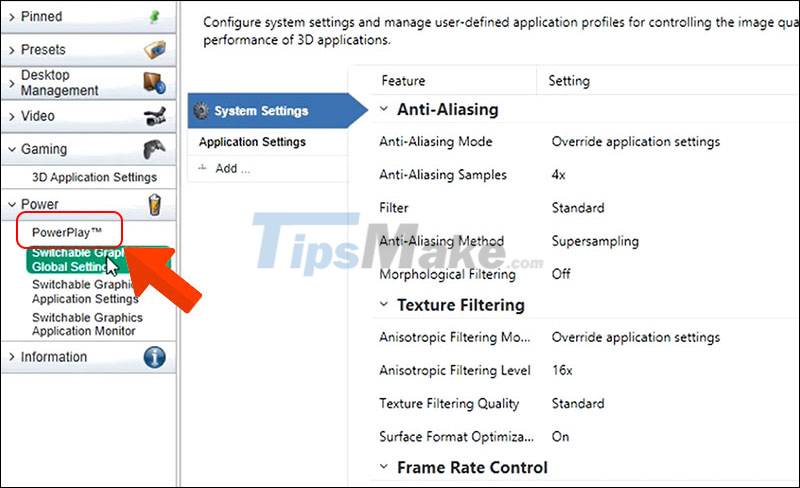
Step 3: Select PowerPlay.
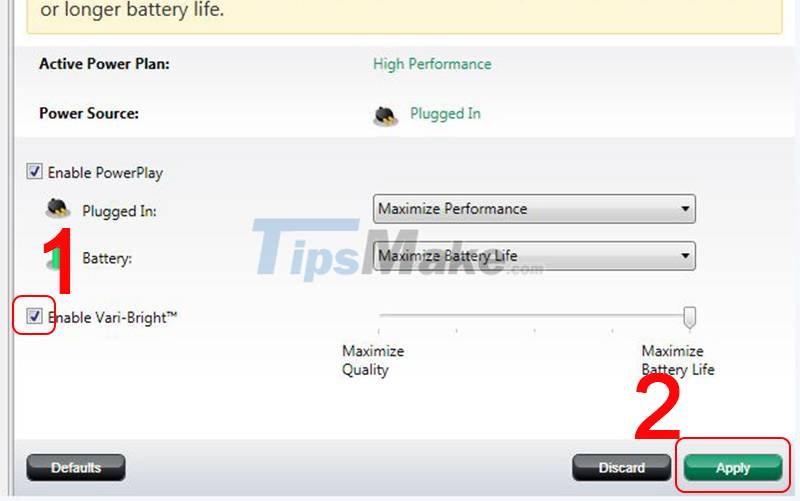
Step 4: Click to remove the tick in the Enable Vari-Bright section > Select Apply.
With just a few simple steps, you can immediately turn off the screen brightness adjustment function to save your computer's battery. Wishing you success!