Table of Contents
This guide provides a clear, practical overview of steps to reset firewall in Windows 10, with useful context, important details, and straightforward takeaways for everyday readers.
Usually, you will not need to change or change any settings for the Firewall. However, some applications and programs require us to turn off this security feature to be able to use it.
Or maybe you have previously used Firewall to set up rules for the Windows operating system, resetting the Firewall is also quite necessary.
Or there is also the case that the Firewall of the Windows operating system is in conflict with other applications during the installation of anti-virus software, or remote computer control software, etc.
Although you can modify the firewall rules to resolve these conflicts, sometimes we make changes to the Firewall that create more problems.
So, in this article, I will show you in detail some ways to Reset the Firewall on Windows to the original default settings.
#first. How to Reset Firewall from Control Panel
Resetting the firewall is simple and anyone can do it through the Control Panel.
+ Step 1. First, open Windows Search (Windows + S) => and enter the keyword control panel => then click on the result to open the control panel.
Or a way to open the Control Panel that applies to all Windows operating systems is: Open the Run dialog box (Windows + R) => enter the command control => and press Enter.
+ Step 2. In the next window, click on Network and Sharing Center. The view by you section is Large icons!

Step 3. Now click on the Windows Defender Firewall option located in the lower left corner of the window.
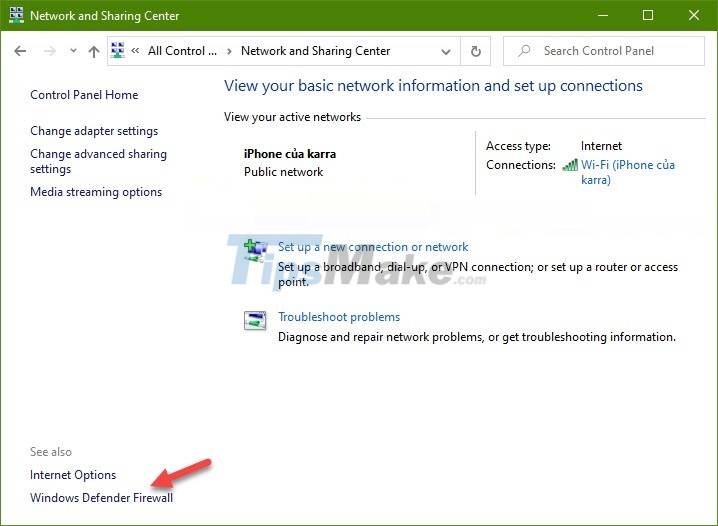
+ Step 4. Next, select Restore Defaults as shown below.
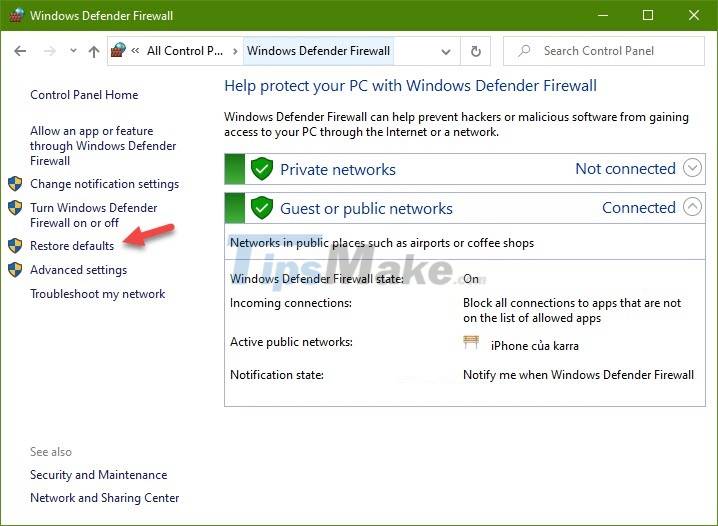
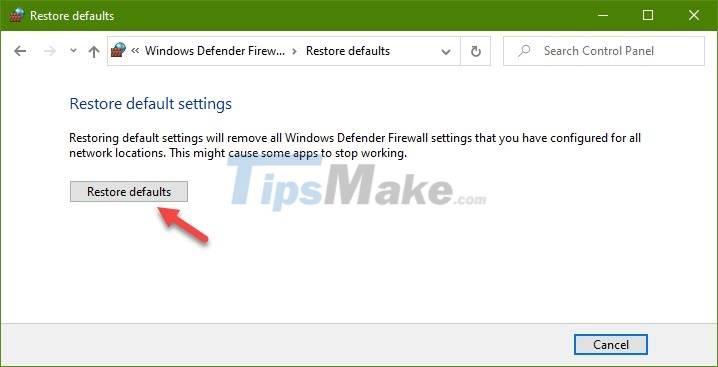
+ Step 5. In the next window, click on the option Restore defaults to reset Windows Firewall.
#2. Reset firewall to default via Windows Settings
Just like the Control Panel, the Windows Settings application on Windows 10 also allows you to Reset Firewall easily.
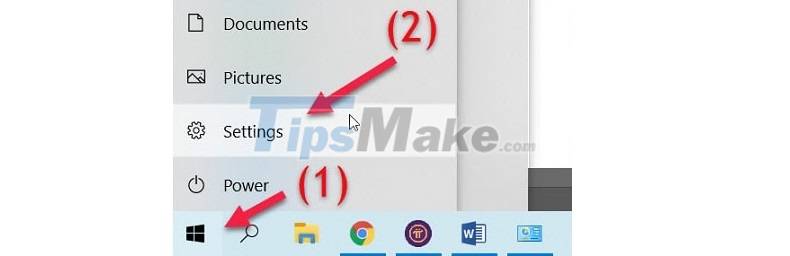
+ Step 1. First, to open Windows Settings, press the Windows + I key combination. Or you click the Start button => and select Settings.
+ Step 2. Next step, click Update & Security option => then you choose Windows Security.
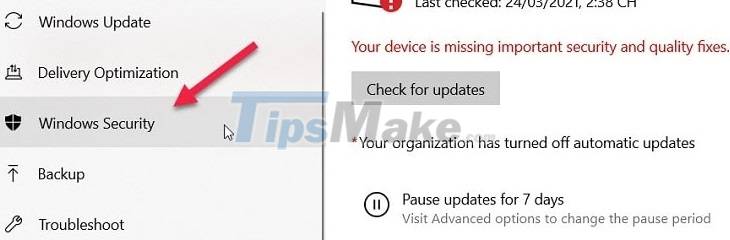
+ Step 4. Next, click on the option Firewall & Network protection.
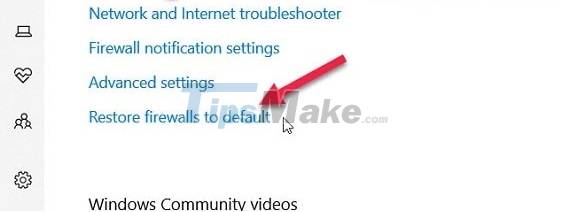
+ Step 5. Okay, now you just need to click on the option Restore firewalls to default => then click Yes to confirm.
#3. Reset the firewall with the command in Windows PowerShell
If you do not like to use the above methods, you can use the command line to do it.
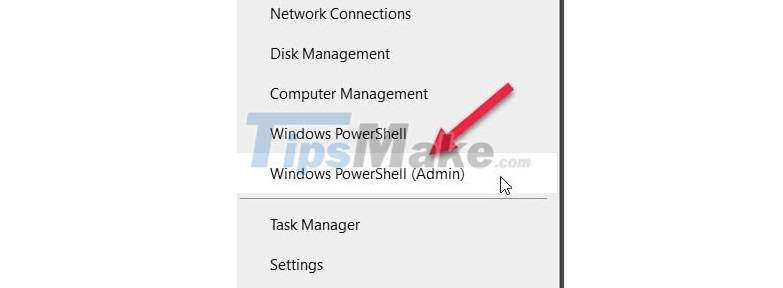
+ Step 1. Right-click on Start => then select Windows PowerShell (Admin). Or you can also use the keyboard shortcut Windows + X to quickly open this window.
Alternatively, you can also press Windows + S to open Windows Search => and search with the keyword powershell.
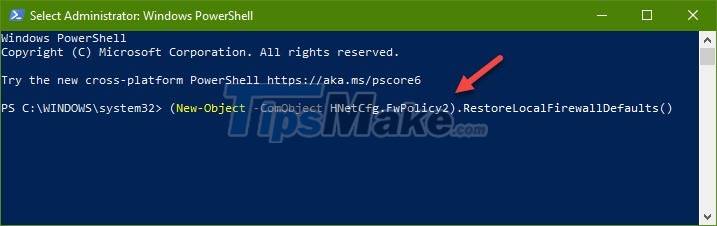
+ Step 2. In the command window just opened, enter the following command => and press Enter to finish:
(New-Object -ComObject HNetCfg.FwPolicy2).RestoreLocalFirewallDefaults()
#4. Reset Windows Firewall with Command Prompt
Like the PowerShell command line window, you can also use the command in the Command Prompt to reset the firewall settings.
+ Step 1. You open CMD with Admin rights.

+ Step 2. On the command prompt window, enter the following command => and press Enter:
netsh advfirewall reset
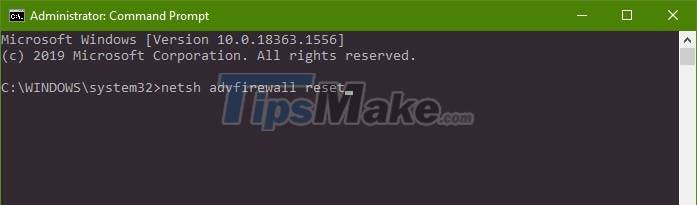
+ Step 3. Finally, you just need to restart the computer to apply the default settings of the Firewall.
#5. Epilogue
Well, above are the 4 simplest ways to reset the Firewall (firewall) of your Windows 10 computer that you can apply.
You can also apply it to other versions of Windows operating system, exactly the same. Hope this tutorial helps you. Good luck !
Key Takeaways
Use the information above as a practical reference for steps to reset firewall in Windows 10. Review each step carefully, confirm any requirements, and choose the option that best fits your situation.
FAQ
What does this guide explain about Steps to Reset Firewall in Windows 10?
It explains the main concepts, practical considerations, and useful steps related to steps to reset firewall in Windows 10 without requiring advanced knowledge.
Who can benefit from learning about Steps to Reset Firewall in Windows 10?
This information is useful for readers who want a clear overview, practical guidance, and reliable steps related to steps to reset firewall in Windows 10.
What should I check before applying this information?
Review the requirements, confirm that your device, software, or situation matches the instructions, and back up important data before making major changes.
Related Articles
 Instructions to Reset Windows Firewall Rules to the Initial3 minutes read
 What Is a Firewall? General Knowledge About Firewall15 minutes read
 Turn Off the Windows Firewall 11: Complete Guide6 minutes read
 How to Turn on and Off Windows 10 Firewall, Windows 105 minutes read
 Turn Off Windows 10 Firewall: Complete Guide6 minutes read
 Summary of Some Simple Ways to Reset Windows 1013 minutes read
Reader Comments 0
Sign in with email or Google to join the discussion.