Table of Contents
This updated guide examines How to Change Hair Color in Gimp and organizes the essential facts, background, and practical takeaways in clear American English.
Method 1of 2:
Changing Hair Color
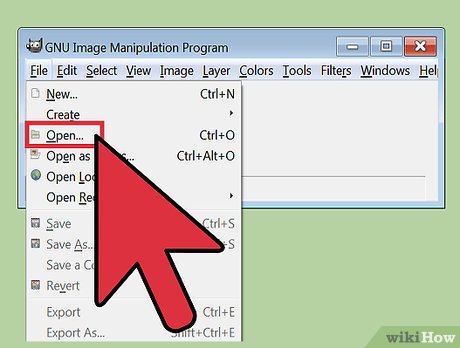 Open your image in GIMP. Choose the image you want and zoom in so that the hair fills the screen. You should have your layers box, the little window that shows what layer you're working on, open as well.
- If the layers window is not open, press the Ctrl and L keys simultaneously to bring it back.[1]XResearch source
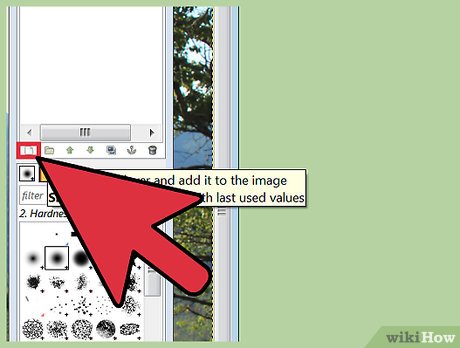 Create a new transparency layer. These layers are clear overlays that let you adjust the image without damaging or changing the original photo. Once you've made it, click and drag it in the Layers window so that it is above your picture. You can make a transparency layer in several ways:
- Click the little white paper icon in the bottom left corner of the layers window. Chose "transparency" under Layer Fill Type.
- Click on Layers → New Layer from the bar at the top of the screen. Choose "transparency" under Layer Fill Type.[2]XResearch source
 Use the Path Tool to create an outline of the hair. The path tool looks like an old fountain pen. You use it to create a detailed, point by point outline on your image. Zoom into the hair and start clicking at the top, following the curve of your hair and face until you reach the starting point. When you're done you should have only your hair outlined and encircled by the path tool. As you work with the hair, anything within this path will change color once you start coloring.
- For detailed, precise work, zoom in as close as possible to make your path perfect. If you're only doing this as a test or for fun you can be a little looser with the work.[3]XResearch source
- Don't worry about an odd strand or small, impossible to trace tufts. You can color those in later, by hand, if you need.
 Turn your path into a selection. A path is a versatile, editable line. A selection is the current area of the picture you're working on, meaning that any edits made outside the selection (in this case, your hair), won't show up. To create a selection, click "Selection" → "From Path" from the top bar.
- You can also press Shift and V simultaneously to create a selection from your path.
 Choose the color you want for your hair in the color box. Set you foreground color near where you want the picture's final color. In general, the final shot will be a merge between the color you selected and the color of the original hair, but you can adjust the exact color later to get the one you want. For now, choose a common color, like brown, and select it as your foreground color.[4]XResearch source
- The color selector is the set of two overlapping squares of color in your Toolkit. To adjust one, double-click the foremost square.
- To make crazy, vibrant changes, go to Colors → Hue-Saturation. Adjust the hue to drastically change your hair color into a clown-like shade, no matter how dark it is.[5]XResearch source
 Select the Bucket Tool, set it to "Fill Selection," and dump the color onto your hair. Right now, the picture will look like a terrible Photoshop job, with a solid block of color where your hair should be. This will soon be merged into the image below as a realistic hair coloring.
- You can also use this mode to see if you've missed anything. If you want, use a paintbrush to coat any missed hairs in your new color.
 Adjust the "Mode" and opacity of your transparency layer to change your hair color. Return to the layer's window and make sure your transparency layer is selected. Then click on the drop-down menu for "Mode" and select "Overlay." This will take the color and imprint it on the image below it, merging the colors while keeping the same shadows and highlights from the original image. You can play with other modes as well, such a Multiply (which leads to a darker hair color, overall) to find one that fits perfectly.
- Turn down the layer's opacity to bring the new color closer to the old one. This is a good, quick way to fine-tune your new coloring.
- Remember that this is only an overlay. If you deleted the transparency layer at any point you would return to your original image.[6]XResearch source
 Adjust the color and layer mode until you reach the color you want. Once you've made the layer, you can use the bucket to drop in new colors and instantly change your hair color. Play with the opacity and image mode until you get the digital dye-job you were hoping for.[7]XResearch source
- Remember to use the Hue and Saturation feature before coloring if you're having trouble with dark hair, or want a more comically bright color like pink or green.
 Use the eraser to perfect the lines between hair and skin. The biggest issue when changing hair color is the skin underneath. If the hair is thin or splayed out the skin underneath is exposed and accidentally changed colors, leading to unnatural lines and an obvious editing job. Luckily, you can use the eraser to perfect your lines. Simply set the eraser to a gentle dot with faded edges -- a soft brush. Lower the opacity to 20%, then slowly erase away a little bit of your transparent layer where the hair meets your scalp. This removes 20% of the coloring with each pass, allowing you to adjust it slowly so that it looks natural.
- You can use a paintbrush, set to the same color as your transparent layer, to do similar detail work. You can zoom in and "paint" the hair your new color by hand. You will need to deselect your selection area (Ctrl + K) to paint outside of the outline, however.[8]XResearch source
- If you're really talented you can use the brush and eraser to put in highlights, or add new colors to your haircut.[9]XResearch source
Method 2of 2:
Working with Very Dark Hair
 Lighten the original hair for greater control over the final color. Sometimes the image you have doesn't lend itself well to color changes. This commonly occurs with very dark hair, which may be so close to black it is impossible to lighten it or get new colors. A good way to fight this is to use multiple transparency layers, allowing you to get multiple effects on the same head of hair. Create a new transparency layer underneath the first one by right-clicking on the first transparency layer. Then try the following effects before moving on to your standard color-changing layer.
- Adjust Hue and Saturation for wild color schemes. Click on Hue and Saturation and adjust the Hue to turn one color into another one, like vibrant red, purple, green, etc. Saturation will adjust how vibrant the color is -- too low and the hair will get gray, two high and it will be nearly-neon. Change the hair to yellow to make it easier to adjust.
- Use Brightness and Contrast to lighten dark hair before changing the color. Brightness affects the light, contrast affects the difference between whites and blacks.
 Put as much light and color into the black hair as possible before moving on to the transparency layers. Mix and match the two colors to get good final tones-- a bright, low contrast yellow hue on black hair can be easily transformed into blond hair with the second layer. The more you can lighten the dark hair before moving on, the better.
- A yellow hue, combined with raised brightness and contrast, should give you enough room to start messing with the actual color.
 Double up your transparency layer to make your changes more prominent. This may be the easiest way to get dark hair lighter. Use the normal techniques to get the hair a little bit darker. Once you're happy with the first layer, simply copy and paste the transparency layer once or twice. If you're using "Overlay" mode, the lighter copies will "stack" on each other, making the final effect much more pronounced.[10]XResearch source
 Retain the photo's original lighting when making precise edits. The benefit of transparency is that it retains the light values of the original photo, making sure the shadows and highlights all stay the same and match the rest of the photos. When making precise edits with the eraser or brush, remember to leave the natural dark and lights spots on the hair identical. Save your tweaks to the strands on the side and the difficult, uneven lines. Don't try and darken up a shiny spot to make the hair look darker or lighten up the shadows to make the photo blonder.
- You may be tempted to invert the colors of dark hair blond (making black white and visa versa), but this will completely flip the lighting of the shot and make the hair look unnatural.
- Any change you make to the total lightness or darkness of the hair should be done to the whole head, not just certain sections.
FAQ
What is How to Change Hair Color in Gimp about?
It provides a structured overview of hair, explains the main context, and highlights practical takeaways for readers.
Why does this topic matter?
Understanding the main concepts helps readers evaluate the issue, avoid common mistakes, and make better-informed decisions.
How should readers use this information?
Use the guidance as a practical starting point, confirm details that may have changed, and follow current product, safety, or security recommendations.
Related Articles
 4 Apps That Change Hair Color in Photos on Iphone5 minutes read
 Beautiful Hair Color Palette 20203 minutes read
 Photoshop Hair Color: How to Change Hair Color in Photoshop3 minutes read
 The Most Flattering, Beautiful, and Trendy Hair Colors Of 20267 minutes read
 These Milk Tea Hair Dye Colors Are Beautiful5 minutes read
 Dyeing Brown Hair: The Most Beautiful Brown West Color 20203 minutes read
Reader Comments 0
Sign in with email or Google to join the discussion.