Overview of Windows Server 2008 Firewall with advanced security features
Thomas Shinder
Part 1: Set up firewall and IPsec connection security defaults
Windows Server 2003 already has a fairly basic firewall that protects your computer against external connections that you don't want them to connect to the server. This problem is very useful in protecting Windows Server 2003 machines, but it is quite simple and does not allow kernel control for both inbound and outbound access to Windows Server 2003 machines. , the Windows Server 2003 firewall is not tightly integrated with the installed services, so you must configure the firewall whenever you add a new server or new service.
Windows Server 2008 introduces a new firewall and has significant improvements; Windows Firewall with Advanced Security. This new firewall in Windows has many improvements and is very similar to the firewall introduced in Windows Vista. New features included in this new firewall for enhanced security include:
- Many access controls come in
- Many access controls sent
- Tight integration with Windows Server 2008 Server Manager, with automatic firewall configuration when services are installed using Server Manager.
- The configuration and IPsec policy management has been greatly improved, besides the name change. IPsec policies are now declared as Connection Security Rules .
- Check for improved firewall policies
- Check for improved IPsec policies (now called connection security rules)
- Check out the focus on combining improved Main and Quick security modes
There are many configuration options available in this new firewall, so in this article we will split into three parts, the first part is to introduce the basic configuration options for the firewall and for IPsec policies. Part two will focus on how to create inbound and outbound rules, and in part three, we will show you how to create connection security rules.
The Windows Firewall with Advanced Security console can be opened from the Administrative Tools menu . When you open this console, you will see the left pane as shown in the image below.
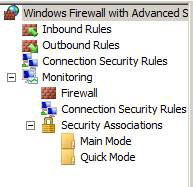
Figure 1
The center panel of the console will give you information about Domain, Private and Public profiles. Default values for each profile are:
- Windows Firewall is 'on'
- Inbound connections that are not valid with the rule will be blocked
- Outgoing connections that do not match the rule will be allowed
For those with firewall administration, the final component seems to be somewhat confusing because on network firewalls, if there is no rule that allows a connection, then the 'clean up' rule is enabled. and the connection will be locked. However, in the contents of Windows Firewall on host with Advanced Security, the outgoing connection that is not valid with the rule will be allowed, meaning that no outbound access control is set by default.
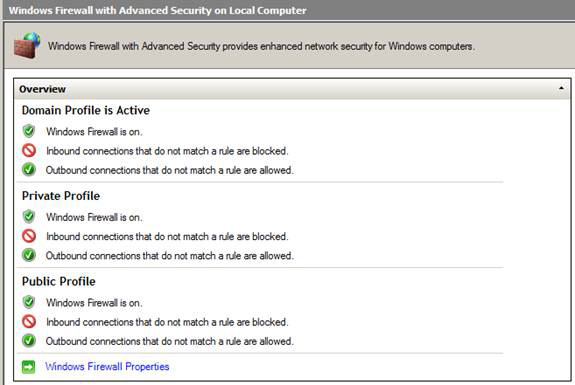
Figure 2
In the left pane of the console for Windows Firewall with Advanced Security, right-click the Windows Firewall with Advanced Security button in the upper part of the left pane of the console and click Properties . This will open the Windows Firewall with Advanced Security Properties dialog box
The Domain Profile is the first tab that appears in the Windows Firewall with Advanced Security Properties dialog box. Domain Profile applies when the computer is connected to the corporate network and can contact the domain. Since servers do not move from one network to another, only the Domain Profile can apply in the vast majority of cases. Exception when the server is not a domain member, in which case the Private Profile will apply it.
The State frame you configure is as follows:
- Firewall state . This state may be off or on. It is the default and should be so.
- Inbound connections . The default settings for locking. This means that connections without a permission rule will be blocked. There are two other options here: Allow , this option will allow all inbound connections and Block all connections , will block all outgoing connections. You should be careful with both of these changeable settings, because the Block all connections option can block all incoming connections, which makes it more difficult to manage computers from the network.
- Outbound connections. Set the default setting to Allow (default) , allowing the connection to be sent. Another option here is to block outbound connections. We recommend that you choose by default, the computer will not be able to connect to other computers. There are some exceptions such as Internet-connected devices that should only handle incoming connections and should not establish new outbound connections.
In the Settings frame you can configure settings to control some firewall behavior. Click the Customize button.
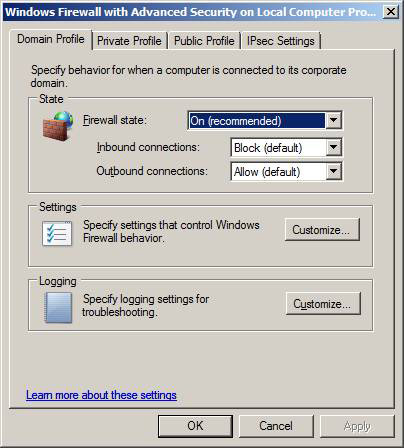
Figure 3
Then the Customize Settings dialog for the Domain Profile will appear. In the Firewall settings pane , you configure whether or not you want the message to be displayed when the incoming connection is blocked. This setting is defaulted to No and you should leave that default option selected. Because if you choose yes, there will be a lot of notifications for connections sent to the server.
In the Unicast response frame, you configure how the computer responds to multicast and broadcast network traffic. The default value is Yes (default) , which allows the server to provide unicast (single) responses to multicast (multi) requests. If you are in an environment that is not dependent on multicast or broadcast messages (you do not have multicast applications on the server and server that do not depend on broadcast-based protocols such as NetBIOS over TCP / IP), then You can adjust to No.
The last frame cannot be configured via the interface and must be configured via Group Policy. How the Merging framework shows you how clients will deal with rules comes from the internal firewall rule set and firewall rules configured through Group Policy. The default settings in Group Policy apply both internal firewall rules and internal connection security rules. As with other Group Policy settings, the priority order is determined by LSDOU.
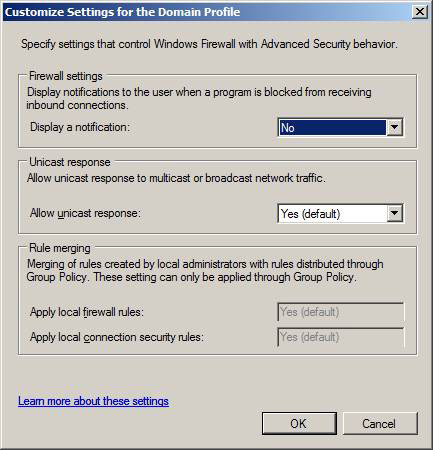
Figure 4
On the Windows Firewall with Advanced Security Properties dialog box, in the Logging pane you can configure some options for Logging for Windows Firewall. Click Customize .
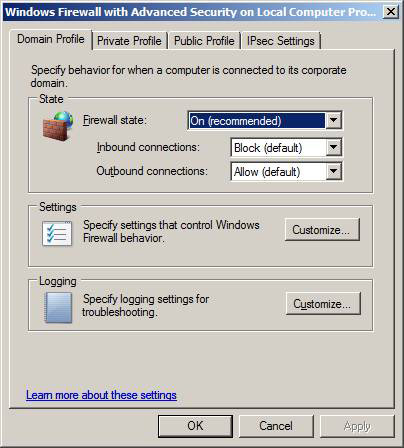
Figure 5
Then the Customize Logging Settings dialog box for the Domain Profile will appear. The name of the default log file will be pfireall.log and be saved in the default location on the internal hard disk. You can change this location if you like by typing a new path into the Name box or clicking the Browse button.
The default Size limit (KB) value for the log file size is 4 MB ( 4096 KB) . You can reduce or increase this size if you want. After the record is filled in, the old entries will be deleted and the new entry will be added.
By default, Log dropped packets and Log successful connections are set to No (default) . Note that if you configure both of these settings, there is nothing to record for the .J log file
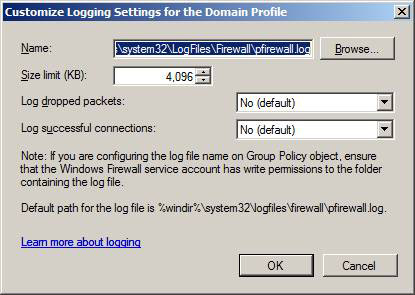
Figure 6
In the tab, you can configure the same firewall settings that you have made on the tab, but these settings will only affect when your computer is connected to a private network, this private network. cannot connect to the domain. These settings are not applied when a domain member server is a member of the domain, because it will not be deleted on and off for the network, so it is always the connected domain, otherwise it will not be real. Show all functions.
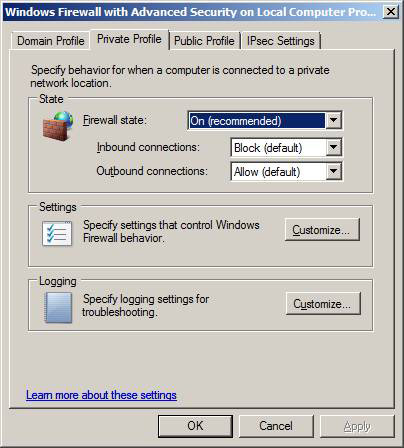
Figure 7
On the Public Profile tab, you configure the settings that apply when the computer is connected to a public network. These configurations will not apply to servers because they are used when the computer is connected to a public network.

Figure 8
In the IPsec Settings tab, there are two frames:
- IPsec defaults . There are default IPsec settings that apply when you create connection security rules (new names for IPsec policies). Note that when creating rules you will have the option to change the settings on each rule from the default settings.
- IPsec exemptions . By default, the IPsec exemptions are disabled. However, you can troubleshoot the network using Ping, tracert and other ICMP tools much easier if you change it from the default mode No (default) to Yes .
Click the Customize button in the IPsec defaults pane.
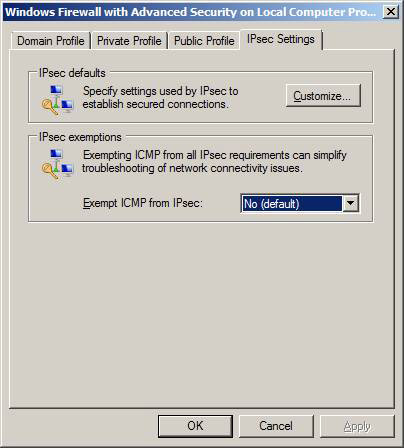
Figure 9
In the Customize IPsec Settings dialog box, you can configure the following:
- Key Exchange (Main Mode)
- Data Protection (Quick Mode)
- Authentication Method
Each of these options is configured with a set of default values that Microsoft has considered beforehand. However, they can be reset. With K ey exchange (Main Mode) and Data Protection (Quick Mode) you need to select the Advanced option . With the Authentication Method options you can choose another option or use the Advanced option to control more fine-grained authentication methods.
In the Key exchange (Main Mode) frame, click on the Advanced option, then click the Customize button.
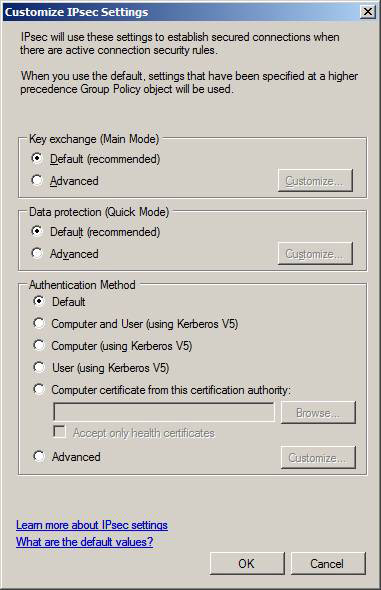
Figure 10
The Customize Advanced Key Exchange Settings dialog box will appear. The default settings are shown here. As you can see, AES-128 is the preferred method used for key exchange and if not available here it will be 3DES . Key lifetimes are also configured on this page. The key exchange algorithm is set by default to Diffie-Hellman Group 2. Group 1 is 768 bits, Group 2 is 1024 bits and Group 14 is 2048 bits.
Note that the Elliptic Curve and Group 14 algorithms will not work with earlier versions of Windows. They only work with Windows Vista and Windows Server 2008.
Click Cancel on the Customize Advanced Key Exchange Settings page .

Figure 11
We will return to the Customize IPsec Settings page . In the Data Protection pane, select the Advanced option and click Customize .
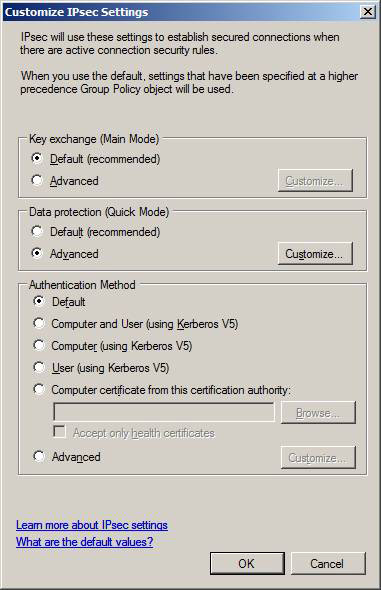
Figure 12
On the Customize Data Protection Settings page , you configure encryption and data integrity options. By default, ESP is used for data integrity and ESP with AES-128 encryption is used for data encryption. Note that AES-128 is not supported in previous versions of Windows, so configuration settings can be used with DES (3DES).
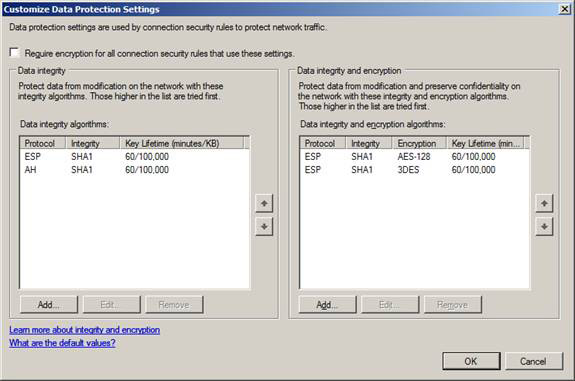
Figure 13
In any data encryption and encryption protocol, you can also click the Edit button after selecting the protocol to see the protocol settings. When you double click on the ESP integrity protocol, you will see that ESP has been selected and is the recommended protocol. The reason is that it can go through NAT devices when IPsec NAT traversal is enabled on both devices. The SHA1 hash algorithm is used by default because it is safer than MD5.

Figure 14
If you double click on the ESP encryption entry, you will see a configuration dialog for that option. Here you can see that ESP is only selected by default, because of AH's inability to traverse NAT devices. However, it should be noted that if you do not have NAT devices in the path between IPsec connected peers, you can add connection security rules by enabling AH. However, this seems like a problem. You should make a custom way to create connection rules.
The default is set to AES-128, but as you can see in the frame, there is also a setting of DES if you need to connect to previous Windows clients and servers.

Figure 15
The last option you can configure is the default Authentication Method . To see detailed information about available authentication methods, click the Advanced option and then click Customize .
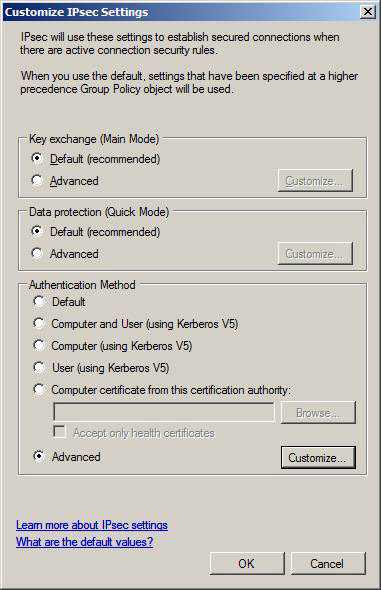
Figure 16
Here you will see the dialog box Customize Advanced Authentication Methods . You can see that the default settings are enabled only for Computer authentication (Kerberos V5) . It is referred to here as a First Authentication certificate. You can also choose to enable User Authentication for a Second Authentication certificate . You will see this when we create connection security policies, you can set up authentication for the computer, for users, or for both users and computers.
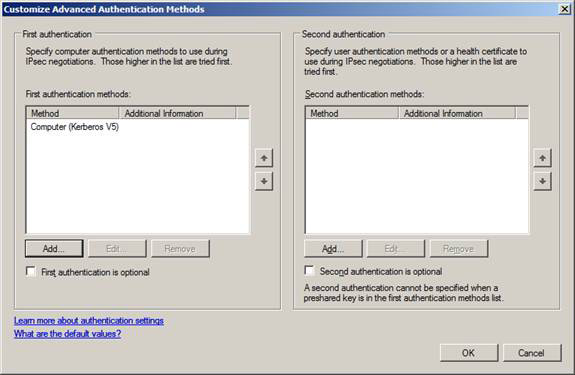
Figure 17
In this article, I have introduced some general settings that you can do with Windows Firewall with Advanced Security. We introduced the default firewall settings for Domain, Public and Private Profiles, then introduced the default settings that you can create for IPsec policies.
 Part 2: Inbound Rules and Outbound Rules