Overview of Windows Server 2008 Firewall with advanced security features - Part 2
 Part 1: Set up firewall and IPsec connection security defaults
Thomas Shinder
Part 2: Inbound Rules and Outbound Rules
In the first part of this three-part series, we introduced some global configuration settings for using a firewall. In this section, I will introduce the inbound / outbound rules so that you can control incoming and outgoing connections for computers that have Windows Server 2008 installed.
Inbound Rules and Outbound RulesTo get started, open the Windows Firewall with Advanced Security console from the Administrative Tools menu . In the left part of the console will appear two buttons, Inbound Rules and Outbound Rules. The Inbound Rules button will list the controls for incoming connections to the server. The Outbound Rules button controls the outgoing connections created by the server.

Figure 1
Click the Inbound Rules button. The rules you see here will vary depending on what server and what services are installed and enabled on the server. In the figure below, you can see that the computer is an Active Directory domain controller, and some rules are enabled to enable Active Directory operations.
By default, if there is no rule that allows inbound connections to the server, the connection will be blocked. If there is an allowable rule, this connection will be allowed if the connection characteristics match the rules in the rule. We will take a look at these properties.

Figure 2
When you click on the Outbound Rules button, you will see the rules created to allow connections to be sent from the server to other computers on the network. At this point, the default configuration for outbound connections is being set to allow all traffic, thinking there is no Deny rule. So if we still choose the default settings of Windows Firewall with Advanced Security, why do we need all Allow rules?
This is because of the way it works. In fact, when the Allow (default) setting is enabled for outbound connections, the computer will indicate the behavior for outgoing connections that do not match the firewall's outbound rule. Therefore, the reason for all rules is if you choose another behavior, the behavior is locked and if there is no allowable rule, the connection will be blocked. This is the reason for all Allow rules.
Remember that with both Inbound Rules and Outbound Rules, the nature and number of rules are determined by the services and servers installed on the computer. When you install the service using Server Manager, this utility automatically works with Windows Firewall with Advanced Security to create the most appropriate and secure firewall rules.
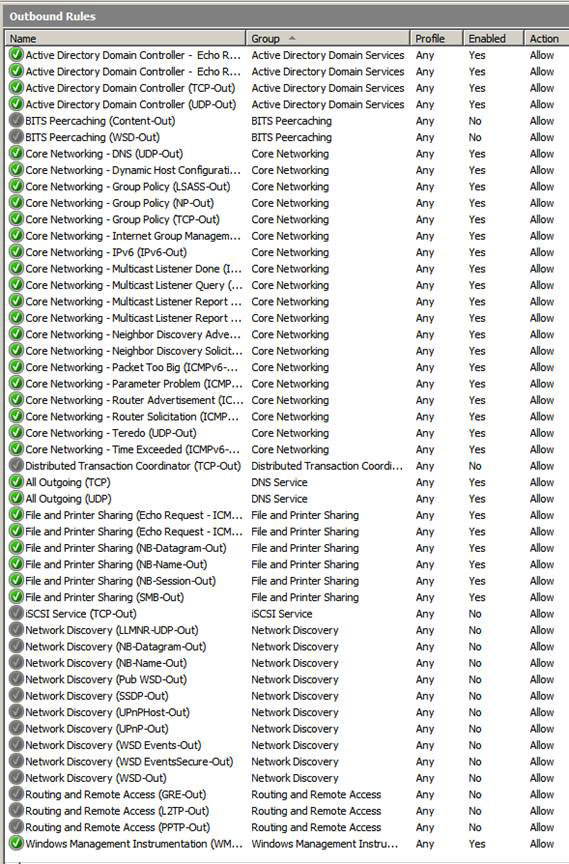
Figure 3
You can see that the rules are not numbered, it seems that there is no priority order. This is not entirely true, rules are evaluated in the following order of priority:
- The bypass rules are authenticated (ie rules that override rule blocks. Authentication takes place in IPsec).
- Block
- Allow
- Default profile behavior (allow or block the connection as configured in the Profile tab of the Windows Firewall with Advanced Security Properties dialog box , you can review part one for more details about it).
Another problem that you should keep in mind is that the more specific rules are evaluated, the more general rules that will be evaluated. For example, rules with specific IP addresses that include source or destination will be evaluated in advance compared to rules that allow any source and destination.
In the left part of the Windows Firewall with Advanced Security console, you can right-click the Inbound Rules or Outbound Rules button and see that you can perform filtering by Profile, State or Group. The included Windows firewall rules will automatically group you, which will be based on the functionality that these rules provide. You can see in the picture below, there are several groups in which you can filter.
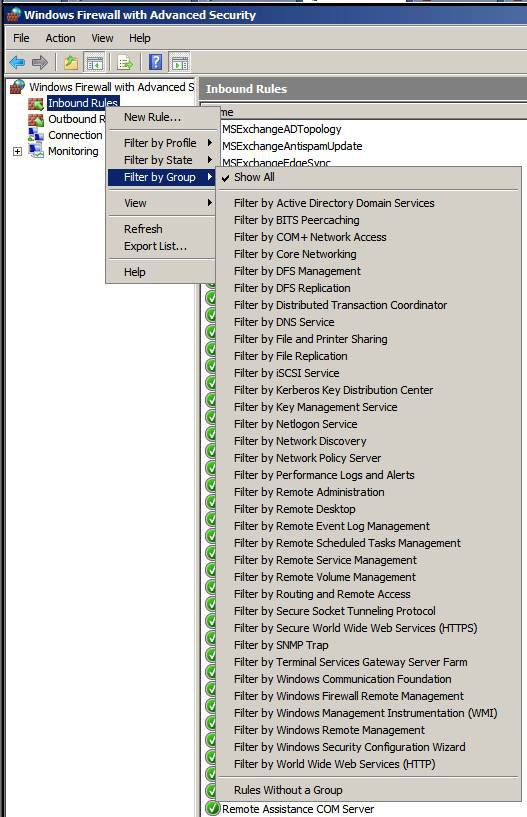
Figure 4
To see detailed information about firewall rule configuration, double click on any of the rules in the list. When you double-click, a Properties dialog box will appear for that rule. On the General tab you will see the rule's name and some descriptions of the rule as well as information about whether the rule is one of the set of rules that were predefined by Windows. With rules set in the previous section, you will see that not all components of the rule can be configured.
The rule is activated when the Enabled check box is checked
In the Actions pane, you have three options:
- Allow the connections . This option indicates that this rule is Allow rule
- Allow only secure connections . When this option is selected, only users or computers that can authenticate with the server can connect. In addition, if you select this option, you have two options to Require encryption and Override block rules . The Require encryption option requires that not only users or computers authenticate, but must also use an encrypted session with the server. If you select the other option, you can bypass other firewall rules. This allows you to create Deny rules to lock connections to all machines or users who do not authenticate with the server.
- Block the connections . This option will configure the rule to a Deny rule.
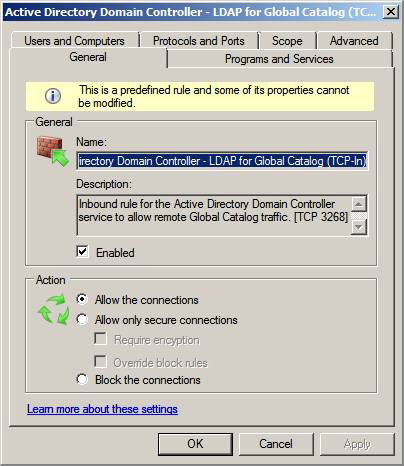
Figure 5
Click the Programs and Services tab. Firewall rules can be configured to allow or deny access to installed services and applications on the server. In the example in the figure below you will see the rule that applies to translation. lsass.exe service . lsass.exe can configure some services. In this case, you can click the Settings button in the Services pane and select the specific service configured by the executable program lsass.exe.

Figure 6
Click on the Users and Computers tab. Here you can configure the rule to apply to specific users or computers. To support the authentication of computers and users, users and computers need to be members of your Active Directory domain, and an IPsec policy is configured to support IPsec security between the two endpoints. We will look into this section after creating a firewall rule.
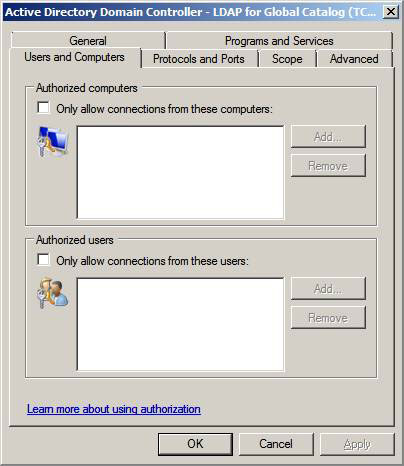
Figure 7
On the Protocols and Ports tab, select the protocols to which the rule will apply. The options here are:
- Protocol type . This is the same protocol as UDP, TCP, ICMP, GRE and many other protocols.
- Protocol number . If you need to support special protocols, you can configure the protocol number, and if you use one of the pre-built protocols , the Protocol number will be filled for you.
- Local Port. Internal port files on the server that the firewall rule uses. If the rule is inbound rules then this will be the port for the server to listen to. If the rule is an Outbound Rule, then this will be the source port for the server to use to connect to other machines.
- Remote port . This is the remote control port to use for the rule. In case the connection rule is sent, this will be the port that the server will connect to another computer. In the case of a connection rule, this is the source port of the computer you want to connect to the server.
Customize button is used to configure settings for ICMP protocol.
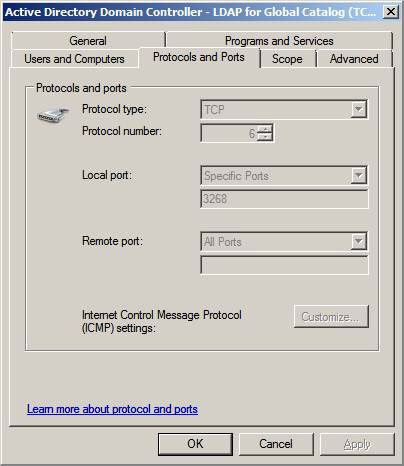
Figure 8
Click the Scope tab. Here you can set the local IP address to the IP address and the Remote IP address for the range of rules used. Local IP address is the address on the server that accepts the connection or address used as the source address to send outgoing connections. Remote IP address is the IP address of the remote server that this server is trying to connect to (in the outgoing access scenario), or the source IP address of the computer that is trying to connect to the server (in the field). Integrated access scenario scenario).

Figure 9
Click the Advanced tab. Here you can set what profile will use the rule. In the figure example below, you can see that the rule is used to provide all profiles.
In the Interface type frame, you can select the interface to apply to this rule. The figure below shows that the rule is used for all interfaces, including Local area network, remote access and wireless.
The Edge traversal option is also a good option, since it was not introduced in many documents, so we criticized what it introduced in its help file.
' Edge traversal indicates whether edge traversal is enabled (Yes) or disabled (No). When enabled, the application, service, or port that the rule uses will be able to address and access from outside the network address translation (NAT) or edge device. '
What do you think about this issue? We can create services available on NAT using port forwarding on NAT in front of the server. Does it need to do anything with IPsec? With NAT-T? . these problems you can create on your own use.

Figure 10
Create a firewall rule
You can create firewall rules to add rules that are automatically configured by Server Manager when installing servers and services. Start by clicking on the New Rule link in the right pane of the Windows Firewall with Advanced Security console. The New Inbound Rule Wizard will appear.
The first page of this utility is Rule Type . Here you can configure the rule to apply to:
- Program . Allows you to control access to and from a specific program. Note that when you try to apply firewall rules to programs and services, the program or service must be overwritten by the Winsock interface so that port requests can be communicated with the Windows firewall.
- Port . Allows you to configure a rule based on TCP or UDP port numbers.
- Predefined . Windows firewalls can be configured to use a set of predefined protocols or services and apply them to the rule.
- Custom . Allows you to fine-tune your rule outside the parameters available in other options.
Let's select the Custom option to see all the configuration options.
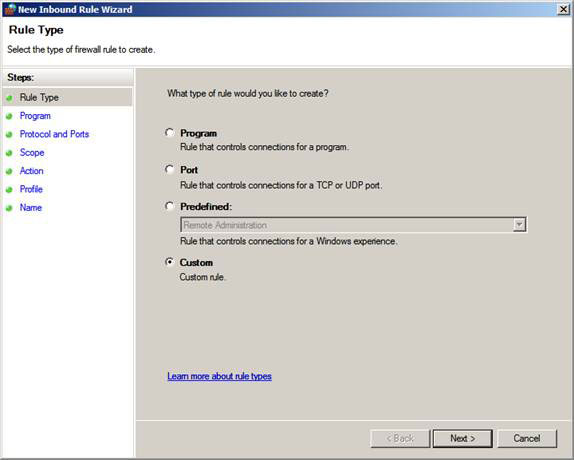
Figure 11
The second page of the gadget will have three options:
- All programs . The rule applies to all programs that match the components of the rule.
- The program path . Allows you to configure the rule to use a specific program and this program only applies to connections made to and from that program.
- Services . Some programs are like a 'container' for many programs, such as services.exe and lssas.exe that we have seen. When selecting one of these programs, you will be able to restrict the service that the rule uses by clicking the Customize button and selecting the program.
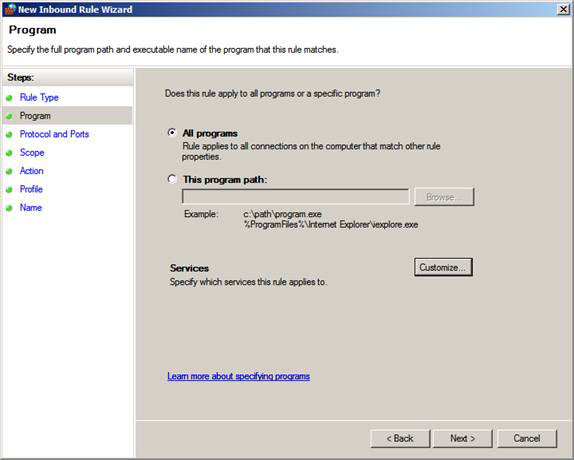
Figure 12
When you click the Customize button, you will see the Customize Service Settings dialog box. There will be some options here:
- Hãy dùng vào các chương trình và dịch vụ . Use this option when you want the rule to apply to all programs and services configured by an .exe file.
- Apply to services only . In this case, the rule applies only to the services provided by the .exe file you selected.
- Apply to this service . When you select this option, you can select the specific service configured by the .exe file.
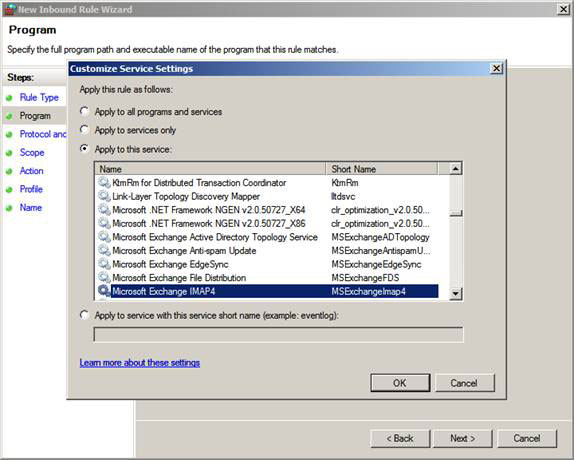
Figure 13
The next page of the utility, you can set up what protocol you want to apply to. Note that when you select a program, you will not have to configure the protocol because the Windows firewall will obtain protocol information from the Winsock interface. However, if you do not select a program, you need to configure the protocol that the firewall rule will apply.
The options here are:
- Protocol type . Here you can set the protocol type to apply to this rule. In the picture below you can see the Windows firewall supports many types of protocols.
- Protocol number . To control advanced protocols like IPsec, you should choose this number of options.
- Local Port. This is the port on the server on which the rule is used. The internal port is the port that the other computer is connecting to in the inbound scenario and is the source port for an outgoing connection in the outbound connection scenario.
- Remote port . This is the port on another computer. The remote port will be the port that the server wants to connect to in the sending scenario and is the source port for the computer that wants to connect to the server in the inbound scenario.
- Internet Control Message Protocol (ICMP) settings . If you configure ICMP protocols, you can set the type and code here.
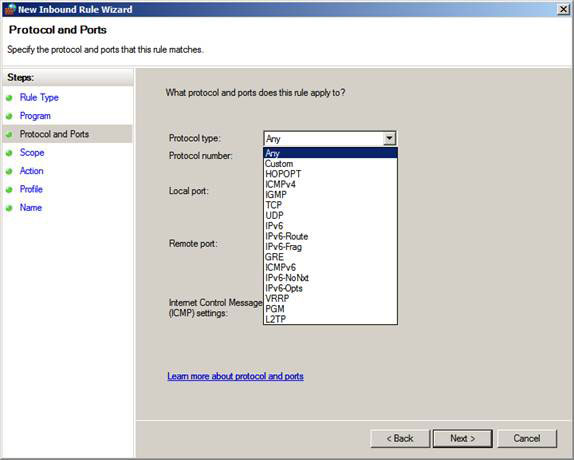
Figure 14
In the picture below you can see that we have created a protocol to control IMAP4. We chose TCP as the protocol type and the number of protocols entered is completely automatic. The internal port that IMAP4 clients connect to is 143. The remote port is set to All Ports because IMAP4 servers are not interested in what the source port of the connecting client is.
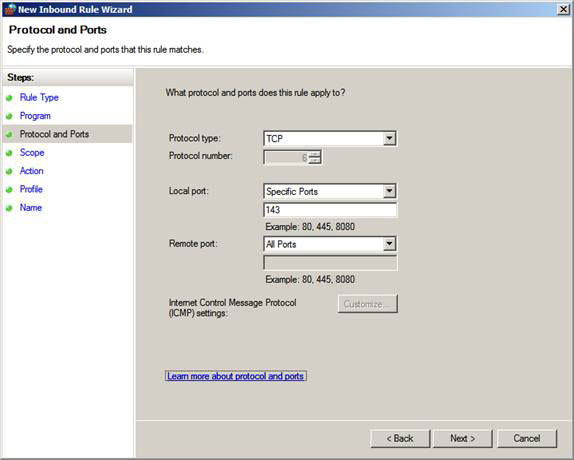
Figure 15
On the Scope page, you can set the local and remote IP addresses to apply the rule. You can choose IP address or These IP addresses . This option allows you to get some control over control, control on which computers connect to the server and which computers the server is not connected to when configuring in accordance with the elements of rule.
You also have the option to apply this scope to a specific interface, as shown in the image below. The Customize Interface Types dialog box can be viewed when clicking the Customize button .
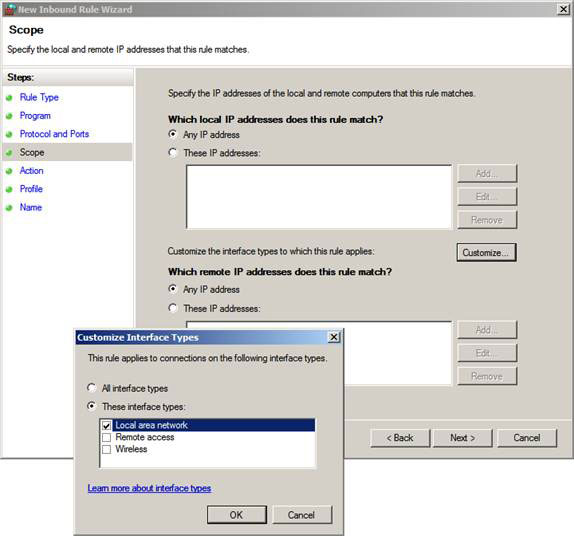
Figure 16
In the Action page, you can choose what happens when the connection matches the rule elements. The options here are:
- Allow the connection . Create Allow rule
- Allow kết nối với nó là bảo vệ . Allow connection if there is an IPsec policy that allows two endpoint points to establish a secure connection. You have the option to encrypt sessions between endpoints by checking the Require the connections to be encrypted checkbox . If you want this rule to override another rule to lock the connection, select the Override block rules option
- Block the connection . Create Deny rule.
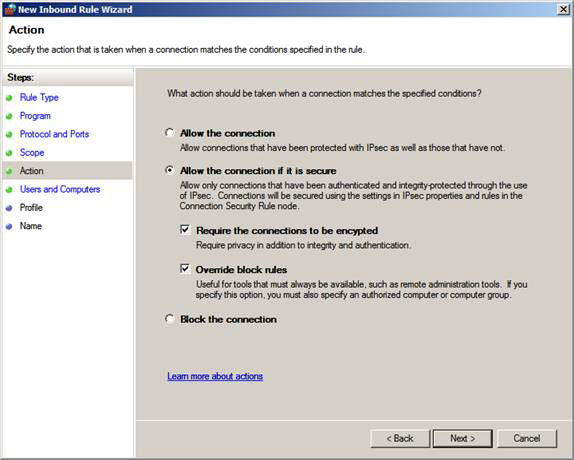
Figure 17
On the Users and Computers page, you can choose which users or computers can connect. To work, both endpoints need to be members of the same Active Directory domain and the IPsec policy must be appropriate to create IPsec connections between the two endpoints. Windows Firewall with Advanced Security tends to IPsec policies as Connection Security Rules . Therefore, I will discuss Connection Security Rules in the next part of this series.
Check the Only allow connections from these computers check box if you want to allow connections only from specific computers. Also, leave Only allow connections from these users if you want to restrict access to some users or groups of users.
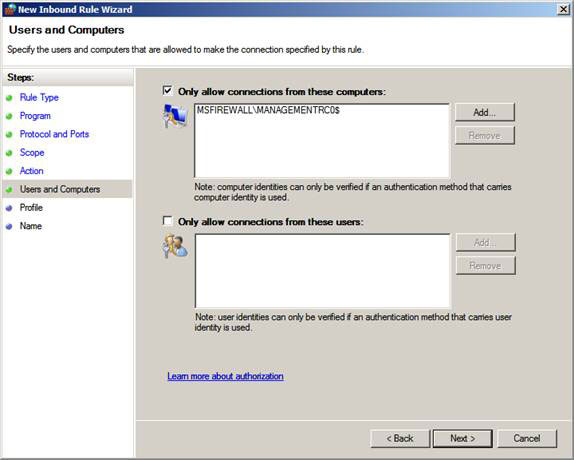
Figure 18
On the Profile page, you can set the profile to which you want the rule to apply. In most cases, only the domain profile will be applied to the server, so other profiles will not be activated. However, there is absolutely no problem with activating all of them.
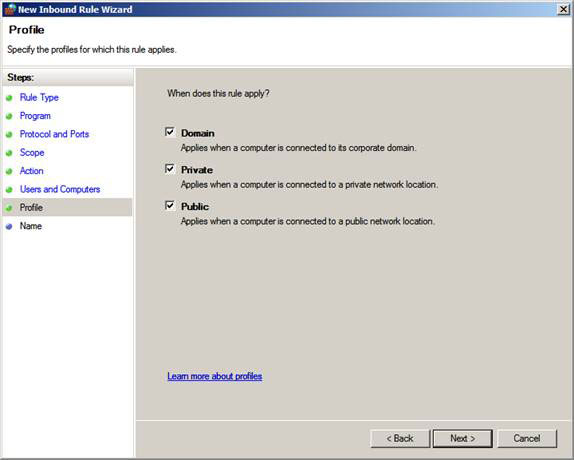
Figure 19
In the last page of the utility, you need to name the rule. Click Finish to create a rule.
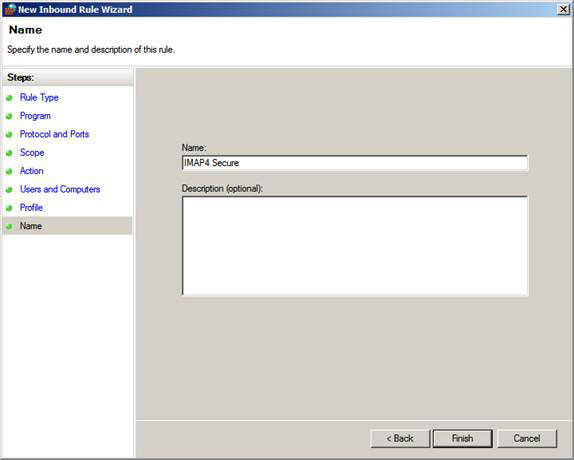
Figure 20
That is all the work to be done. The Monitoring button checks the firewall rules, but it doesn't really give you much information except what rule is enabled. There is also no information regarding which rule might be activated at some point, perhaps this will be an interesting feature that the Windows development team needs to consider in the future.
Conclude
In the second part of this article series, I have shown you some detailed information about Inbound Rules and Outbound Rules, along with how to create new rules. In the next section we will talk about Connection Security Rules and see how they work, what requirements are needed for it and how to set up and test connections.