Networking Ubuntu 8.04 and Windows
Network Administration - Have you ever been unable to share Ubuntu computers from My Network Places or Network in Windows? You should know that this is not a "hide and seek" game, but you will win unless you know how to use the features that exist on your computer.
Although Ubuntu can see files and printers shared on Windows computers, Windows cannot see the shared components on the Ubuntu side by default. However, you should not give up Ubuntu and buy another XP or Vista subscription; instead you can easily shake hands between Ubuntu 8.04 and Windows without spending a lot of time.
In principle, computers that want to communicate with each other must have the appropriate resource sharing protocols installed. You can imagine two people talking to each other in different languages; then no one can convey their ideas until they speak the same language they both understand. This principle also applies to communication between two computers in a network.
By default, Ubuntu does not have a protocol installed that makes it possible to share resources. Therefore, the first step we need to do is to install a protocol to allow you to share files and printers. You have two protocols that can be used with Ubuntu: NFS (Network File System) developed by Sun Microsystems for Linux / Unix, and SMB (Server Message Block) is used primarily in Windows.
Windows uses SMB by default, so installing the SMB protocol on an Ubuntu computer will make the Ubuntu computer able to communicate with it and Windows. In the open source world, Samba packages can allow your Linux computer to have SMB capabilities. Follow the steps described below to install the Samba package in Ubuntu.
Install the Samba Package for Ubuntu
Click System | Administration | Synaptic Package Manager .
At the command prompt, enter your password and click OK .
In the Synaptic Package Manager window, click the Search button, type samba in the Search field, and click the Search button .
Wait for a search to complete and the results appear
Find and right-click samba, select Mark for Installation as you see in Figure 1.
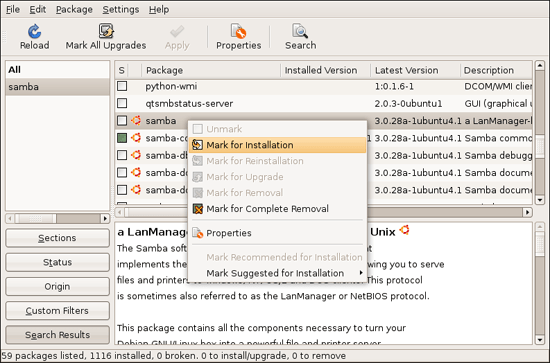
Figure 1
If you can't find the samba, you can refer to the next steps and then come back here.
Click the Apply button on the Synaptic Package Manager toolbar, then review the changes on the Summary dialog box and click Apply .
On the dialog Changes Applied box, click Close .
You can now close Synaptic Package Manager.
If you do not see the samba package, you may have accidentally modified the search scope in the Main repository of Ubuntu's supported software. If this is the case, you can follow some steps below to activate the Main repository :
Click Settings | Repositories from the Synaptic Package Manager window.
Select the Canonical-Supported Open Source Software (Main) checkbox and click the Close button.
If prompted with the Repositories Changed dialog box, click the Close button .
On the Synaptic Package Manager toolbar, click the Reload button and proceed with the steps described above.
Create an SMB password in Ubuntu
By default, Samba will ask you to configure a password to use when accessing shared folders from other computers. (At the end of this article we will introduce you to advanced sharing configurations, such as guest sharing).
The steps to create a username for Samba only take one line of code in Terminal:
Click Applications | Accessories | Terminal .
Type the sudo smbpasswd -a username and press the Enter key.
Replace the username above with the username or username of your Ubuntu account, what you can see in the example shown in Figure 2.
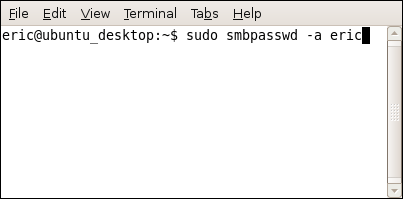
Figure 2
If the Terminal reappears and reports sudo: unable to resolve the host , then you need to do some steps below before continuing.
Type in your Ubuntu account password and press Enter .
Type a password for the SMB account and press the Enter key.
Re-type the password and press the Enter key.
If you get an error that cannot resolve the host after executing the smbpasswd command, it is probably because you changed the settings and assigned a Domain Name in the General tab of Network Settings. You can switch back to the old domain name by editing a host file. Here's how to fix that problem:
Click Applications | Accessories | Terminal .
Type sudo gedit / etc / hosts and press the Enter key.
Type in Ubuntu's account password and press Enter .
The text editor will appear with an open host file.
Delete your domain name and computer name, as shown in Figure 3.

Figure 3
Click the Save button on the editor toolbar, close the window and proceed with the steps described earlier.
Allow Ubuntu users to share
Because shared folders on a network are usually valuable files, they need to be protected to prevent unauthorized people from accessing them. Ubuntu developers have realized this and only allow Administrator accounts to share directories and files on the network by default, on the user side classified into Desktop User or Unprivileged . However, if you have a non-Administrator account, if you want to share, give this account sharing privileges, which is easy in the Users and Groups window:
Click System | Administration | Users and Groups .
In the User Settings window, click the Unlock button and select the Administrator account, enter the account password and click the Authenticate button .
In the User Settings window, select the user you want to grant sharing privileges to, then click the Properties button.
Select the User Privileges tab and select the Share files with the local network check box .
Click the OK button to use the changes and close the window.
In order for your changes to take effect, restart the computer.
Change Workgroup for Ubuntu
When browsing through computers on your network, such as from My Network Places in Windows XP or Vista or Ubuntu Network window, you will see computers divided into groups. These groups can be Workgroup (used for small networks) or Domain (used for larger networks) and exist to help control which users can access the network.
If you've worked with small networks, you've probably used a Workgroup (rather than a Domain) and every computer on the network is set up for the same Workgroup. The default Workgroup value after installing Samba software on Ubuntu is WORKGROUP . This may be the same as in Windows computers; however, you should check and follow these steps if necessary to change something on the Ubuntu computer:
Click System | Administration | Shared Folders .
If you don't see the shortcut of Shared Folders, click Applications | Accessories | Terminal , type shares-admin and press Enter .
In the Shared Folders window, click the Unlock button, enter your account password and click the Authenticate button.
Select the General Properties tab .
Type your desired value in the Domain / Workgroup field .
Click the Close button.
In order for the changes to take effect, restart your computer.
Another way you can change the value of Domain / Workgroup is to edit the smb.conf file, here's how:
Click Applications | Accessories | Terminal .
Type sudo gedit /etc/samba/smb.conf and press the Enter key.
Type in your Ubuntu account password and press the Enter key.
The text editor will display the open smb file.
Change the value that appears after workgroup = , see Figure 4.

Figure 4
Click the Save button in the editor toolbar and close the window.
In order for your changes to take effect, restart the computer.
Change the computer name in Ubuntu
After browsing and selecting a Workgroup from your computer's web browser, you will see icons for each computer on the network and in Workgroup, which are correctly configured computers for sharing. These icons are labeled with the name of the computer. You can also use a computer name when manually accessing computers with a UNC path; For example, type // computername into the web browser.
The value of the computer name for the Ubuntu computer is a username of the account and from the desktop . However, you can change it to something you like, or fit the conference you use to make it easier for you or other users to differentiate between computers on the network. If you wish, you can follow the steps below to change the computer name in Ubuntu:
Click System | Administration | Network .
In the Network Settings window, click the Unlock button, enter the password of the account and click the Authenticate button .
Select the General tab on the Network Settings window.
Change the value for the Host Name field.
On the dialog box that appears, click Change Host Name .
For the changes to take effect, restart your computer.
Network icon
Ubuntu has a network icon on the main toolbar, as you can see in Figure 5. When connecting to a wireless network, the icon will be used as a signal strength indicator. The logo itself also shows you the signal level with 4 bars and mouse over the icon you will see the SSID (or network name) and the signal strength as a percentage.
Right clicking on the network icon will allow you to disable or enable all networks or wireless networks only. From the drop-down menu, you can access a shortcut to access the Connection Information window, which shows you the details of the network connection, such as speed and IP address. and MAC address. In addition, this menu also provides a shortcut to the wireless network manager, where you can edit the encryption keys used for secure networks.
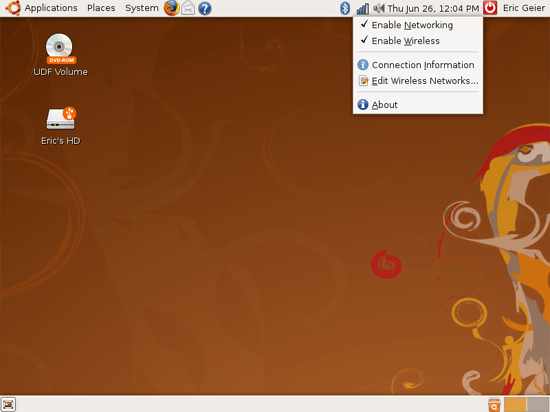
Figure 5
Clicking the left mouse button on the network icon will bring up another drop-down menu as you see in Figure 6. You will see a list of available wireless networks in your area, along with their signal strength. Networks protected by encryption will have a symbol on the left side of the signal strength. The radio button of the network you are currently connected to will be marked. To connect to a network, simply click on the network you want.
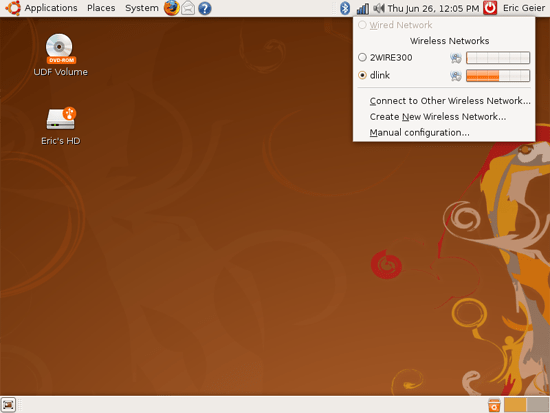
Figure 6
The menu also provides three shortcuts: Connect to Other Wireless Network so you can connect to hidden networks or networks that are not broadcast, Create New Wireless Network to create an ad-hoc network, or peer-to-peer network, Manual Configuration will guide you to the Network Settings window, where you can set a (static) IP address to connect to the network and set up Workgroup or Domain and Computer (Host) Name.
Connection information
In the introduction above, you can see the details of your network connection by opening the Connection Information window. Right-click the network icon and click Connection Information . You should see results similar to those shown in Figure 7, similar to the Network Connection Status window of Windows XP that you can access by double-clicking on the network icon.
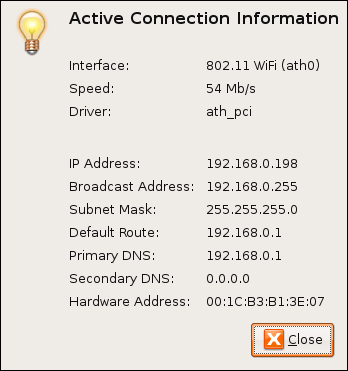
The theoretical speed is Mbps, or GBps when you connect to the network. If you have the latest and most advanced wireless devices, 802.11n products, this value will be over 54 Mbps, and 802.11g devices only give speeds below 54 Mbps. However, when you use older 802.11b products, the speed may only reach 11 Mbps.
The IP Address ( IP Address ) field is the address of the computer or private network adapter you are using. All devices and computers on your network have their unique IP address. This address will help them distinguish them from other addresses in the network and can be used to manually access shared resources.
Subnet Mask is part of what defines the subnet or part of the IP address range you are using. You will only need to reference this value if you set a static IP address for your computer. The default route value ( Default Route ) is the router's IP address that you can use to access its web configuration utility.
The last information you should consider about the Connection Information window is the Hardware Address . In most utilities and other documents, you will see this value mentioned as MAC ( Media Access Control ) or physical address. You can compare it to the serial number of a product. Each network product has its own MAC address and is used to distinguish between products. You only need to care about this value when setting up the MAC address filtering system on your router, to better protect the wireless network with the aim of avoiding intruders inside the range.
Network window and network settings
Along with the ability to access the Network Settings window by clicking the network icon and selecting Manual Configuration, you can click System | Administration | Network . When the window appears (see Figure 8), to make changes, click the Unlock button , enter your account password and click the Authenticate button.
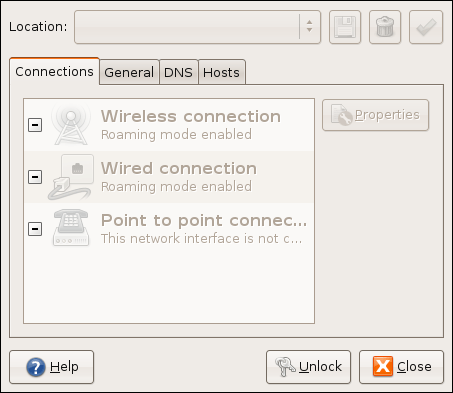
On the Connections tab, you can double-click a static connection configuration type. On the General tab, you can change Host (or Computer) Name; however, you can configure Domain Name (or Workgroup) differently (as mentioned above). DNS and Hosts tabs contain advanced settings that you may not need at this time.
To conclude a tour of Ubuntu's networking menus, windows, settings and Network window views, as shown in Figure 9. Here you can browse through computers and files on the network. mine. You can access this window by clicking Places and selecting Network , or by clicking the Network Servers icon when in the File Browser window.

To view files in Windows computers, you first need to double-click the Windows Network icon. Then double-click on the Workgroup that you want to assign your computer to. Double click on the name you want to access, be distinguished by their computer name. Finally, you can browse the shared folders of computers.
Share files in Ubuntu
In the previous section we have configured Ubuntu to share with Windows and set the Computer Name and Workgroup values. Next is an introduction to some details in Ubuntu's network connection. Below we show how to share files on Ubuntu computers.
When setting up Windows sharing in Ubuntu, you can start sharing the folder. This process is quite similar to what you felt in Windows XP. To share files, you need to share a folder. All files and subdirectories within the shared folder will be available to other computers on the network. You or others on the network can manipulate shared files (for example, read-only or editable) from other computers based on the settings you choose when sharing folders.
Once you have selected the folder to share, follow these steps in Ubuntu 8.04:
- Right-click the folder you want to share and click Sharing Options .
You can also access the preferred shares of folders from their Properties window; Right-click the folder, click Properties , and select the Share tab. - In the Folder Sharing dialog box that appears, check the Share this folder checkbox .
- Type the shared name in the Share Name field.
This name is customizable, but it is easy for you and other users to differentiate the directory when working with other Ubuntu shared folders in the Network or My Network Places window on another computer. This shared name may differ from the actual names of the directories. - If you want people to be able to edit, add or delete files in certain folders, select the Allow other people checkbox to write in this folder . The computer will ask the user to enter the username and password that was created during the SMB installation.
- If you want people to have access to the folder without the SMB username and password, select the Guest access check box.
- Click the Modify Share button to apply the changes and close the window.
Once you're done, you can see this folder when browsing Network or My Network Places in Windows.
Summary of common sharing privileges
The sharing privileges introduced above can be a bit confusing, so we want to summarize some of the different sharing scenarios we have shown how to apply through dialogs. How is Folder Sharing:
- Users have read-only access, no editing: When you share a folder, as discussed above, you may not touch the terms by not checking the two checkboxes. If so, anyone on the network who has an SMB password can access the directory but cannot change anything in it. Only users who have shared that folder have full access.
- Users have read / write access: Select the second checkbox on the Folder Sharing dialog box, then you will allow users to get the file editing privileges in the folder.
- Guests receive read access: The third checkbox in the Folder Sharing dialog box allows you to provide guest access (without editing rights) to users without a SMB password. Selecting both options will allow people, even those without accounts, to have the privilege to change files in the directory.
- Everyone (including guests) has read / write access: This is done when you mark both the second and third checkboxes in Folder Sharing. This option is not recommended for wireless networks unless you have a highly secure network, for example if you are using WPA encryption.
Set up advanced sharing terms
You can edit the advanced permissions by right-clicking on the folder you share and selecting Properties , then clicking the Permissions tab. You will see the same options as you see in Figure 2. From here you can configure a separate access type for the owner, the group, and the rest. Selecting None or List Only Files will not provide any directory access for any group, selecting Access Files will provide read-only capability, and Create and Delete Files will provide full access.
Learning about script settings for Group and Others can give you some very useful sharing privilege scenarios:
- Không có truy cập có, except cho người chủ thư mục: This option is the best way to share folders without you interfering with others; Only you can view and edit them. This option is done by selecting None for the Folder Access in the Others and Group categories.
- General users have no access; accounts belongs to a certain group have read / write access: This scenario is a way to share only folders for certain users. For example, you can create a Parents or Management group to be able to share files only between you and your spouse or you and others in your management group, your family or other employees without know. To perform this scenario you must select None for the Folder Access of Others and select Create and Delete Files for Group 's Folder Access . You will then select the Group you want to apply this clause to. If you have not set up a Group, please refer to the above sections before executing this scenario.
- General users have read-only access; accounts belonging to a certain group have read / write access: You can perform this scenario by selecting Others' Access Files for the Folder Access and selecting Create and Delete Files for the Group 's Folder Access . As with the previous option regarding Groups, you first need to create and assign groups for your Ubuntu accounts, then you can select the Group you want to apply this clause to.
Create and assign groups to your account
If you want to use a shared permissions script related to the Group, as discussed in the above two sections, you must create the Group first. You can then assign accounts to these groups, then set up unique sharing privileges for some of the selected accounts. Creating Groups is a very simple task; You just need to follow the steps below:
- Click System | Administration | Users and Groups .
- In the User Settings window, click the Unlock button, select an Administrator account, enter the account password and click the Authenticate button.
- In the User Settings window, click the Manage Groups button.
- Click the Add Group button (see Figure 3) and in the New Group dialog box, enter the group name and select the accounts you want to be in that group, then click OK .
You can now use Group when setting permissions for your shared folder.