Use Gbridge to create a friendly and free VPN
In this article, I will show you how to use a Gbridge software to create a VPN.
Network administration - Virtual private networks (VPNs) are often used by many organizations to connect remote networks and secure access and networks when away from the office. In this article, I will show you how to use a Gbridge software to create a VPN.
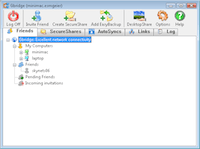 Figure 1 You can install Gbridge software (see Figure 1) on all computers to remotely access your desktop, files and sync or backup folders. All of this data is transmitted in an encrypted virtual network, so they are securely protected when connecting from computers to wireless access points. In addition, you can invite your friends to the Gbridge network, giving them some level of access to your data files and computers.
Here are some features and functions provided by Gbridge:
- Access files shared by Gbridge on your computers or other users (friends) inside a browser.
- When viewing photos remotely, it will automatically create thumbnails and sideshow.
- Allows you instant access to video and media files.
- Access the Windows shared drive or folder between your computers.
- Use the remote desktop on an encrypted connection to another user's computer.
- Use AutoSync to synchronize folders between your computers and other users.
- Use EasyBackup to automatically backup folders to another computer.
Learn about accounts and Hostname
To use the Gbridge service, you need to sign in with your Gmail account. If you haven't set up an account yet, create an account on Google's Gmail page.
When logging in to your Gmail account, you will find that you must enter a Hostname. The hostname is the name to distinguish between computers and is displayed in Gbridge on your computer and other users. For example, your home computer can name HomeDesktop , but the office computer can use WorkDesktop name, and with a laptop you can use Laptop .
Initial installation and configuration
 Figure 2 First, install Gbridge on all computers. While you install it on computers, you should configure the settings. The default settings will lock most features, so you need to know what you will share.
If your network or Router supports UPNP, the default port configuration will work fine. However, if it does not support UPNP, you must change the settings (click Options> Advanced Options ) and configure your Router to forward the port defined to the computer that has installed Gbridge. If there are multiple computers loaded with Gbridge on the same network, you can configure them on the private port and forward port in the Router.
In addition, you must specify the type of traffic that Gbridge opens to share. Click the Options button and select Advanced Options . On the dialog box shown in Figure 2, you will see the firewall settings. Now you should open all traffic for other computers. If you do not select anything, your computer will show up on other computers when you connect, but nothing is shared and it cannot be accessed remotely.
Tip: In the Advanced Options dialog box, you will see a place where you can list your trusted users (friends). This allows them to gain access to your computer. So use it for your most trusted friends. This is a great way to allow them to access your desktop via Windows instead of VNC and access your shared folders in Windows.
Next, review the remote desktop settings. To use Microsoft Remote Desktop, you still need Windows XP Professional, or Vista Business or Ultimate. Any version of Windows can connect to a computer via Windows Remote Desktop, but to host a remote desktop connection, your operating system needs to fall into one of these two operating systems. In addition, Gbridge only supports Microsoft's remote access protocol between your computers. However, Gbridge also supports VNC desktop connections remotely between your computers and others. Plus, you can host and connect on any operating system or version.
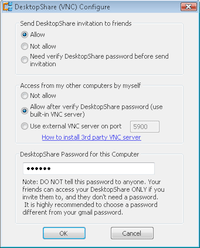 Figure 3 Allowing Microsoft Remote Desktop support in Gbridge is quite simple. Click DesktopShare and select Configure Microsoft Windows Remote Desktop . Then check the checkbox on the dialog box that appears and click OK .
To set up VNC, click DesktopShare and select Configure Gbridge DesktopShare (VNC). As you can see in Figure 3, the options here are very simple. Once you've done this step, click OK . You should then run a test to make sure that the VNC server is working. Under the DesktopShare button, click Test Gbridge DesktopShare on Computer.
Do not forget other settings under Options for network bandwidth and chat settings. Now that we have configured the general settings, we will go through some features later.
Page 2 : Use Gbridge to share and access files
Use Gbridge to share and access files
Most features are very simple and easy to understand. When your computers are configured and online with the Gbridge service, or you have added or invited friends, the list of My Computers and Friends will have icons. To see what you can do with a computer, right-click its icon as shown in Figure 4.
Sharing files through the SecureShares feature will allow other computers to access certain files or entire folders. Keep in mind that if read-access is only allowed, you or your friends will not be able to change or add files to the remote computer via the SecureShares web interface. To be able to read and write to your own computers, use Windows' shared folders and right-click the icon, then select Explore Windows Share Folders . Then, if prompted for a username and password, enter the criteria of an administrator. This is because Windows sharing and NTFS file permissions will still apply, just like you do on your local network.
 Figure 4 If you want to allow your friends to edit files or add files to SecureShares, you can use the AutoSync feature. First share a folder through the SecureShare feature. Your friend can then AutoSync your SecureShare to synchronize files (and any updates) to their computer automatically. Note that this feature works one way, so if you want to make a change or add files from your friend, they must share the folder they are using for AutoSync. You can then AutoSync their destination directory. So both computers will be updated each other's files automatically.
If you have multiple computers on Gbridge, you can use EasyBackup. This program will allow you to select a folder to automatically backup to a remote computer. To configure a backup, click the Create EasyBackup button.
Use remote desktop connections
Like tasks, you can start a remote desktop session by right-clicking on the computer. Alternatively, you can click the DesktopShare button. On the menu that appears, you will see a shortcut for VNC or Windows Remote Desktop, deciding whether the remote computer is set to accept connections.
Note that Windows Remote Desktop is only available between your computers. If you want to start a connection, right-click on the desired computer and click Access Windows Remote Desktop . After you enter the username and password of the authenticated user or administrator account.
VNC connections to your friends must be initiated by sending you an invitation. Similar to you. If you want to allow a friend to access via VNC desktop remotely, right-click the computer icon, click the Send DesktopShare Invitation button, and select the button you want. For remote access to one of your computers with VNC, right-click the computer, select Access Gbridge Builtin VNC , enter the password you configured on the Advanced Options dialog box.
Practice with VPN
We discussed all of Gbridge's features and functions and how to work with them. Now you need to upgrade new patches, security patches and features. Click the Help button and select Check for Updates .
Before you practice, the last tip I want to show you is: you can also run other services or servers via Gbridge, such as a secure FTP access or in intranet. After you install a server on one of your computers, make sure the firewall doesn't block access, then use Gbridge to access it from other computers.
Was this article helpful?
Your feedback helps us improve.
Related Articles
 8 free apps that help build an environmentally friendly lifestyle9 minutes read
 Friendly Rivalry: A Story of Ambition and Obsession6 minutes read
 10 free and useful network tools8 minutes read
 Create animated images online using Makeagif.1 minutes read
 How to add or delete friends on LINE?3 minutes read
 How to Start a Blog For Free7 minutes read
Reader Comments 0
Sign in with email or Google to join the discussion.