Some troubleshooting tips for Windows network
Network administration - In the process of network connection, there are many problems, but how to overcome them? That's exactly what I want to show you in this article - Some tips to overcome Windows network connection numbers.
Today in a computer network we not only use a single Windows operating system, but also in your network there may be other operating systems such as Windows Vista and Windows 7. Problems Having multiple operating systems on a network will certainly make it more difficult to manage the network. What we introduced in this article are basic troubleshooting tips, these tips will help you overcome the common problems that occur in your Windows network.
First let's start by troubleshooting basic connectivity problems.
Connect to a network
This is a very common problem when setting up a new computer or upgrading a new Windows version of an old computer. The phenomenon of no connection can stem from many causes, so let's take a look at some potential problems and solutions to overcome them.
Problems after upgrading Windows : Installing a new version of Windows operating system on a computer may break the network connection. You may encounter many different problems, these problems depend on whether you upgrade or perform a completely new installation.
If you upgrade your computer from Windows Vista to Windows 7, you will probably have to reinstall the driver for your network hardware; This problem often occurs for Wi-Fi connection. The best way to solve this problem is to download a new driver from the system manufacturer's website or motherboard before attempting to upgrade the operating system. Another way is that you can search in the CD that came with your motherboard or system driver accordingly.

It is possible to determine if an IPv4 or IPv6 driver is being used by viewing Network Adapter Properties.
IPv6 and IPv4: We may encounter this strange problem when installing a new system. IPv4 (or IP version 4) is the most commonly used Internet addressing system. While IPv6 is the next version of this type of addressing, the problem is that it is not yet common.
There are many cases where you have a number of computers that only use IPv4. Meanwhile Windows 7 can implement both IPv6 and IPv4. If you simply assume that a computer can run both IPv6 and IPv4 protocols will be able to connect to an IPv4-only system completely wrong. Computers that are using both protocols will not easily connect to computers using IPv4. To overcome this problem, you need to upgrade the system so that they can use both IPv6 and IPv4 protocols.
Laptop failed to connect : About 90%, this problem occurs because the laptop's Wi-Fi hardware is not activated.
Many laptops have buttons that turn on and turn off the Wi-Fi function to save battery power for the computer. However, in some models, software is used to perform this function.
If you are unable to connect, usually a Windows troubleshooter, Windows network troubleshooter, will be launched and you can follow its prompts. If this program tells you that the laptop's wireless hardware is turned off, you need to figure out how to turn it back on. The specific implementation method for each laptop is very different so we will not show here. This Windows utility can turn off or turn on the wireless hardware if the laptop uses software to do this.
The remaining 10% is unable to connect to the wired network. The reason for this is probably because many laptops have been disabled for wired networking. If this is the case, we must activate the wired network function in the Windows power management interface, in the 'System and Security' applet.
File sharing in Windows
Almost everything we want to do is share files between computers. You may want to copy some files from one system to another but you cannot do it on your system. Here are some causes and remedies.
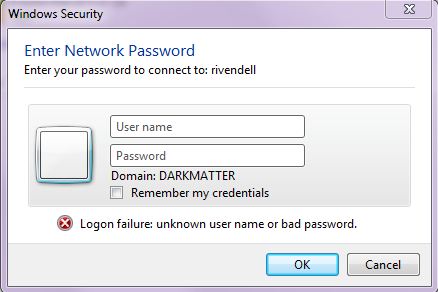
Windows password security
Windows password : Assume when making a new Windows 7 installation. Windows 7 can see other systems on the network. When connecting to another computer, you will see a screenshot like the one below.
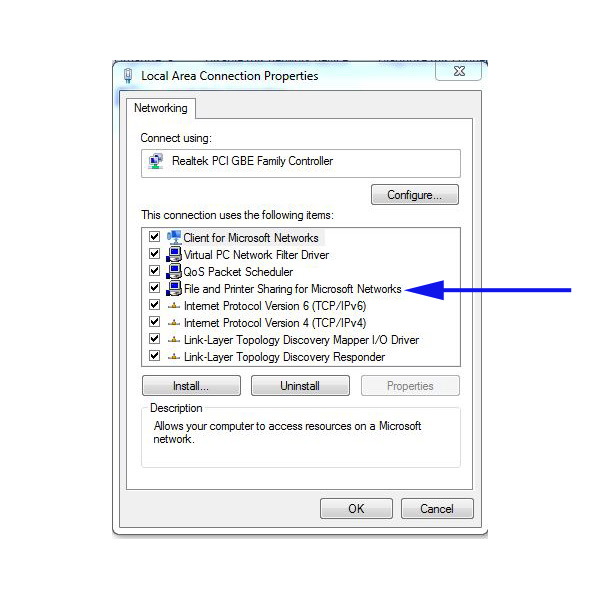
You can enable Windows Simple File Sharing if you don't care about safety
Normally you will be able to log in to the target system, but sometimes it is not possible - even know that computer's login and password. If network security is needed, it is best to maintain logon authentication when connecting to other systems on the network. If you are using Windows Home Server, you will have a login for each user on the network.
If you don't use Windows Home Server or don't care about security, we can use Windows Simple File Sharing mode. Keep in mind that in this mode you won't get the best security, but if your systems are protected by a hardware firewall on your router, you can be assured of security.
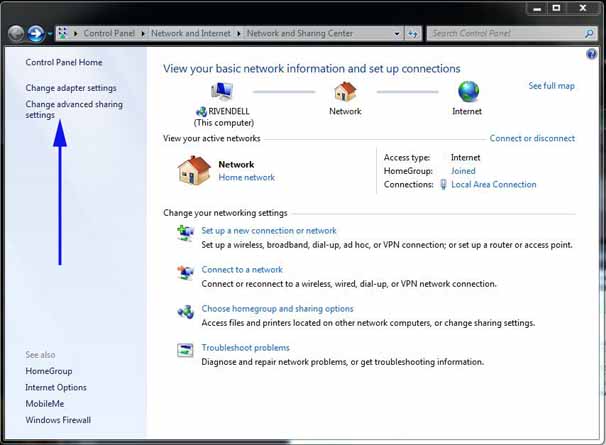
Windows Network and Sharing Center
To enable simple file-sharing mode, first ensure that the Windows File and Printer Sharing feature is enabled in Local Area Connection Properties.
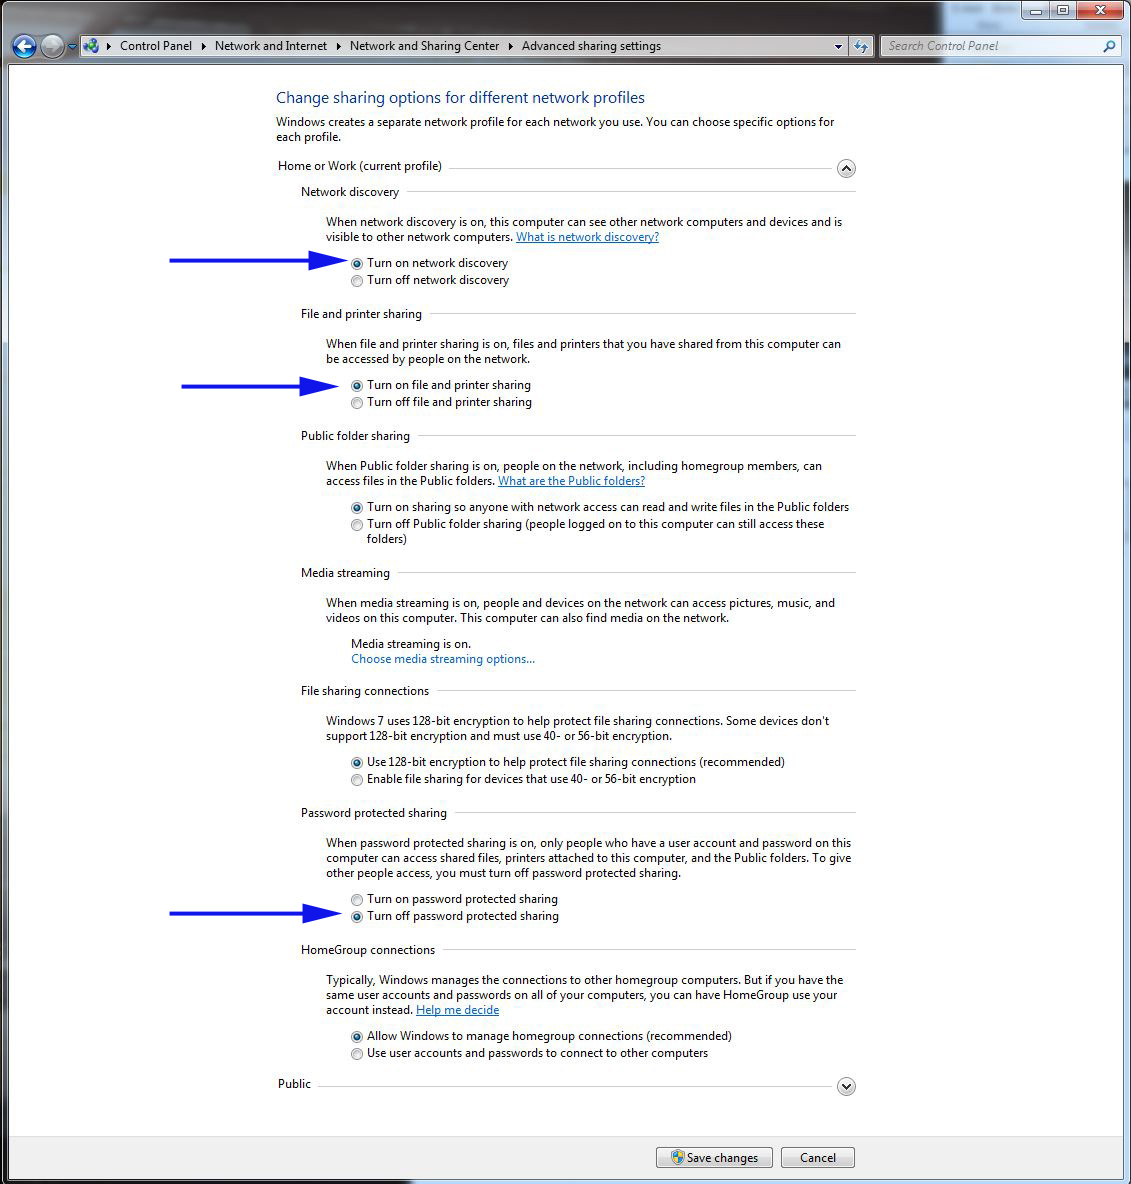
Advanced connection options
Next, open the 'Network and Sharing Center' (one of the Windows panels). Click the Change advanced sharing settings link on the left.
Once you have entered the advanced connection panel, make sure that some radio buttons are activated. You can now explore the network (to see other systems) as well as share files and printers. If you just want to share files at a simple level, disable the password-protected sharing attribute by clicking the Turn off password button to protect sharing.
Disable logon for Windows Home Server: Next, if you're using Windows Home Server, you won't be able to use the file sharing feature simply because WHS requires user accounts, login and password. In other words, you must login every time you connect. This can be time consuming if you regularly connect to shared shares on the network. However, one way to fix this problem is to provide login IDs and passwords to all users in the network. This tip can work with Windows XP, Windows Vista and Windows 7.
To do this, you first need to open the Run dialog box, then type the following command:
control userpasswords2
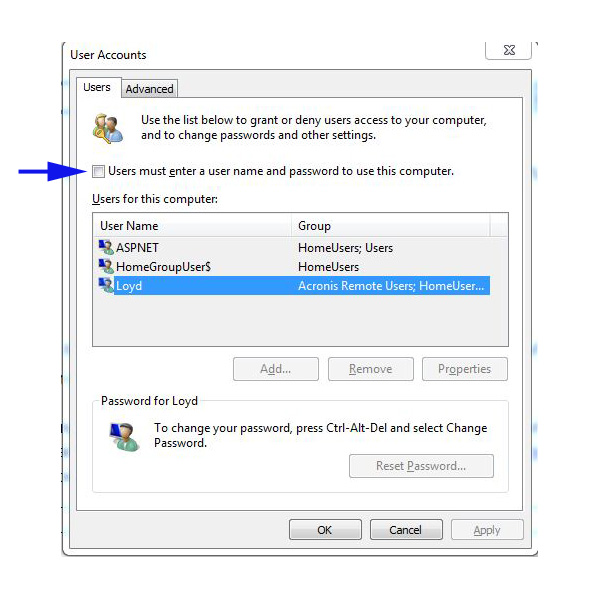
Uncheck this box, you will not have to log in every time you access computers on your network.
Note the specific syntax of the second word, number 2 attached at the end. You will see a dialog box that allows you to enable or disable login requests when you want to make a connection to WHS sharing.
First, select the correct user account in the account list. Mark the account you want to select. Then uncheck the checkbox with the Users label to enter a user name and password to use this computer .
When you click Apply , another dialog box will appear, and you will have to enter the user password twice. After this execution you will never see the login screen appear. When starting the computer, the computer will automatically boot into the user account with the specified name. If the account name and password are for someone who is used on the Windows Home Server system, the user will not have to login.
Note that this tip also works if you want to access another Windows system with user accounts with passwords. If all the systems in your network have the same login and password, you can avoid the login screen but still maintain the security. Although this method is not recommended, it is better to have multiple accounts with different passwords, especially if you use a normal Windows system as a server. Remember that you will be limited to 10 connections if you implement this solution.
Network connection between Windows 7, Vista and XP computers
Sharing files on a Windows 7 computer with other computers using an older version of the operating system may be a bit complicated. Windows 7 has two new features that can disappoint users when they want to connect to Windows 7 on a Windows XP or Vista computer: it is the HomeGroups and Libraries.
When first launching Windows 7, this operating system will ask if you want to create a homegroup. Suppose we choose Yes. Windows will show you a key (password), which is required to enter on other Windows 7 systems to make them a member of the homegroup. The HomeGroups feature makes Windows 7 connections simple.
However, Windows XP and Windows Vista do not understand what a homegroup is. Here Microsoft recommends two ways to connect from old computers to Windows 7 computers.
First you can create an account just to share. Give this account an easy-to-remember password, then provide that information to everyone (who needs to connect to a Windows 7 computer). Here, make sure the shared account is a standard account (do not use an administrator account) for better security.
The second way is to enter the advanced network connection console and the check box is labeled Use user accounts and passwords to connect to other computers . After doing this, you will never have to log in every time you want to connect to other computers.
Finally, if you can't connect, go back and make sure all computers have IPv4 and IPv6 installed, as mentioned above.
Do you use libraries in Windows 7? Note that Windows XP will see all the folders in the library, not the library name itself. However, there is a problem you can't access them in the same way as previous versions of Windows.
Other tips and tricks
Here are some tips and ways to deal with some specific issues.
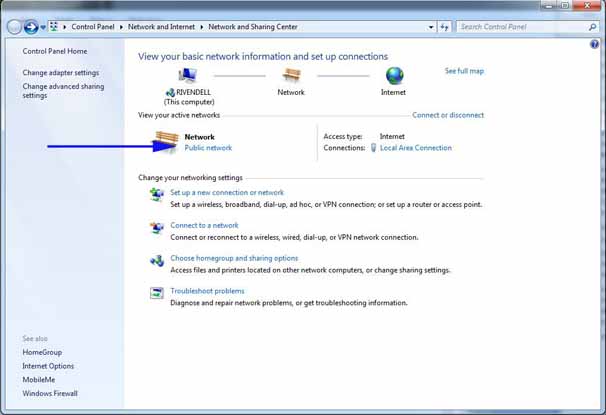
If you have problems, change the 'Public' network to 'Home' can help solve the problem.
Check your network settings : When you first start your Windows Vista or Windows 7 computer, you need to make a decision, is it a choice to connect to home, work or public? If you use a laptop, you should choose 'Public network' because your laptop is often used in public places like airports, cafes, etc. this is the type of connection that will ensure your laptop is safe.
Do not select Home network in such a case. However, if you chose 'Public network' instead of home network before, you can easily change it by opening 'Network and Sharing Center' and clicking the Public network link , then you will see a dialog box that allows you to choose the type. network.
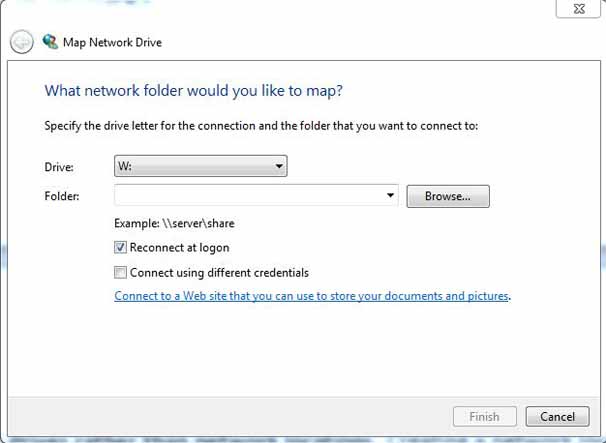
Maps can help applications that require drive letters
Using a map instead of a network location : Creating a network location is very simple. All you need to do is open My Computer, right-click on any empty area. One of the options will be 'Add a network location'. Type in the network sharing location (servernamefoldername), then you can open that location by double-clicking on the folder.
This method of use is absolutely no problem unless an application requires a hard drive letter. To fix this problem, you can look at the My Computer screen linked to Map Network Drive , click on this link. Select the drive letter and enter it in the network location. You can then access the network location using the Windows drive letter syntax.
Knowing the limitations in Windows versions : Windows 7 Home Basic and Windows 7 Starter does not allow creation of homegroups; they can only join the homegroup. You need to know this when you join them to a homegroup using a password created on another system.
Use homegroups for Windows 7 users : When you first start Windows 7, it's easy to skip the step of creating a homegroup. Note that this step should not be ignored, especially if you use multiple Windows 7 computers on the network. When creating a homegroup, connecting between computers becomes much easier. In addition, Windows 7 does not limit the number of computers that can join a homegroup.
Use the operating system troubleshooting utility: Use Windows 7 troubleshooting kit if you still have problems. Be aware that this Windows 7 utility has many advantages over previous Windows versions. You can find this network troubleshooting utility in the 'Network and Sharing Center'.