How to install Ubuntu 22.04 LTS on PC or laptop
It provides a functional desktop thanks to the GNOME desktop environment, a great collection of open source productivity tools (including LibreOffice), and receives regular security updates. Installation is similar to installing Windows on a computer, but it would be better to know what choices you will be faced with.
Here is how to install Ubuntu on PC.
5 ways to install Ubuntu
How to install Ubuntu is up to you. You can install it on your PC (following the main part of this guide) or find another way to do it. As with most Linux distributions, Ubuntu can be installed on many devices.
Step 1. Install Ubuntu on Windows PC
Step 2. Install on Chromebook
Step 3. You can even install on a MacBook or iMac
Step 4. Ubuntu can be installed in a virtual machine
Step 5. Amazingly, Ubuntu can even run on Raspberry Pi!
Just like using the desktop, you can install Ubuntu Server to host data of all kinds, from games and websites to file servers. This is what makes Ubuntu Server different from Ubuntu desktop.
Some other devices can also handle Ubuntu. The article will assume that you are using a standard Windows computer or laptop and want to install Ubuntu from scratch.
Get started: Choose and download your preferred Ubuntu version
There are usually two Ubuntu desktop operating systems at a time.
- LTS version (Long Term Support)
- Latest version
The LTS version is released every 3 years. At the time of writing, the LTS is Ubuntu 20.04, but 3 non-LTS versions have been released since then.
Ubuntu is released in April and October each year, shown in version numbers. The April 2022 release will be Ubuntu 22.04, while the October release will be Ubuntu 22.10.
So, what is the difference between the LTS release and the latest version? Simple: the LTS version is more stable, but lacks the improvements found in newer versions (hence called 'long-term support').
If you want to use Ubuntu reliably every day, you should choose the LTS version. Otherwise, select the most recent non-LTS release.
Create installation media
With the ISO file downloaded, it's time to create the installation media. Once this installation media is inserted and the target laptop or PC is restarted, the installation will begin.
To install Ubuntu on your computer, you can use:
- USB
- SD card
Whichever option you choose, make sure that there is an empty port on the target computer.
Your operating system may have a built-in tool to create bootable installation media from an ISO file. If you don't know what it is or how to use it, the best option is to use Etcher.
This is a cross-platform software that can easily burn ISO files (or any other disk image) to USB.
Boot computer from USB or SD card
With the installation media connected to the target computer, reboot or power on. Hopefully it will detect the USB and give you the option to boot from it.
Otherwise, you will need to access your computer's UEFI/BIOS [LINK] to edit the boot menu. In this case, you'll need to prioritize your USB or card reader (they're often considered the same thing in the BIOS) before your computer's hard drive or SSD.
After the changes are made, restart the computer. This time, it will boot from the ISO file you burned to the USB or SD card.
Installing Ubuntu: A Look at the Options
When your computer boots, you'll see a GRUB screen with 4 options:
- Ubuntu
- Ubuntu (safe graphics)
- OEM install (for manufacturers)
- Test memory
In most cases, select Ubuntu, use the arrow keys, and press Enter.
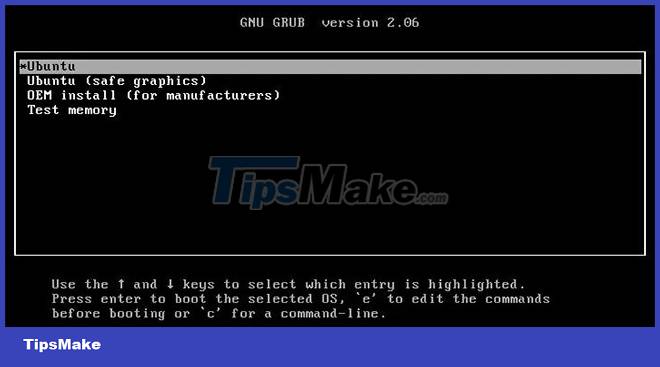
If your first Ubuntu installation fails and the error message is related to your computer's monitor or GPU (graphics card), try Ubuntu Ubuntu (safe graphics). Meanwhile, if you want to check if your PC's RAM is working properly, use the Test memory option. Once the process is complete, you can select Ubuntu and continue with the installation.
The installation environment will start and you will see the Install screen.
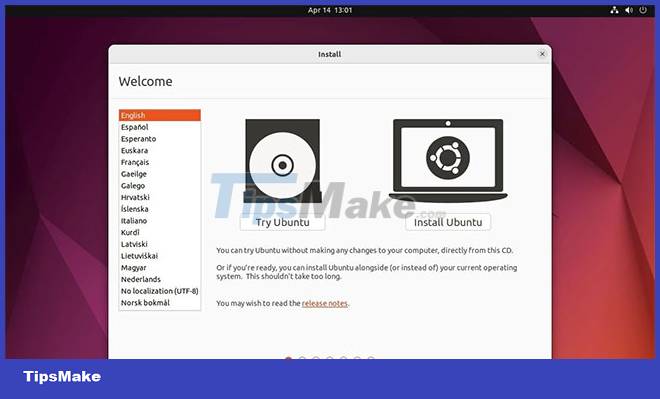
Choose your preferred language, then click Install Ubuntu.
Try Ubuntu to test the live environment
If you choose Try Ubuntu, you will soon see the Ubuntu desktop.
However, this is not a genuine desktop but a "live" environment. Instead of being installed on an HDD or SSD, Ubuntu is running from system RAM. This gives you the option to go through and capture some settings and options.
For example, you can adjust the desktop background or launch a browser and access the Internet.
If you have never used Ubuntu before, this is a good opportunity to learn more about it before installing.
If everything seems to be working fine in the live environment, you're ready to move on. Look for the Install Ubuntu option on the desktop and double-click it.
Install Ubuntu in 7 steps
The Ubuntu 22.04 LTS installer makes installing the operating system simple. It can be completed in 7 stages.
1. Keyboard Layout
Choose your keyboard layout. This option should usually match the physical keyboard you own.
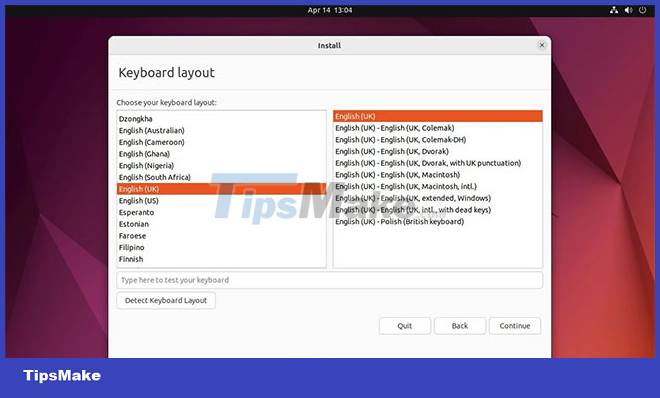
Click Continue.
2. Updates and Other Software
Identify the applications and updates you want to install with the operating system. You can choose Normal installation with media tools and Office software or Minimal installation without these.
You can also choose Download updates while installing Ubuntu, which saves time after installation. For advanced users, there is also the option to Install third-party software for graphics and Wi-Fi hardware and additional media formats. This includes things like drivers for NVIDIA GPUs.
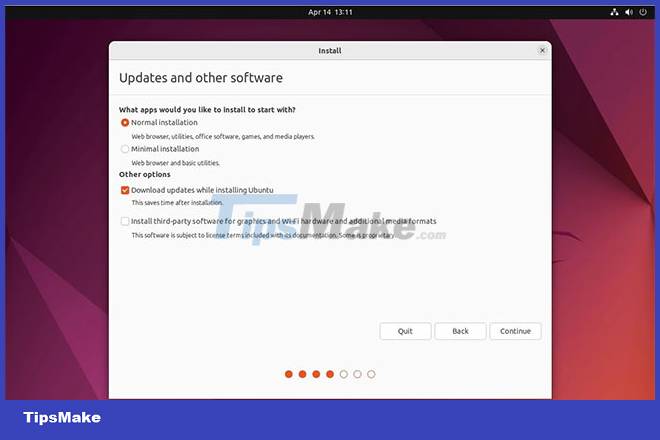
Click Continue after you make your choice.
3. Installation Type
Choose between Erase disk and install Ubuntu or Something else. The first option has the Advanced features option, which allows the selection of non-standard file tables. The second option gives you tools to create and resize partitions.
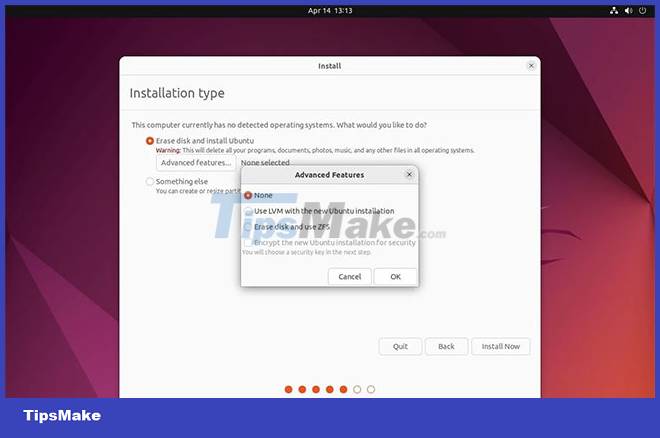
Click Install Now to continue.
4. Write the Changes to Disks?
The installer will confirm the selections you've made to the drive (Ubuntu formats two partitions by default).

Click Go Back to make changes or Continue to continue with the installation.
5. Where are you?
Use the map to select the correct time zone or enter the city closest to your location in the text field.
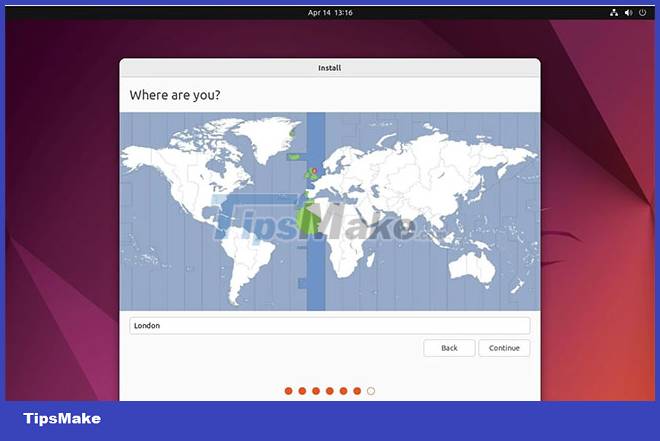
Click Continue when you're done.
6. Who Are You?
You are now ready to enter your name, give your computer a name, and choose a username and password. If you are using a work or school network, you may need to select the Use Active Directory check box.
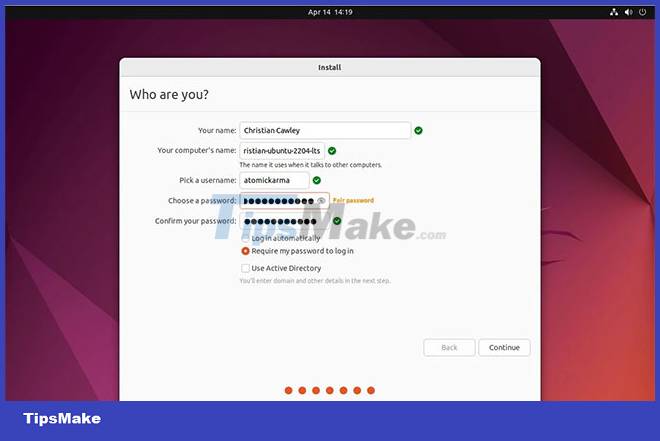
Click Continue and enjoy the Ubuntu 22.04 LTS Jammy Jellyfish welcome screen.
7. Restart
A few minutes later, the process will complete and you will be prompted to Restart Now to start using your new Ubuntu computer.

When the computer restarts, you will be asked to remove the installation media. Make sure the drive is unmounted before pressing Enter.
As noted, Ubuntu can be installed on almost any computer you can think of. But the easiest and simplest way to install it is on a PC or laptop - where the Ubuntu desktop operating system works best.
Installing Ubuntu is generally very simple, although your experience may be different, especially if you have special hardware. However, installing Ubuntu is easy and you can get your computer up and running in under 30 minutes.
Now it's time to install the right software.
You should read it
- What's new in Ubuntu 18.04 LTS just released?
- How to prolong the life of Ubuntu 18.04 installation with Ubuntu Pro
- What is the difference between Ubuntu Desktop and Ubuntu Server?
- Ubuntu 21.04 users need to update the system ASAP
- 5 things to do after upgrading to Ubuntu 22.04 LTS
- 5 Reasons Ubuntu Cinnamon Is Better Than Other Ubuntu Versions
 How to disable and remove LightDM on Linux
 How to Boot Linux from USB on Windows 10
 How to run multiple Linux distros inside Terminal using Distrobox
 How to install Azure Data Studio on Linux to manage SQL server
 Should Linux dual boot?
 Why does Linux have so many distributions?