Set up an Open-Mesh wireless network for Linux
The service or dashboard is provided free of charge by Open-Mesh and allows operators to manage their mesh networks online.
Network administration - Mesh is a type of network among many different network topologies. This is an appropriate way to connect to Wi-Fi in large areas. In addition, they are especially useful in many places where the environment has frequent changing factors. In addition, they are also perfect for locations and applications where it is difficult to run a network with a cable.

Dashboard of OpenMesh
Instead of having to run Ethernet cables to each access point, mesh networks work completely without wires. Just a mesh button (or multiple nodes in larger networks) is connected to an Internet connection. Other mesh nodes, which work like repeaters, and can be placed across locations inside or outside the building, require only the source. When someone surfs the web from a repeater, traffic will be transmitted (also called jumps) from node to node (node-to-node), and reached the gateway. These steps may vary, depending on the current signal levels between them. Therefore, it is generally said that mesh networks are 'self-configuring and self-processing' and that is why they are perfect for busy areas.
What role does Linux or open source play? Open-Mesh, an organization based on volunteer members, provides hardware and software services for mesh networks. Hardware or nodes will be loaded with open source software.
The service or dashboard is provided free of charge by Open-Mesh and allows operators to manage their mesh networks online.
In this two-part tutorial, we'll set up a mesh network using Open-Mesh devices and services. The first is hardware collection, creating Dashboard accounts, configuring network settings. Then in the next section, we will examine other features such as setting up web filtering with OpenDNS, installing buttons and testing coverage, etc. Now let's start our work!
Collect hardware
First you need to estimate how many nodes or routers you need to cover a desired area. Each node provides the same coverage as a regular wireless router or access point. However, it should be noted that adjacent nodes need to overlap. You can assign them anywhere with a power supply, if the budget and time are limited, you should place them in indoor locations.
There must be at least one node directly connected to the Internet and called a gateway; Other nodes that are not directly connected to the Internet will be called repeating nodes. For larger locations or networks, you should use two or more gateways, which will require many Internet connections. This will give users better bandwidth, since each hop between buttons will reduce about half the bandwidth. It also provides redundancy for Internet access; If a gateway is broken, you can still use another gateway.
You can refer to the Open-Mesh guide to help design and deploy your mesh network.
You can use the Open-Mesh hardware line. The price is about $ 29 for low-end buttons and $ 49 for professional levels. The professional (professional) button will be able to restart when detecting certain errors or problems. In addition, it has Power-over-Ethernet (PoE) support, 2dbi built-in antennas and removable 2.5dbi external antennas.
The following features are available in both professional and low cost buttons:
- Use the Open-Mesh Dashboard to control and test your networks.
- Dual ESSID (network name); A public ESSID and one are blocked by firewall and WPA encryption to protect private access.
- Optional splash page feature for public access can be adjusted with HTML / WYSIWYG editor.
- User authentication and advertising options through third-party solutions from Coova.org, WiFi-CPA.com, WorldSpot.net, or any RADIUS server.
- Redirect users after they see the splash page or login.
- Bandwidth (speed) restriction settings for public access.
- Wireless bridge mode on non-gateway nodes allows you to plug into a computer for public access.
- Automatically download software and updates.
- Support longer PoE for professional buttons
- Access SSH and Telnet redboot
You can change your support device with Open-Mesh software. It should be noted that the button features can greatly affect design and installation. So you need to carefully compare features between carriers and buttons.
Configure general Dashboard settings
When you have the original design and hardware in hand, sign up for a Dashboard account on the Open-Mesh website and log in.
This control panel is hosted completely free of charge and will allow you to configure all network settings and buttons. You can even perform remote configuration. The buttons check for setup updates from Open-Mesh servers every 5 minutes.
First you can configure most settings before connecting buttons. On the Dashboard General tab (see Figure 1), you can change at least one of the time zone settings, displaying the name and email address for notifications.
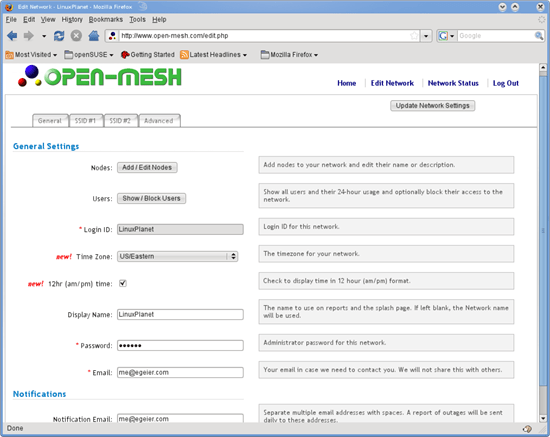
Figure 1
On the first SSID tab (see Figure 2), you can change the network name. This is the name the user will see on their computer when searching for the public network. We will introduce other settings after obtaining the basic components and working features.
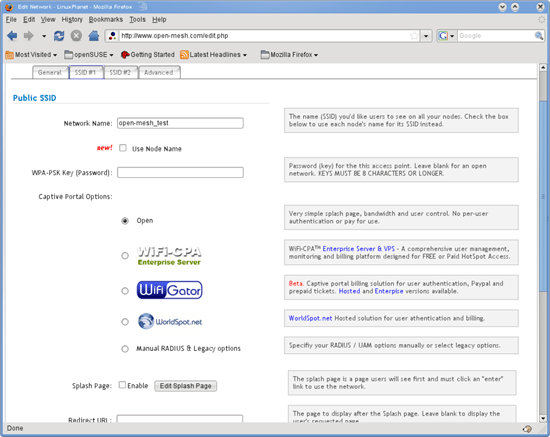
Figure 2
On the second SSID tab (see Figure 3), you can configure your own network settings if you want, or disable it.
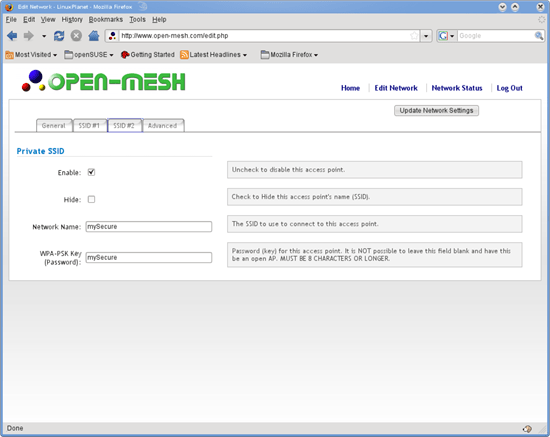
Figure 3
On the Advanced tab (see Figure 4), select the root password for SSH . Just as we know about the Access Point Isolation feature, it prevents communication between users. You should activate if the first public SSID is open for guests. If you want to share a printer, look at sharing a printer on the Internet using the Internet Printing Protocol (IPP), on a Windows or Linux computer. This way you can set up a shared printer on the Internet (port 80) for any public workstation instead of the typical shared ports that are still blocked. You can also report visitors to this printer, maybe add a link to the splash page for easy configuration. However, if you use public SSID for private purposes, it is best to disable Access Point Isolation because sometimes you may want to share files between two computers.
Add buttons to the network (Dashboard)
Now you can add buttons to your Dashboard account. Select the General tab and click the Add / Edit Nodes button . The Google map will appear, zoning in the location you entered when registering the Dashboard account. You can switch to another area where you are using the Satellite mode to get photos of buildings and regions. Click on the map where you are planning to install a button. A dialog box will appear, where you can name it and enter the button's MAC address.
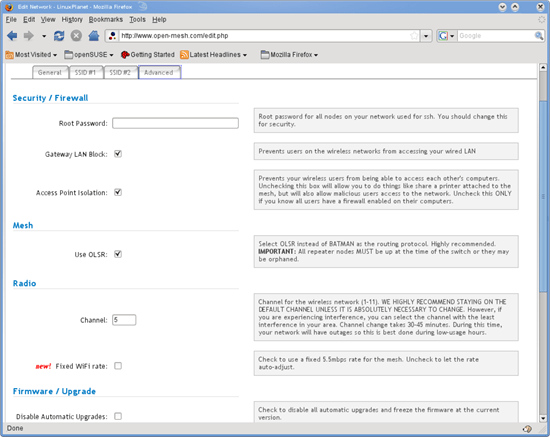
Figure 4
After the nodes are added, you can view their status and details by clicking on their markers. In addition, you can click the Network Status link in the upper right corner for details, such as shown in Figure 5 below.
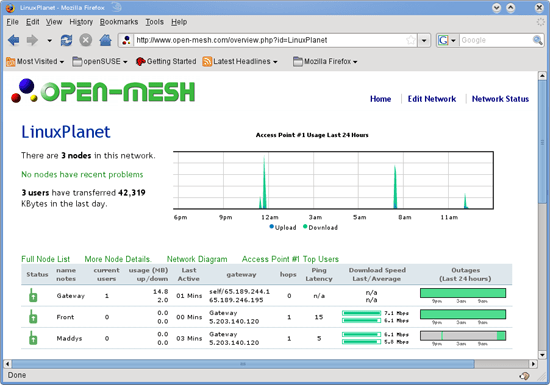
Figure 5
( Also )
Was this article helpful?
Your feedback helps us improve.
Related Articles
 10 best mesh Wi-Fi network systems15 minutes read
 How to Create P2P Mesh VPN with Tinc8 minutes read
 Upgrade wireless network system6 minutes read
 What is the Wi-Fi Mesh system? How does it work?8 minutes read
 How to Set up a Wireless Network in Linux3 minutes read
 Learn about mesh routers9 minutes read
Reader Comments 0
Sign in with email or Google to join the discussion.