How to set up an internal RADIUS Server - Part 1
Network administration - Small businesses can save costs and increase security by using an access point with an attached RADIUS server. In this article we will show you how to set up a RADIUS server via ZyXEL NWA-3160.
In this two-part tutorial, we will show you step by step in the process of setting up an AP internal RADIUS server. In this series, we use ZyXEL's NWA-3160 AP. The advantage of this solution is simplicity and savings. In addition to having an existing wireless network, you can still add the NWA-3160 (or another similar AP) and use its RADIUS server for the network, enable 802.1x authentication, code. WPA-Enterprise. In other words, an NWA-3160 can serve as a RADIUS server for all other APs on the network.
If your network is a basic WLAN - based on a wireless router - the NWA-3160 needs to be connected to the Router via one of the rear Ethernet ports. You can then follow the steps in this tutorial. For larger Wi-Fi networks, ZyXEL's AP can be added anywhere along with the chain of existing APs. Other APs on the network will then be configured to use the NW-3160's internal RADIUS server. If you're currently in the process of designing an advanced Wi-Fi network, the NWA-3160 can be chosen as a model for all your APs.
In Part 1 of this series, I will show you how to set up the NWA-3160 to communicate with an existing network, turn on the internal RADIUS server and create a digital certificate for the server and client. In Part 2, we will introduce the steps to set up the APs and prepare the clients to connect.
Configure basic settings
Before starting to configure the internal RADIUS server, we need to set the basic LAN settings so that AP becomes part of the existing network. First, plug the AP into an electrical outlet and connect wirelessly from the computer to the AP. Since the AP cannot provide an IP address to the computer (because it does not have a DHCP server) and the AP is not set up to communicate with the Router, the IP address will not be granted to the computer's network adapter.
At this point, we will configure the computer's network adapter with the same static IP address and subnet mask inside the default AP subnet. For example, the IP address 192.168.1.3 and the subnet mask 255.255.255.0 will work for NWA-3160, as shown in Figure 1.

Figure 1
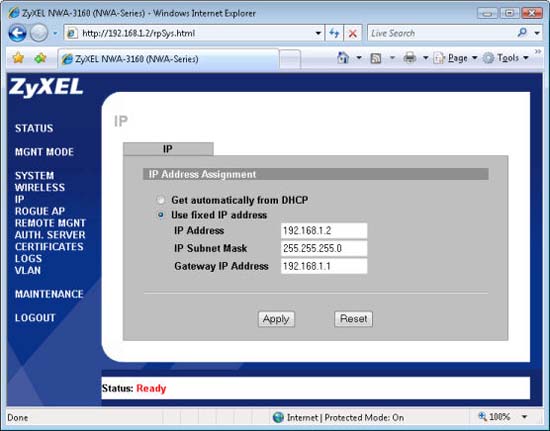
Access the web configuration utility by entering the default IP address of the AP ( 192.168.1.2 for NWA-3160) into the web browser and using the default password ( 1234 for NWA-3160) to log in. Then go to the IP section and change the default IP settings of the AP (see Figure 2) corresponding to your existing network.

Figure 2
If the IP address of the router on the existing network is 192.168.1.1 , leave the default IP address and subnet mask of the AP, but you need to enter the Router's IP address for the gateway's IP value. Note that IP addresses are unique. Therefore, if multiple APs are set up, the following addresses can be set for other APs: 192.168.1.2, 192.168.1.3, 192.168.1.4, 192.168.1.5, . If the Router's IP address is 192.168. 0.1 , the following addresses will work for APs: 192.168.0.2, 192.168.0.3, 192.168.0.4, . In most cases, the subnet mask 255.255.255.0 will work with any Router IP address . Remember, the gateway's IP address is the router's address on the network.
After the appropriate IP settings have been set for the AP, the computers connecting to the new AP will be given IP addresses automatically.
To end the basic installation of the AP, find an appropriate point for the AP and connect it to an existing network (a Router or switch) via an Ethernet cable.
Enable the internal RADIUS server
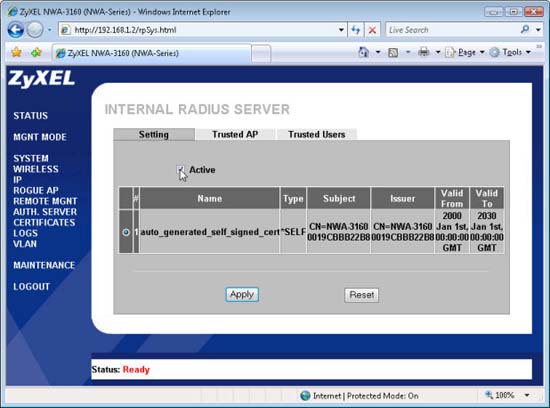
After configuring the AP to work with an existing network, access the settings for the internal RADIUS server by clicking on the AUTH link . SERVER from the web configuration screen. Make sure the Active checkbox is checked (see Figure 3), this is the checkbox that will activate the server.

Figure 3
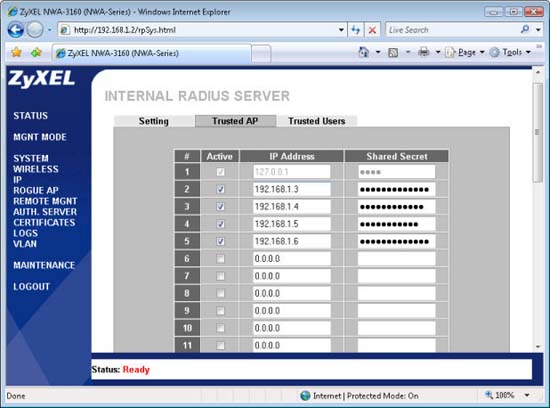
Next, click the Trusted AP tab and enter the IP addresses of all APs in the network, each with a separate shared secret . Figure 4 shows an example of that entry. You must not forget to click the Active checkbox for each AP entry.

Figure 4
Tip: When creating shared secret for APs, choose a strong password, the number can be up to 31 alphanumeric characters. Later these passwords will be entered into APs and for network encryption; therefore you need to keep a copy of them in a secure location. Similar to the account passwords, the length can be up to 14 characters; Use strong passwords and keep them safe.
Next, select the Trusted Users tab and create a user name and password for the person who will access the network, need to select Active for each entry. There is a combination of the name and password that the user will use when connecting to the wireless network.
Configure and distribute a digital certificate
Our setup is designed to make wireless clients distinguish the RADIUS server before a connection is established. This will prevent the possibility of someone setting up a fake AP to steal the username and password that users use to connect. Digital certificates are used for this authentication process. The certificate loaded on the RADIUS server must be issued from a certificate authority (CA) that computers trust, such as VeriSign. When a self-signed certificate is used instead (such as the certificate that the NWA-3160 creates) the user will have to manually install the certificate on the computer for the authentication process to work. The reason for this is because the certificate is not issued from the CA that the computers trust automatically.
We can load a certificate on the AP's RADIUS server using the built-in utility of the NWA-3160, which is a utility to create a self-signed certificate, or by uploading a certificate purchased from a CA Tuesday. If using the built-in utility, replace the factory certificate with a single certificate. This certificate (based on the MAC address of the NWA-3160) can be created after logging in to the AP for the first time, on the Replace Factory Default Certificate page . If this step is omitted, you will have another option to go to the CERTIFICATES section of the AP configuration screen and click the Replace button. To upload a third-party certificate, click the Import button in the CERTIFICATES section.
If using a self-signed certificate, a Windows computer that uses the WPA-Enterprise network will need to have such a digital certificate installed. If a certificate is purchased from a CA that Windows can automatically identify, this is not necessary. In addition, installing certificates (self-signed or not) on Mac OS X computers is also not required.
The first step to obtaining a self-signed certificate on a Windows computer is to export a server certificate to the .crt file. On the CERTIFICATES section of the AP configuration screen, click the Details button, find and click the Export button. In the Save As box, browse to the location where you need to save it, add the .crt extension and the file name and click Save .
To install a certificate on a Windows computer, right-click the .crt file and select Install Certificate . On the Certificate Import Wizard appears, click Next . Then select the Place all certificates in the following store option , click Browse , select Trusted Root Certification Authorities , and click OK . Then click Next to move to the next screen and click Finish on that screen.