Managing Receive Connector - Part 4
In this article, I will continue the discussion by showing you the permissions at the Receive Connector level and configuring TLS authentication in a receive connector.
 Managing Receive Connector - Part 1
 Managing Receive Connector - Part 2
 Managing Receive Connector - Part 3
Anderson Patricio
TipsMake.com - In this part 4, I will continue the article on the Receive Connector level and configure TLS authentication in a receive connector.
In the previous article of this series, I have shown you how to manage permissions using Exchange Management Shell and AdsiEdit.msc and in this section we will help you personalize the terms of a receive connector according to Another way without using the default Permissions group.
Exchange Server 2007 has a set of predefined Permissions groups, which makes it easy to administer using a checkbox to define the necessary permissions. When there are multiple servers operating in your system, then we encounter some other problems, the reason is that some teams, but need a receive connector, are more restrictive. can be done by the procedure outlined in this section. If you don't really need such a feature, use the default Permissions Groups available throughout Exchange Management Console or Exchange Management Shell.
We assume that we want to have Active Directory Group called Grp_Relay allowed to relay in Exchange Server 2007. To do that, we have to further exploit the Receive Connector's permissions configuration to assign to users. other than the default list.
Note:
If you will use multiple Transport HUBs in an NLB for receive connector, then all changes must be made in the NLB nodes to provide the same authentication mode and permissions.
First of all, we need to remove all the groups that are currently in the Receive Connector Permissions tab in the Exchange Management Console. To do so, go to the Internal Relay connector properties page and make sure that no groups are checked on the Permissions tab.
Now, go back to AdsiEdit.msc and right click on the Internal Relay connector and click Properties. Click the Security tab, add the Grp_Relay group from Active Directory. Ensure that the group has at least the following terms (Figure 1):
• Submit Messages to Server
• Submit Messages to any Recipient
• Bypass Anti-Spam
• Accept routing Headers
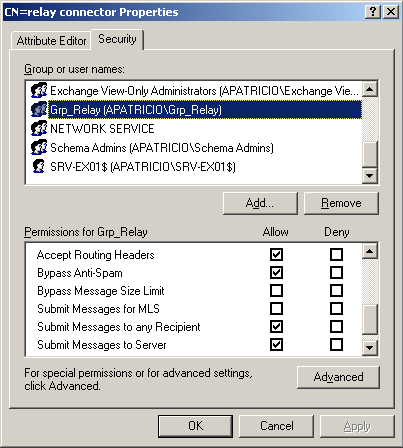
Figure 01
At this time, only users who belong to the Grp_Relay group can send messages using the Internal Relay Receive Connector. If a user is outside the group who wants to send a message, they will be required for the necessary credentials (which may come a few times); You can validate errors in the Receive Connectors log file. This error will contain the following information:
Xác thực trong lỗi bị lỗi vì máy phục vụ DOMAINusername không có quyền submit.
If you encounter a situation where some servers have to relay on Exchange Server without using authentication, then you must use the same procedure above to agree to the clause for the Anonymous entry on the Receive Connector Security tab. .
Note:
It is not good if you allow privileged permissions to relay in an Exchange Server server. Make sure that only one set of servers can use this connector using the RemoteIPRanges configuration of the receive connector.
Configure TLS on Receive Connector
Now that you have seen how to configure authentication methods and authentication groups in a Receive Connector, let us now enable TLS in the Receive Connector. First of all, go to the properties window of the Internal Relay Receive Connector, then click the Authentication tab and check the TLS option as shown in Figure 2.
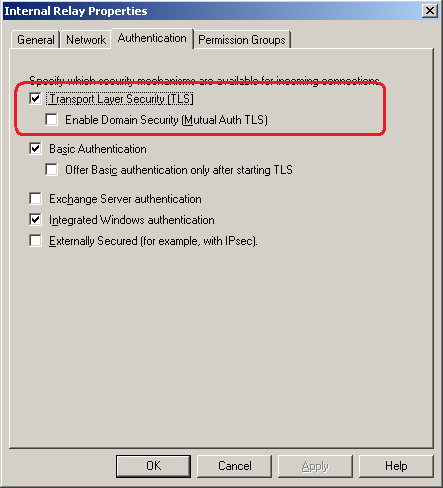
Figure 02
Please refer to this receive connector, the receive connector with the FQDN is defined as relay.apatricio.local (Apatricio.local is the name of the FQDN of Active Directory). Using the previous SMTP verb, EHLO example.org , then we will see that STARTTLS is not present, which means that even if TLS is enabled on Receive Connector, we still cannot use it ( See Figure 3).
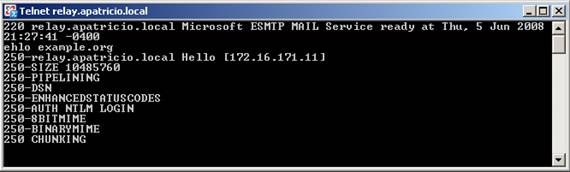
Figure 03
After that connection, we can enter the Event Viewer of Exchange Server and EventID 12014 (Figure 4) will be here, the error message will tell us what is happening with our current environment. A simple answer is that there is no certificate with the name already configured in the FQDN of that Receive Connector.
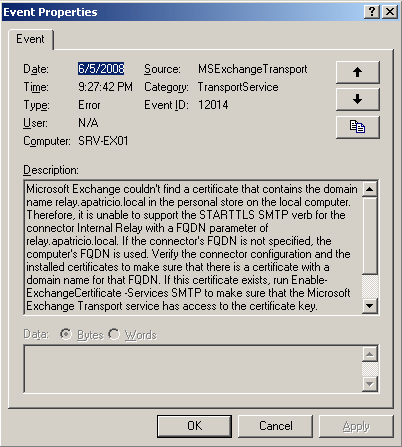
Figure 04
Let's fix this case. We assume that using a PKI in and to request a new SMTP certificate with the Exchange Management Shell, use the following command:
New-ExchangeCertificate –GenerateRequest –Path c: cert.req –SubjectName 'cn = relay.apatricio.local' –FriendlyName 'Internal Relay Certificate' –PrivateKeyExportable: $ True
Now request that the certificate has been created using the Certification Authority website:
1. Log into Exchange Server with the path http://// certsrv, here is the server that holds the Certification Authority.
2. Click on the Request a Certificate link
3. Click the advanced certificate request.
4. Click on the second link Submit a certificate request by using a base-64-encoded CMC or PKCS # 10 file, or submit a renewal request by using a base-64-encoded PKCS # 7 file.
5. Open file C: cert.req, this is the file created by New-ExchangeCertificate command and copy the content.
6. Paste the contents of that file into the 64-encrypted certificate request field in the website.
7. Also on that page, select Web Server in the Certificate Template field and then click the Submit button.
8. On the new page, click the Download Certificate link and save it in C: root of Exchange Server.
Let's import a new certificate, to do that, use the following command:
Import-ExchangeCertificate –Path: C: certnew.cer
Note:
The file name and path here are for example only, you must use the file name and path you used in the previous step.
Now enable a new imported certificate to use for the SMTP service using the Exchange Management Shell. To activate, we need to copy the Thumbprint that appears when you have imported the request in the previous step and use the following command:
Enable-ExchangeCertificate –Thumbprint -Services SMTP
You will be prompted to change the default SMTP certificate, type N and press Enter.
Let's test our changes, first connect in the Internal Relay Receive Connector and type in the previous SMTP verb, ehlo example.org. Do you see any changes? Now you have STARTTLS already provided by Exchange Server. We can also return to the Exchange Server Event Viewer and do not see any Transport errors like we saw before.
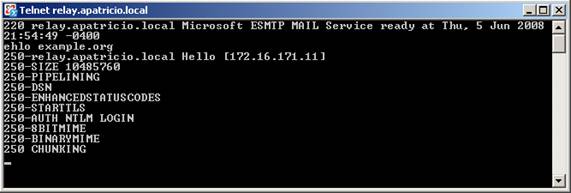
Figure 05
Please return to Outlook Express to confirm the solution. In the properties of the Outlook Express account, we must use the FQDN name in the Outgoing mail (SMTP) field and this name must be analyzed and understood by the client and must be the name used by the deployed certificate. recently (see Figure 6).
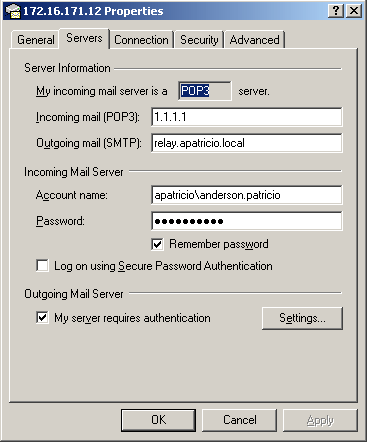
Figure 06
The second step needs to be done here is the Advanced tab name, you must check the option This server requires a secure connection (SSL) , as shown in Figure 7.
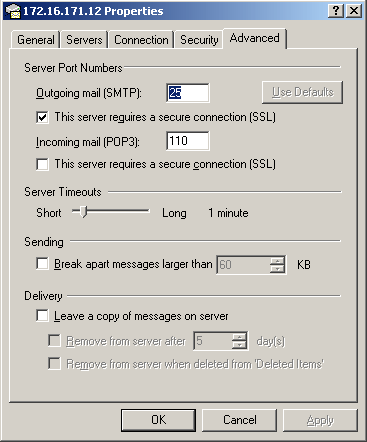
Figure 07
Now, send a message using Outlook Express. We will not receive on the Outlook Express client because we do not set up POP3 server properly but only SMTP. If the message does not appear in the Outbox folder, this is a good sign, but we need to validate the log files and will see the last message sent by TLS as shown in Figure 8.

Figure 08
Conclude
In this section, I have explained how to avoid Event ID 12014 when configuring a new FQDN in Receive Connector, how to configure a group to specify relay in a certain Receive Connector, how to configure a certificate. Only and validate log files to make sure that the configuration is working properly.
Was this article helpful?
Your feedback helps us improve.
Related Articles
 Managing Receive Connector - Part 18 minutes read
 Managing Receive Connector - Part 39 minutes read
 Managing Receive Connector - Part 29 minutes read
 Use the MCP connector correctly.13 minutes read
 What is an MCP Connector? What makes it special?4 minutes read
 Comparing Copilot connector and Power Platform connector9 minutes read
Reader Comments 0
Sign in with email or Google to join the discussion.