The receive connectors we created are listening on port 25 and on a specific IP address. Let's use the telnet utility to connect to our server:
telnet 25
Results: 220 Banner information
Managing Receive Connector - Part 2
In this article, we will show you how to send a message using telnet and configure security features in the Receive Connector.

Managing Receive Connector - Part 1
Anderson Patricio
In the previous part of this series we created a Receive Connector to receive mail from the Internet and also tested it with the telnet utility and in this article we will show you how to send a message using telnet and Configure security features in Receive Connector.
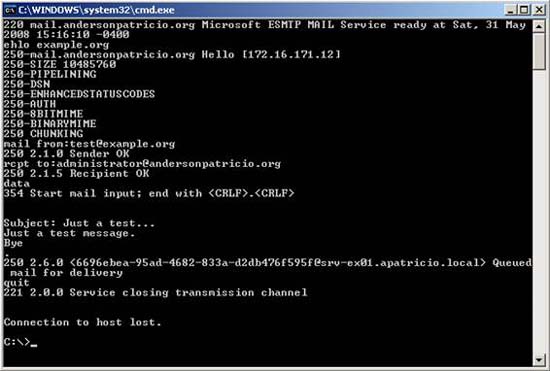
To test a receive connector, we need to know some basic SMTP actions to send messages using the telnet session. The following commands will allow you to send a test message using the telnet utility. All basic SMTP actions require the following message to be sent:
-
Start SMTP communication
EHLO example.org
Results: a list of all SMTP verbs that được nhận được từ sự nhận kết nối. In dòng đầu một câu hỏi hello với địa chỉ IP được dùng bởi sender sẽ được hiển thị. -
Definition of sender of test messages
Mail from: user@example.org
Result : 250 2.1.0 Sender OK -
Define the recipient of this test message. The SMTP domain used by the recipient must exist in the current organization.
Rcpt to: user @
Result: 250 2.1.5 Recipient OK -
Start a notification
Data
Result: 354 Start mail input; kết thúc với. -
Pressing the Enter key twice and hitting the inner key will appear in the body of the test message. To finish, type a dot '.' In the white line and press Enter.
Test notification section.
.
Result: 250 2.6.0 Queued mail for delivery -
Close the session.
Quit
Result: 221 2.0.0 Service closing transmission channel
We can log in to OWA to check if the message is received. The whole process can be observed in Figure 1.
This process is very important in troubleshooting mail flow as well as validating Receive Connector.
Exploiting some security of Receive Connector
We have configured Receive Connector with both Exchange Management Console and Exchange Management Shell, now let's exploit some security configurations for Receive Connector. All of the security issues we will look at here are governed by the Receive Connector and they must be configured with the Exchange Management Shell. Please configure some features in the Internet Receive Connector as follows:
Change the Banner information
Some companies don't like the idea of displaying the server name in SMTP connections. We will change the banner information used for the Receive Connector with the command below and the results are shown in Figure 2.
Set-ReceiveConnector -Banner '220 Mail Server'

Figure 2
Specify the number of errors during a session .
We can control the number of protocol errors in a session. The initial default value is set to 5, to configure it to 2, we use the following command:
Set-ReceiveConnector -MaxProtocolErrors 2
At this point, if an SMTP Server / user is connected and reaches the maximum number of errors defined in the receive connector, the following message will be displayed (Figure 03):
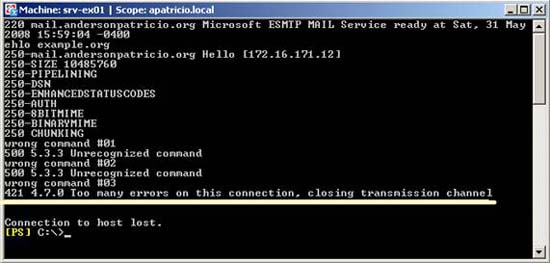
Figure 3
Adjust the save for Receive Connector .
Receive connectors allow us to limit inbound traffic and limit usage from a certain source, preventing overloading of the system. Here are three options we can use:
-
MaxInboundConnectionsperSource : Defines the maximum number of connections made in a receive connector at the same time by the same source. The default value of this setting is 100.
-
MaxInboundConnection : Defines how many connections the receive connector will accept at the same time. The default value of this setting is 5000.
-
MaxInboundConnectionPercentagePersource : Based on the MaxInboundConnection value it indicates the number of connections that the same source can establish with the receive connector. The default value is 2%.
To configure the Receive Connector with the new settings we have seen, we can run the following command:
Set-ReceiveConnector -MaxInboundConnection -MaxInboundConnectionsperSource -MaxInboundConnectionPercentagePerSource
We can also configure the time of the receive connector time-out according to certain aspects, such as: during SMTP communication as well as during an inactive connection (inactive). To configure ConnectionTimeout , we can run the following command:
Set-ReceiveConnector -ConnectionTimeout
To cancel the connection due to Inactive time, we can use the following command:
Set-ReceiveConnector -ConnectionInactiveTimeout
We can also restrict the number of recipients, limit the maximum speed and size of the message at the connector level, to configure these settings, we can use the following parameters:
-
MaxRecipientsPerMessage: The maximum number of recipients in a notification, the default value is 200.
-
MaxMessageSize: The maximum size of the message; The default value is 100MB.
-
MaxRateLimit: Specify the maximum number of notifications that can be sent by the same client in a minute.
Let's change the Internet Receive connector to accept the 100 largest users, the notification size will be greater than 2MB and the limited speed is 200 as below:
Set-ReceiveConnector –MaxRecipientsPerMessage: 100 –MaxMessageSize: 5MB –MaxRateLimit: 200
The last feature we will introduce to you is TarpitIntervall. In Exchange Server 2003 we must configure it through the Registry Editor. In Exchange Server 2007 we can do this using the Exchange Management Shell. The tarpit feature will insert a pre-defined delay in each SMTP response, it contains a 5.xx error code during communication between two servers. This feature is only applied to anonymous connections and it should be used with the Recipient Filter Agent and Recipient Lookup features enabled.
In this article we are using Exchange Server 2007 with all three roles they have been installed (Mailbox, CAS and Hub Transport) and it will receive notifications from the Internet, we have also configured Anti-spam agent on the machine. this owner Now consider the Recipient Filtering agent and enable the Recipient Lookup feature:
-
Open the Exchange Management Console.
-
Open Organization Configuration.
-
Click Hub Transport.
-
Click the Anti-Spam tab
-
Double-click the Recipient Filtering.
-
Click the Blocked Recipients tab
-
Check the first option 'Block messages sent to recipients not listed in the list Global Address' (see Figure 4).
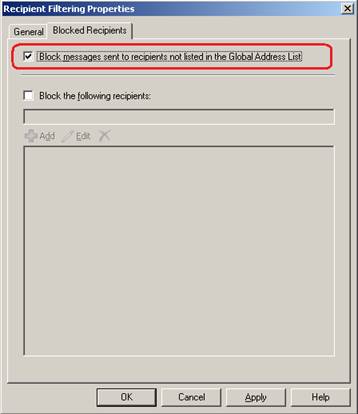
Figure 4
From this point on, all messages that have an unknown address in the organization will be rejected by Exchange Server, as shown in the SMTP rcpt to action: in Figure 5. Even so, we may encounter problems. The problem here is that spammer can massively attack Exchange Server with dictionary attack to find out which emails are valid in your organization. So is there any way to counteract that phenomenon? There is no way to fix that problem, but with each wrong address tried in the SMTP communication, there will be a '5.1.1 User unknown' error and with each of those errors we have It is possible to configure tarpit to delay the server's response.
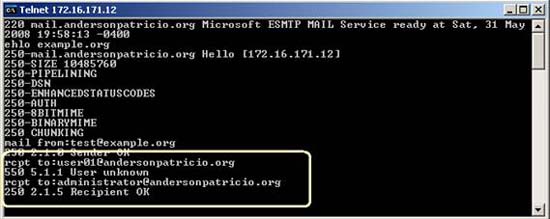
Figure 5
The default value is 5s, to change this configuration, we can run the following command:
Set-ReceiveConnector '' –TarPitInterval:
Conclusion
In this article, I have shown you how to configure security settings and some restrictions in Receive Connector. Introducing some configuration must be done with the Exchange Management Shell. In the next article in this series, I will show you how to write information, authentication methods and how to configure permissions using AdsiEdit.msc and Exchange Management Shell.
3.9 ★ | 15 Vote
Read More
- Managing Receive Connector - Part 3
- Use the MCP connector correctly.
- What is an MCP Connector? What makes it special?
- 5 disadvantages of the USB-C connector you should know
- Instructions on using the Connectors feature in Claude AI.
- How to Install a UHF Connector
- GroupWise to Exchange 2007 - Part 4: Ability to collaborate and convert
- Managing mailboxes in Exchange Server 2007 (Part 2)
MORE LIKE THIS
- What is Device Manager? A detailed guide on how to open and use it.
- How to unlock, fix Task manager errors on Windows
- Restart Windows Explorer when the Not Responding error
- How to pin a Task Manager onto the Taskbar and Start Windows 8 screen
- How to Find out How Long Your Computer Has Been On
- How to Use BOINC
- How to Exit out of a Frozen Computer Program
- How to Enable Task Manager in Windows
- How to Open Device Manager in Windows
- How to Close Apps in Windows 8
FOLLOW US ON


-
 Arena of Valor Gift Codes, Arena of Valor SSS Skin Codes
-
Links to get Coin Master spins and the latest Coin Master codes.
-
Summary of events to receive free skins in Arena of Valor in April 2026
-
How to check in Genshin Impact to receive gifts
-
17 Code MU Unlimited Golden Egg 2025 receive KC, Bless, Soul
-
Latest LaLa Land Code Mysterious Continent and how to enter code
 Arena of Valor Gift Codes, Arena of Valor SSS Skin Codes
 Links to get Coin Master spins and the latest Coin Master codes.
 Summary of events to receive free skins in Arena of Valor in April 2026
 How to check in Genshin Impact to receive gifts
 17 Code MU Unlimited Golden Egg 2025 receive KC, Bless, Soul
 Latest LaLa Land Code Mysterious Continent and how to enter code