Managing Receive Connector - Part 1
This series will introduce you to the Receive Connector component. In part one we will create a Receive Connector
This series will introduce you to the Receive Connector component. In part one, we will create a Receive Connector using Exchange Management Shell and Console, then we will do a test.
Introduce
Exchange Server 2003 uses SMTP Virtual Server with the operating system to control mail flow. In Exchange Server 2007 the SMTP service is installed inside the Exchange Server 2007 installation process. So we have two different components when talking about SMTP traffic in the Exchange 2007 architecture, which is the receive connector and the send connector. . These components are configured in two different locations, the Send Connector is configured at the Organization level and the receive connector is configured at the Server level. Receive connectors are responsible for all incoming SMTP traffic, they can be collected from external sources, clients, partners or other Exchange Server, use authentication and some other features to manage them all. Connections are received.
By default, Exchange Server 2007 has two receive Connector named Client Receive Connector and Default , here is the name of the Exchange Server Netbios. The default Receive connectors are in Server Configuration / Hub item in the Exchange Management Console interface, as shown in Figure 1. We can also find them using the Get-ReceiveConnector command through the Exchange Management Shell. By default, any Exchange Server can receive messages from other Hub Transport servers with the Default Receive connector (named Default ) and configured to receive traffic from any host, to any location. Any internal IP on port 25 but this traffic must be verified first.

Figure 1
Create a Receive connector
Now we will create a Receive Connector and during this process we will explain the options that appear during the setup process. The server used in this article has two IP addresses: 172.16.171.11 and 172.16.171.12 .
Each connector has a set of the following attributes: IP address, port number and remote IP address range. These parameters are always validated during the Receive Connector creation process. If you have a previous connector with the same values, a new connector will not be created here.
In this article we will create an Internet Receive Connector with the server's second IP address, how to proceed is introduced below:
1. Open the Exchange Management Console.
2. Open Server Configuration.
3. Click Hub Transport.
4. Select the server name on the right part
5. In Toolbox Actions. Click New Receive Connector.
6. In the Introduction window. Let us name the new connector using the Name field and we can also choose the connector type (Figure 2). There are five options here: Internet, Internal, Partner, Client and Custom, each of which defines a set of permissions and authentication on the connector we are creating. The selection of the connector also changes the New Receive Connector wizard, so the wizard will not be the same for all the previous connector types. In this article we will start with the Internet Receive Connector, so let's click Internet and click Next .
Note:
If we choose the wrong type of connector, it will change the configuration later.
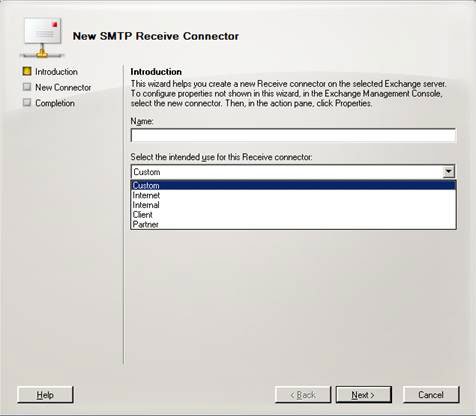
Figure 2
So what happens if we choose Client, Partner or Internal instead of Internet? What will be the difference here? The following table shows the changes that will be applied for each type of receive connector selected. We have three columns, the first column (during creation) shows the information needed during the New Receive Connector Wizard; the second column (authentication) showing the authentication method will be configured by default in the new Receive Connector and at least one (clause) showing which groups are marked in the Receive Connector permissions. Please note that all of these values can be changed through the Management Console or Exchange Management Shell.
Installation process
Expertise
Terms
Internet
On the Local Network settings page, we can manage internal IP addresses, ports and FQND.
TLS
Anonymous Users
Anonymous users
Internal
In remote network settings, we can change the IP address range remotely
TLS
Verify Exchange Server
Exchange Servers
Client
In remote network settings, we can change the IP address range remotely
TLS
Basic validation and provide basic authentication only after initializing TLS
Exchange users
Partner
On the intranet settings page, we can manage internal IP addresses, ports and FQND.
In remote network settings, we can change the IP address range remotely
TLS and Enable Domain Security (Mutual Auth TLS)
Partners
Custom
On local network settings, we can manage internal IP addresses, ports and FQND.
In remote network settings, we can change the IP address range remotely
TLS
None
We will cover the authentication and permissions in the later part of this series, so let's finish the Internet Receive Connector.
7. In the Local Network Settings page. We only use the internal server's second IP address on port 25. We also use mail.andersonpatricio.org as the unique domain address of the FQDN, as shown in Figure 3. This name will be shown when a connection is established with this Receive Connector. Click Next.
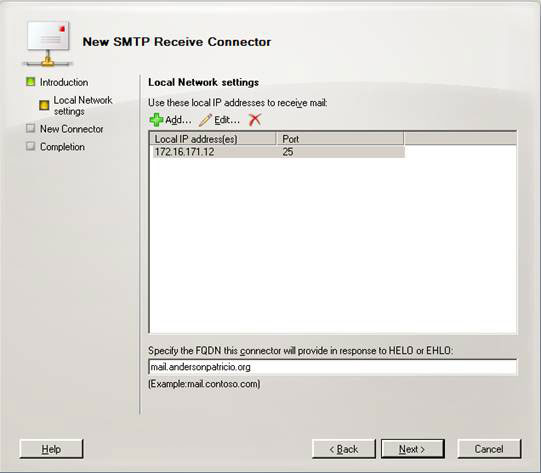
Figure 3
8. New Connector . The page shows a summary of the choices that have been made so far. Click New to create a Receive Connector.
9. Completion . The final screen of the new receive connector wizard with all the information provided during creation and the commands used to create it. Click Finish.
There are many steps needed to create a new receive connector; We can do the same with Exchange Management Shell. To create, we must use the New-ReceiveConnector command. In this example, we will create a connector similar to the one described in the steps above.
New-ReceiveConnector -Name 'Connector Name' –Usage: Internet –Bindings :: -fqdn: '' –Server
Check for new Receive connectors .
We have created a new connector. Now let's start testing our connector using the following command: telnet 172.16.171.12 25, here 25 is the port to be used (Figure 4). The connection will be created and the name of the FQDN that we defined in our new Receive Connector will be displayed. If you want to connect using the IP address 172.16.171.11, we will receive other reminders because it is another connector. Our Internet connector only listens on the 172.16.171.12 IP address.
Figure 4
Conclude
In this section, I have shown you how to create a receive connector and also introduce Receive Connector to maintain at least one of these attributes: IP address, port, remote IP address, so that you can created. In the next section, we will introduce some security features and traffic control configurations.

Was this article helpful?
Your feedback helps us improve.
Related Articles
 Managing Receive Connector - Part 49 minutes read
 Managing Receive Connector - Part 39 minutes read
 Managing Receive Connector - Part 29 minutes read
 Use the MCP connector correctly.13 minutes read
 What is an MCP Connector? What makes it special?4 minutes read
 Comparing Copilot connector and Power Platform connector9 minutes read
Reader Comments 0
Sign in with email or Google to join the discussion.