Managing Receive Connector - Part 3
 Managing Receive Connector - Part 1
 Managing Receive Connector - Part 2
Anderson Patricio
TipsMake.com - This section will introduce you to the logging settings and authentication methods used by Receive Connector.
Configure Receive Connector record settings
We can configure logging per receive connector. To enable logging in a receive connector, we must specify the location of the log files in advance. To configure where log files will be stored before enabling the logging feature at the connector level:
1. Open the Exchange Management Console
2. Open Server Configuration
3. Click Hub Transport
4. Select the existing hub transport on the right and click Properties
5. Click the Log Settings tab. In the Protocol Log section, we can change the path to where Receive Connectors or Send Connectors will be saved by clicking the Browse button (Figure 1).

Figure 01
Now that we know the location of the log files, we can see the properties of any Receive Connector and have the option called Protocol logging level set to None and will change Verbose. (see Figure 2). Use Verbose mode only during the troubleshooting scenario, otherwise leave it to None.
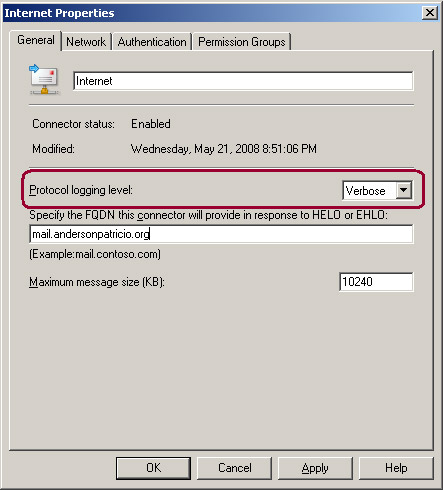
Figure 02
We can now send a text message using SMTP (as introduced in the previous sections) and can check all communications in a log file, as shown in Figure 3.
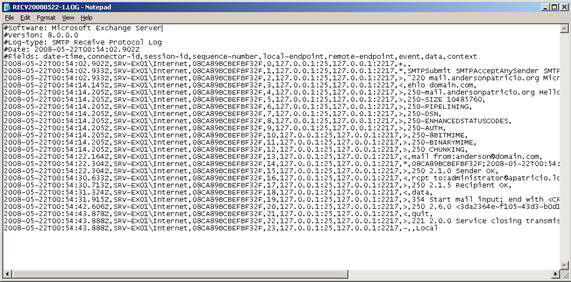
Figure 03
Configure authentication and terms
What we've been working on up to now is how to create a receive connector, how to manage some security features, and how to change IP listeners to make each connector unique. We will introduce you to the authentication methods and available permissions related to Receive Connector.
Receive Connectors use 7 different authentication types: No authentication, TLS, Integrated, Basic Authentication, Basic Authentication over TLS, Exchange Server Authentication (Gssapi and Mutual Gssapi) and External Authoritative. These authentication methods are used for clients in the SMTP session, after authentication is performed next to the applicable terms. To configure the authentication method for a Receive Connector to use, let's use the following steps:
1. Open the Exchange Management Console.
2. Open Server Configuration.
3. Click Hub Transport.
4. Click Receive Connector and click Properties
5. Click the Authentication tab (see Figure 4).
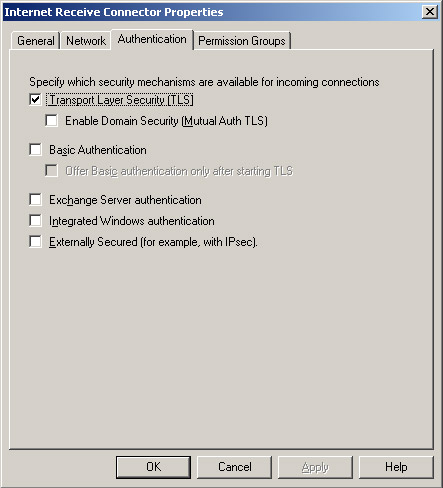
Figure 04
We will see the authentication method used by a receive connector for a simplest telnet session. All existing authentication methods are shown after SMTP verb ehlo . The following table shows the difference in the response of SMTP for each authentication method:
Authentication Method
Response of EHLO
Transport Layer Security (TLS)
250-STARTTLS
Basic Authentication
250-Auth Login
Integrated Windows Authentication
250-Auth NTLM
Externally Secured
250-Auth
250 XEXCH50
We have just seen how to configure authentication methods to use in a Receive Connector, now we will configure an internal relay server, which is useful for users / printers / servers needed. must send the message with an internal relay server. We will create an internal relay connector and then change some configuration to demonstrate what we have done to satisfy our needs. First create the Internal Receive Connector. The connector will use the connection on port 25, though the connections will be made on the machines from addresses 172.16.171.1 to 172.16.171.20 in this example. Assign another FQND; For the receive connector inside, we will use relay.apatricio.local , the following command is used to create the connector:
New-ReceiveConnector –Usage: Client -Bindings: 0.0.0.0: 25 –RemoteIPRanges: 172.16.171.1-172.16.171.20 –FQDN: relay.apatricio.local –Server srv-ex01 –ProtocolLoggingLevel: Verbose –Name: 'Internal Relay'
Now that we have created a Receive Connector, now is the time to go to any remote IP address specified, so you will see a prompt for your new receive connector. . Verify the FQND information displayed in the first line (see Figure 5).

Figure 05
Open the Event Viewer in the Exchange Server and we will see the error number 12014 and MSExchangeTransport Source. This error occurred because we still do not have a certificate for relay.apatricio.local FQDN. However, this error message can be avoided by configuring the internal Receive connector using Basic Authentication and Integrated Windows Authentication, as shown in Figure 6. We will look at TLS and certificates for this connection in next part.
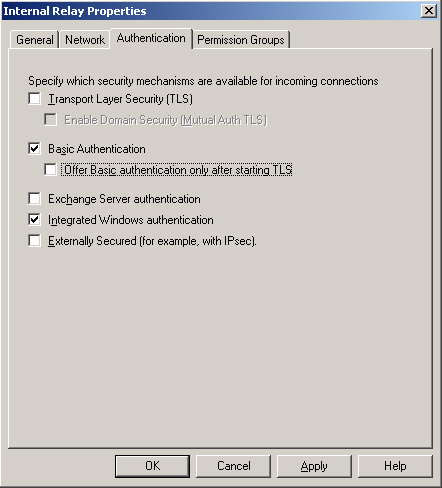
Figure 06
In the Permission Groups tab, we have 5 different permissions groups, all of which are related to the receive connector. These predefined permissions groups are a set of objects that can include users, computers, and security groups, which define the SID (Security Identifier) permissions, for example (Exchange Users group permissions). is an authorized user group in Active Directory) Using these permissions groups is an effective solution for the majority of companies, although we cannot change permissions groups using the Exchange Management Console.
In the Permissions Groups tab, we will validate who is allowed to connect to the Receive Connector. In the Client Connector, by default only 'Exchange Users' are allowed (see Figure 7).
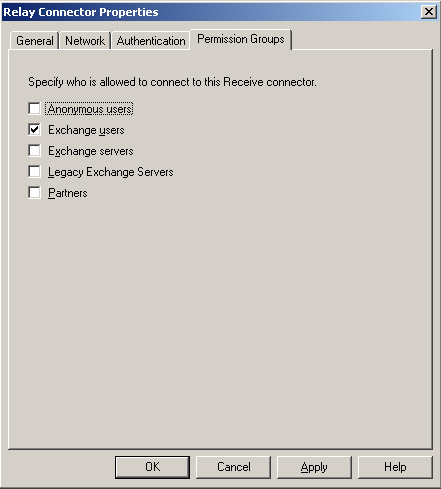
Figure 07
Because we have authentication methods and permissions that are related to Exchange Users, it is possible to test. To test, we can use Outlook Express to create a dummy account with a fake POP3 Server account that is only used to test the SMTP protocol. Make sure that the reply address used in your Outlook Express account is in the current Accepted Domains list in the Exchange organization and that you are using the correct username and password, and finally configure the account to use authentication by 'My Server requires authentication' option.
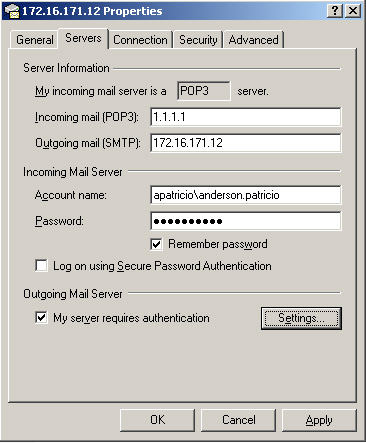
Figure 08
You can now send a message to any email address and the notification will be sent. So how do we make sure that the appraisal works? Absolutely very easy! During the receive connector creation, we have configured logging level for Verbose. Now you understand why we say it's easy? Look at the log files created and we will see the authentication process as shown in Figure 9.

Figure 09
The default configuration is in most scenarios, although sometimes there are exceptions, in these cases, the permissions are required to configure Receive Connector to suit your needs. company. We can configure Receive Connector permissions in two ways: using Exchange Management Shell or AdsiEdit.msc.
The first method is to use Exchange Management Shell. To observe the current provision of a Receive Connector, run the following command:
Get-ReceiveConnector | Get-ADPermission
To manage permissions, use Add-ADPermission to add entries to that list and Remove-ADPermissions to remove entries.
The second method to set up Receive Connector permissions is to use AdsiEdit.msc (default is included in Windows support tool, you must install this tool before using it).
Using ADSIEdit.msc, we can perform some operations with the Receive Connector clause:
1. Open AdsiEdit.msc.
2. Open Configuration.
3. Open CN = Services.
4. Open CN = Microsoft Exchange.
5. Open CN =.
6. Open CN = Exchange Administrative Group (FYDIBOHF23SPDLT).
7. Open CN =.
8. Open CN = Protocols.
9. Open CN = SMTP Receive Connectors.
10. On the right side of the window, we will see all the Receive Connector of the server (Figure 10).
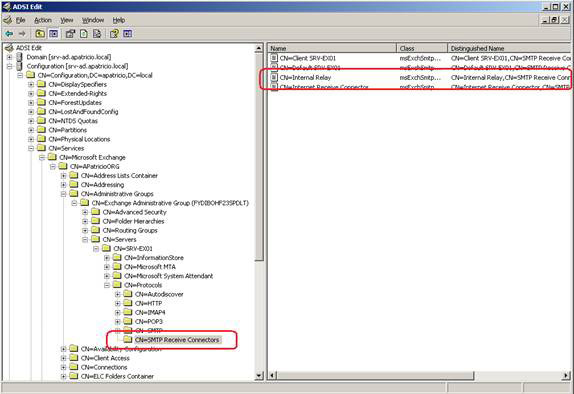
Figure 10
11. Right-click the Receive Connector and click Properties
12. Click the Security tab, in the list we will see all the Security Identifiers for each group of permissions related to receive connectors and permissions.
Now we can completely manage the permissions easily with Adsiedit.msc instead of Exchange Management Shell.
Conclude
In this section, I have shown you how to configure the log settings in a Receive Connector and how to configure permissions using AdsiEdit and Exchange Management Shell.