Manage Wifi connection in Windows 7
Windows 7 is Microsoft's third operating system version for integrated workstations that support Wi-Fi networking.
Network administration - Windows 7 is the third operating system version of Microsoft for workstations with built-in support for Wifi networking.
However, in Windows 7, the process of connecting, managing and maintaining Wifi networks has been greatly simplified compared to Windows XP and Windows Vista. Also provide more utilities to support users when connecting to Wifi networks, such as automatically searching for connections, establishing connections, .
Search for Wifi networks
Windows 7 incorporates an improved version of the automatic Wi-Fi network search feature that was first introduced in Windows XP, and then integrated into Windows Vista.
Note: Windows 7 uses the WLAN AutoConfig service (introduced in Windows Vista) to manage the Wifi network instead of the Wireless Zero Configuration service used by Windows XP.
When no other network connection is enabled Windows 7 will search for Wifi that we can connect. It displays a 5-bar icon marked with a bright star in the notification area in the Taskbar. This icon means Not connected - Connections are Available. (Do not connect - Connected) To start the connection process, click on the icon to display the detected Wi-Fi networks (Figure 1).
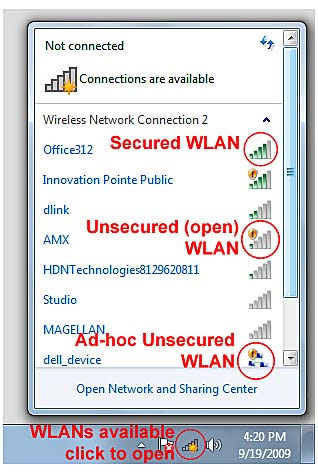
As shown in Figure 1, we can connect Windows 7 to many different Wifi networks. Include:
WLAN connections showing an icon of three devices are Ad-hoc connections. Ad-hoc Connection is a direct link between two PCs or between a PC and a printer, multifunction device, digital camera, or other device. We cannot use Ad-hoc connection to connect directly to the Internet.
Connections marked with a yellow Windows shield are unsecured or unsecured connections, in which no encryption key is used. Unsecured Infrastructure networks are often used in free Internet service providers, such as hotels, libraries, and meeting rooms, etc. Ad-hoc networks are often installed for insecure access.
Connections without Windows' yellow protection shield are secure Wifi networks. We must provide the encryption key used by this network every time we connect to the network.
Unsecured Wifi network connection (open)
If you don't always work at the office, we may always have to connect to unsecured Wifi networks. Here are the steps to take to connect to these networks and then save them for future use.
1. Open the list of available Wi-Fi networks.
2. Click an unsecured connection.
3. To save this connection for future uses, click the Connect Automatically check box (Figure 3A).
4. Click the Connect button to make the connection shown in Figure 3B.
5. After connecting to an unsecured Wifi network, select the network type of Public Network (Figure 4). When selecting Public Network , we will have to configure Windows Firewall to stop sharing the connection on the computer and help block unauthorized access.

If we save this connection (step 3), Windows 7 will automatically make the connection every time the system detects this network.
Connect to secure Wifi network (encrypted)
Connect to Wifi network with hidden SSID

Manage Wifi connection
Check Internet connection sharing properties and settings
Conclude
However, in Windows 7, the process of connecting, managing and maintaining Wifi networks has been greatly simplified compared to Windows XP and Windows Vista. Also provide more utilities to support users when connecting to Wifi networks, such as automatically searching for connections, establishing connections, .
Search for Wifi networks
Windows 7 incorporates an improved version of the automatic Wi-Fi network search feature that was first introduced in Windows XP, and then integrated into Windows Vista.
Note: Windows 7 uses the WLAN AutoConfig service (introduced in Windows Vista) to manage the Wifi network instead of the Wireless Zero Configuration service used by Windows XP.
When no other network connection is enabled Windows 7 will search for Wifi that we can connect. It displays a 5-bar icon marked with a bright star in the notification area in the Taskbar. This icon means Not connected - Connections are Available. (Do not connect - Connected) To start the connection process, click on the icon to display the detected Wi-Fi networks (Figure 1).
Figure 1: Wireless Connection dialog box.
As shown in Figure 1, we can connect Windows 7 to many different Wifi networks. Include:
- Infrastructure
- Ad-hoc
- Unsecured (open)
- Secured (encryption)
WLAN connections showing an icon of three devices are Ad-hoc connections. Ad-hoc Connection is a direct link between two PCs or between a PC and a printer, multifunction device, digital camera, or other device. We cannot use Ad-hoc connection to connect directly to the Internet.
Connections marked with a yellow Windows shield are unsecured or unsecured connections, in which no encryption key is used. Unsecured Infrastructure networks are often used in free Internet service providers, such as hotels, libraries, and meeting rooms, etc. Ad-hoc networks are often installed for insecure access.
Connections without Windows' yellow protection shield are secure Wifi networks. We must provide the encryption key used by this network every time we connect to the network.
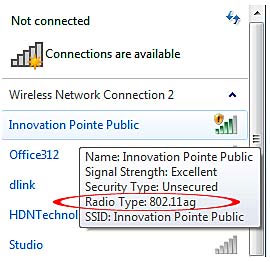
Figure 2: This connection works with both 2.4GHz Wifi Adapter (802.11g)
and 5GHZ (802.11a)
and 5GHZ (802.11a)
Unsecured Wifi network connection (open)
If you don't always work at the office, we may always have to connect to unsecured Wifi networks. Here are the steps to take to connect to these networks and then save them for future use.
1. Open the list of available Wi-Fi networks.
2. Click an unsecured connection.
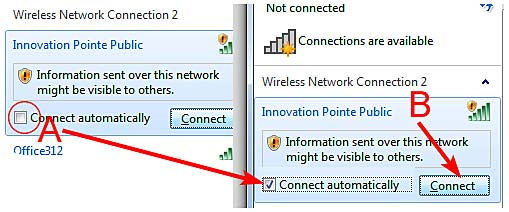
3. To save this connection for future uses, click the Connect Automatically check box (Figure 3A).
4. Click the Connect button to make the connection shown in Figure 3B.
Figure 3: Save an open Wifi connection for the next use (A) and connect to the open Wifi network (B).
5. After connecting to an unsecured Wifi network, select the network type of Public Network (Figure 4). When selecting Public Network , we will have to configure Windows Firewall to stop sharing the connection on the computer and help block unauthorized access.
Figure 4: When selecting Public Network, maximum security
will be applied for open Wifi connection.
will be applied for open Wifi connection.
If we save this connection (step 3), Windows 7 will automatically make the connection every time the system detects this network.
Connect to secure Wifi network (encrypted)
We can also connect to a secure Wifi network from the notification area. Perform the following actions:
1. Open the list of available Wi-Fi networks.
2. Click on a secure connection (these networks are not marked with the Windows yellow shield).
3. To save this connection for later use, select the Connect Automatically checkbox.
4. Click Connect to start the connection process.
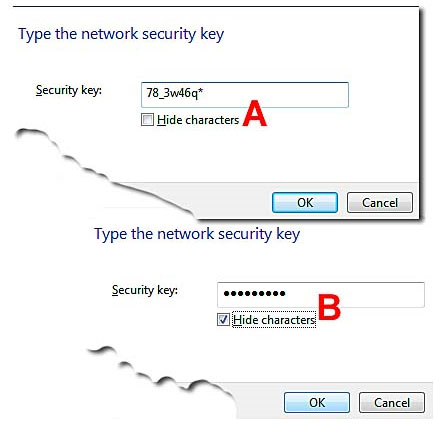
5. Enter the network security key (using WPA, WPA2 or WEP encryption key) when notified. By default, we can see these characters when entering (Figure 5A). Select the H ide Characters check box to hide the input characters (Figure 5B).
1. Open the list of available Wi-Fi networks.
2. Click on a secure connection (these networks are not marked with the Windows yellow shield).
3. To save this connection for later use, select the Connect Automatically checkbox.
4. Click Connect to start the connection process.
5. Enter the network security key (using WPA, WPA2 or WEP encryption key) when notified. By default, we can see these characters when entering (Figure 5A). Select the H ide Characters check box to hide the input characters (Figure 5B).
Figure 5: Enter the network security key.
After connecting to a secure network, select the Home or Work network to configure Windows Firewall to match the network type. If you want to install or join a Homegroup, then we need to select the network type as Home Network.
Automatically reconnect to Wifi network
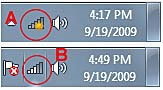
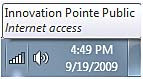
Windows 7 can automatically connect back to a stored Wi-Fi network when the computer in the area has a Wifi signal and if this network spreads SSID (Service Set Identifier). To confirm whether Windows 7 is connected to a Wifi network, check the Wifi network icon located in the system tray (Figure 6).
Automatically reconnect to Wifi network
Windows 7 can automatically connect back to a stored Wi-Fi network when the computer in the area has a Wifi signal and if this network spreads SSID (Service Set Identifier). To confirm whether Windows 7 is connected to a Wifi network, check the Wifi network icon located in the system tray (Figure 6).
Figure 6: Detecting some Wi-Fi networks but no connection has been established (A).
A Wifi connection is being used (B).
A Wifi connection is being used (B).
The number of bars in Figure 6 shows the signal strength of that Wifi connection. When we move the mouse pointer over this Wifi connection icon, the name of the current Wifi network connection will appear.
Figure 7: Move the cursor over the icon
to see the name of the Wifi network connection.
to see the name of the Wifi network connection.
Connect to Wifi network with hidden SSID
Windows 7 detects that Wi-Fi networks do not play their SSIDs like other networks. To connect to a network that does not play SSID, we must enter the SSID of that network as well as the encryption key when notified.
Visit the Web site to complete the connection
Some Wifi connections require that we agree to request to use the service or access a security license before we can use them. Windows 7 will remind us in necessary cases by displaying a message containing Additional Log Content on Information May Be Required (It may be necessary to use additional information records). Click on this message to run the browser application and complete the process.
Figure 8: Click on the message to access a necessary Web site
to complete the process of signing up for Wifi connection.
to complete the process of signing up for Wifi connection.
Manage Wifi connection
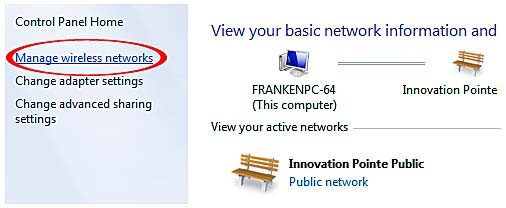
As we all know, Windows 7 will prompt to save a Wifi connection when we start connecting. To manage Wifi connections, open the Network and Sharing Center (we can open it from the Wireless Network Connection dialog in the notification area or from Control Panel). Click on the Manage Wireless Connections link in the left panel to start the management process (Figure 9).
Figure 9: Open the Manage Wireless Connections dialog box from the Network and Sharing Center.
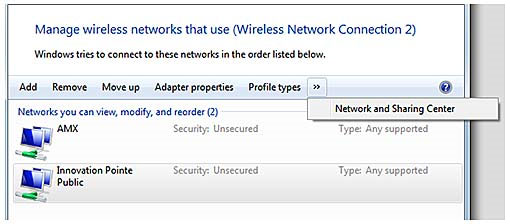
The Wifi network connection management dialog (Figure 10) is used to add, remove, or arrange Wifi network connections. Also we can display the Wifi Adapter's properties, select a profile type, or open the Network and Sharing Center.
Figure 10: Manage Wireless Connections dialog box.
Connecting the Wifi network at the top of the list is the preferred network. To move a connection to the desired location, we just need to select the connection and then press the Move Up or Move Down button.
To remove an unused connection, select it and click the Remove button.
To add a new connection, click the Add button then provide the necessary information such as SSID, encryption type, encryption key, .
To remove an unused connection, select it and click the Remove button.
To add a new connection, click the Add button then provide the necessary information such as SSID, encryption type, encryption key, .
Check Internet connection sharing properties and settings
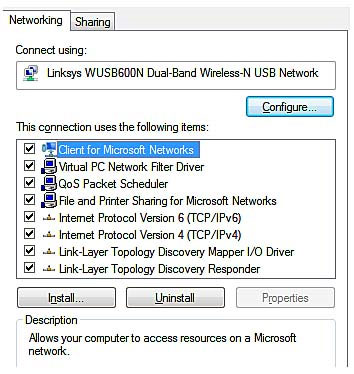
To check the Wifi Adapter's properties , click on the Adapter Properties (Figure 11) in the Wireless Network Management dialog box as shown in Figure 10.
In the Wifi Adapter properties dialog, the Networking tab displays the network components being used and allows us to install or remove components.
In the Wifi Adapter properties dialog, the Networking tab displays the network components being used and allows us to install or remove components.
Figure 11: Networking tab on the Wifi Adapter properties dialog box.
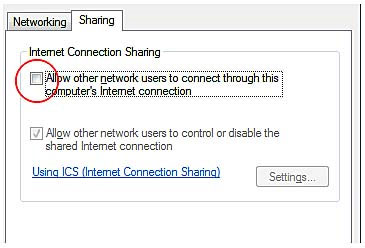
The Sharing tab is used to configure the system as an Internet connection sharing server (Figure 12). An ICS server will provide Internet access to other computers on the network via its own Internet connection. We can use ICS along with a Wifi (or Switch or access server) access point to use the Router.
Figure 12: Sharing tab on Wifi Adapter properties dialog box.
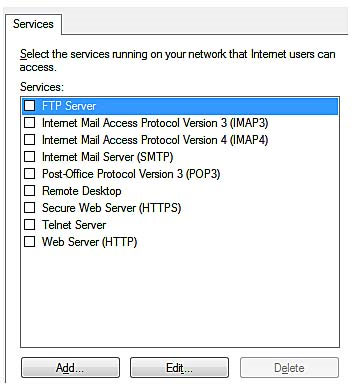
Select the box to select Allow other network users to connect through Internet connection this computer to enable ICS. To specify the services that ICS will support, click the Settings button and select the services in the Services list as shown in Figure 13.
Figure 13: Install ICS support for desired services.
In addition to the services already included in the list, we can include other services by clicking the Add button and selecting the services that need to be supported.
Disconnect Wifi
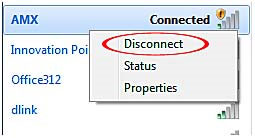
To disconnect from a Wifi connection, click on the Wifi network icon in the system tray, then right-click on the current connection and select Disconnect (Figure 14). In addition, we can check the status and properties of the network from this dialog.
Disconnect Wifi
To disconnect from a Wifi connection, click on the Wifi network icon in the system tray, then right-click on the current connection and select Disconnect (Figure 14). In addition, we can check the status and properties of the network from this dialog.
Figure 14: Disconnect from Wifi network.
Conclude
Windows 7 makes managing Wifi networks much easier than before. However, keep in mind that the network adapter needs to have Windows Vista or Windows 7 drivers installed in order to operate stably.
Was this article helpful?
Your feedback helps us improve.
Related Articles
 How to fix the problem of not connecting to WiFi in Windows 104 minutes read
 How to set up preferred WiFi connection mode on Mac3 minutes read
 Difference between WiFi 5, WiFi 6 and WiFi 6E6 minutes read
![[Tips] Some tips to speed up the most effective WiFi connection](/data1/thumbs_200x120/[tips]-some-tips-to-speed-up-the-most-effective-wifi-connection_thumbs_200x120_VjqHwt5FY.jpg) [Tips] Some tips to speed up the most effective WiFi connection13 minutes read
[Tips] Some tips to speed up the most effective WiFi connection13 minutes read
 How to hide hidden WiFi network SSID on Windows 105 minutes read
 Steps to fix Wi-Fi problems on Windows 112 minutes read
Reader Comments 0
Sign in with email or Google to join the discussion.