Fix Wifi error disconnected on Windows 10, 8, 7 and Vista
Have you ever had a laptop disconnect from your wireless network continuously? Or after upgrading the computer to Windows 10 (or Windows 8, 8.1) operating system, your Wifi connection is disconnected.
Table of Contents
In most cases the cause of the Wifi disconnection is after updating a new Windows version (for example, from Windows 8 to Windows 10), or because the Wi-Fi card settings are incorrect.
If you are faced with Wifi connection error or connection limit error, you can refer to some solutions to fix errors in the following article of Network Administrator.

1. Fix the wireless network card disconnection error on Windows 10, 8.1, 8, 7 and Vista
Edit Power Management Settings
Step 1. Open Windows Explorer.
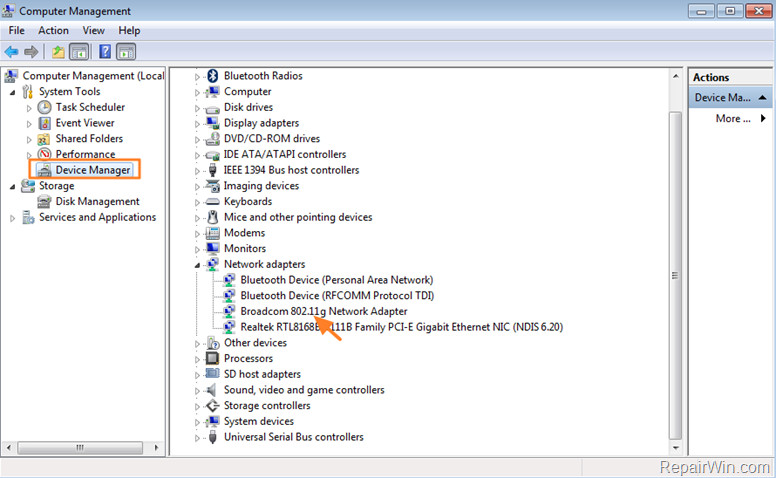
Step 2. On the Windows Explorer window, right-click the Computer icon (This PC), then select Manage .

Step 3. Select Device Manager in the left pane and expand Network Adapters .
Step 4. Double-click on Wifi adapter, to open the Properties window.
Step 5. On the Properties window, find and click the Power Management tab.
Step 6. Uncheck the ' Allow Windows to turn off this device to automatically save power ' section.

Step 7. Close all windows and check if the error is still there.
Step 8. If the Wifi error still disconnects, follow the steps below.
Disable 802.11n (if Wifi network card supports)
The 802.11n Wifi standard (also called Wireless N) is designed to improve 802.11g Wifi standards, using multiple wireless signals and antennas instead of one. But the use of multiple signals can interfere / 802.11b / g networks nearby and in some cases cause the WiFi disconnection.
To disable 802.11N (wifi standard), follow the steps below:
Step 1. Open Device Manager and expand Network Adapters in the right pane.
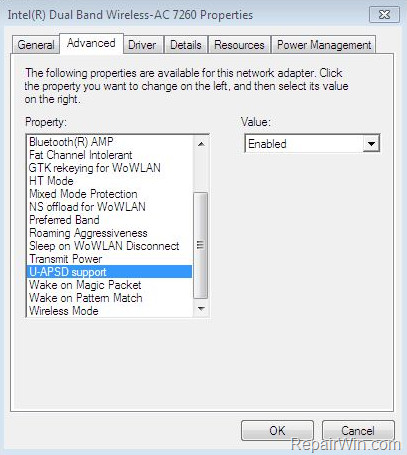
Step 2. Double-click the Wireless adapter to open the Properties window.
Step 3. On the Advanced tab, select 802.11n Mode and select Disabled .

Step 4. Click OK to save the changes and close all windows.
Add more:
In addition, you can disable the uAPSD (Unscheduled Automatic Power Save Delivery) feature if your wireless network card supports it.
Step 5. If Wifi still disconnects, proceed to step 3 below.
Disable the Power Saving feature
Step 1. Open Power Options from Control Panel.
Step 2. In the Power Options window, find and click Change plan settings .

Step 3. Next select Change Advanced Power Settings .
Step 4. Set the Power plan to High Performance .

Step 5. Scroll down to Wireless Adapter Settings and set Power Saving Mode to Maximum Performance .

Step 6. Click OK to apply the change.
2. Some other solutions
In some cases the Wifi card may be disconnected after you update (update) the driver or update Windows. In this case:
Step 1. On the Device manager window, select Bluetooth adapter and disable it.
Step 2. Restore (restore) Windows to the previous version and check the stability of the Wifi connection.
Step 3. Uninstall the wireless network card driver, then restart the computer. After booting, proceed to reinstall the latest driver version for Wifi card on the manufacturer's homepage.
Step 4. Disable Windows Firewall. And if you have a third-party antivirus application or firewall installed, try temporarily disabling or uninstalling these programs on the system.
Step 5. Try another wireless card.
Good luck!
Was this article helpful?
Your feedback helps us improve.
Related Articles
 Learn about error code 0xc00000e and how to fix it5 minutes read
 Fixing the error 'WiFi doesn't have a Windows 10 configuration IP validation'4 minutes read
 How to fix the error Disconnected Among Us, the error cannot be Among Us3 minutes read
 Fixed driver disconnection when connecting to WiFi connection5 minutes read
 The way to fix Windows 8 error does not catch WiFi4 minutes read
 How to fix VPN error 6194 minutes read
Reader Comments 0
Sign in with email or Google to join the discussion.