CorelDRAW X6 interface overview, and CorelDRAW X6 KEYS to know
An overview of the CorelDRAW X6 program interface and all the commonly used shortcuts in CorelDRAW X6 that you need to know
Table of Contents
Before using any program or application, we first need to learn about the layout / interface of that software first. And with the program CorelDRAW is no exception, we will learn about CorelDRAW first.
I. Quick Start Dialog
When you just start the program, a dialog box called Quick Start appears that allows you to quickly create a new drawing or quickly open an existing drawing on the machine. In addition, the dialog box also allows access to learning tools, checking for program updates, etc.

In this dialog box, the commonly used function is New blank document, which in Vietnamese means a new blank document, and when you select it, the Create a New Document dialog box will appear with the interface as shown below.
In this dialog you can set technical parameters such as the name of the drawing, paper size, number of pages, color mode, resolution, etc.
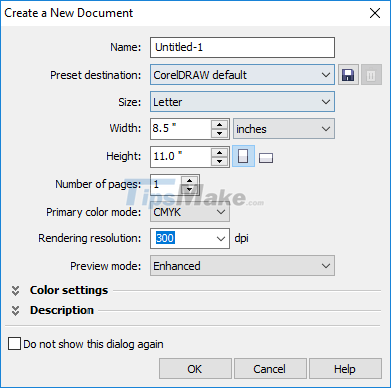
- Name: The name of the drawing that you will create by default is named Untitled-1, Untitled-2, Untitled-3…
- Preset Destination: You can roughly understand where your drawing will appear last like to a website, to a printer or to a photo.
- Size: The size of the paper you will be working on. You can choose from existing paper sizes or create a new one yourself. By entering values in the Width and Height fields below.
- Number of pages: Number of pages to create.
- Primary color mode: The color mode you can choose is RGB tricolor mode or CMYK four color mode.
- Rendering resolution: The resolution of the drawing can be adjusted as you publish.
- Review mode: Preview mode.
II. CorelDRAW . main interface
The interface of the CorelDRAW program is similar to other programs including components such as title bar, menu bar, standard toolbar, status bar, etc.
There are also additional properties bar, toolbox, palette, etc. details of the functionality of the components are listed below.

- Title bar: Displays the title of the drawing.
- Menu bar: Contains submenus and commands.
- Standard Toolbar: Contains commonly used commands such as open, save, print, etc.
- Property Bar: Contains commands related to the currently selected tool and will change according to the tool you are using.
- Rulers: Horizontal and vertical rulers that you use to define the size and position of objects in the drawing.
- Toolbox: Contains tools for creating and modifying objects in the drawing.
- Document Window: A workspace area surrounded by scroll bars including the drawing page and surrounding areas.
- Drawing Page: It is a rectangle where the objects contained herein will be printed.
- Color Palette: The palette contains color swatches.
- Document Navigator: Allows you to add pages to a document or move between pages.
- Document palette: Contains swatches of the open drawing.
- Status bar: Displays information about object properties such as type, size, color, etc.
III. Setting and setting parameters for a page
The page properties bar allows you to adjust page settings such as paper size, size, page orientation, spacing units, etc.
To use the page's property bar, press the Space key on the keyboard or select the Picktool tool in the toolbox, in the order of function of each command button as follows:

- Select the available paper sizes (sizes) such as A0, A1, A2, A3, …
- Enter the width and height of the page as you like
- Vertical or horizontal page orientation
- Apply dimensions to all pages in a drawing
- Apply size to current page
- Select the unit of length measurement
You can navigate the pages in the drawing using the navigation bar at the bottom right of the application window, in the order of function of each command button as follows:

- Go to the first page.
- Go to previous page.
- Open the go to page dialog.
- Go to the next page.
- Go to the last page.
- Add new page.
- Click on any page tab to go to that page.
IV. Shortcut keys and shortcut combinations
In addition to using the mouse to create waterfalls with CorelDRAW, you can use keyboard shortcuts and shortcut combinations to create faster and shorten the time to complete the product. In the beginning you may not know much, but after a while of use, you will certainly know the shortcuts and combinations of these shortcuts listed below.
1. Shortcuts to manipulate files in CorelDRAW
| STT | COMEINAND | SHORT KEYS |
|---|---|---|
| first | new | Ctrl + FEMALE |
| 2 | Open | Ctrl + O |
| 3 | Save | Ctrl + WILL |
| 4 | Save As | Ctrl + Shift + WILL |
| 5 | Import | Ctrl + I |
| 6 | Export | Ctrl + E |
| 7 | Ctrl + P | |
| 8 | Exit | Alt + F4 |
2. Keyboard shortcuts to manipulate EDIT in CorelDRAW
| STT | COMEINAND | SHORT KEYS |
|---|---|---|
| first | Undo | Ctrl + Z |
| 2 | Redo | Ctrl + Shift + Z |
| 3 | Repeat | Ctrl + CHEAP |
| 4 | Cut | Ctrl + X |
| 5 | Copy | Ctrl + |
| 6 | Paste | Ctrl + DRAW |
| 7 | Delete | Delete |
| 8 | Symbol => Symbol Manager | Ctrl + F3 |
| 9 | Duplicate | Ctrl + EASY |
| ten | Step and Repeat | Ctrl + Shift + EASY |
| 11 | Find and Replace => Find Objects | Ctrl + F |
| twelfth | Object Properties | Alt + Enter |
3. Keyboard shortcuts to manipulate VIEW in CorelDRAW
| STT | COMEINAND | SHORT KEYS |
|---|---|---|
| first | Full-Screen Preview | F9 |
| 2 | View Manager | Ctrl + F2 |
| 3 | Snap to => Document Grid | Ctrl + Y |
| 4 | Snap to => Objects | Alt + Z |
| 5 | Dynamic Guides | Alt + Shift + EASY |
| 6 | Alignment Guides | Alt + Shift + A |
4. Keyboard shortcuts to manipulate Arrange in CorelDRAW
| STT | COMEINAND | SHORT KEYS |
|---|---|---|
| first | Transformations => Position | Alt + F7 |
| 2 | Transformations => Rotate | Alt + F8 |
| 3 | Transformations => Scale | Alt + F9 |
| 4 | Transformations => Size | Alt + F10 |
| 5 | Align and Distribute => Align Left | OFFER |
| 6 | Align and Distribute => Align Right | CHEAP |
| 7 | Align and Distribute => Align Top | BILLION |
| 8 | Align and Distribute => Align Bottom | REMOVE |
| 9 | Align and Distribute => Align Centers Horizontally | E |
| ten | Align and Distribute => Align Centers Vertically | OLD |
| 11 | Align and Distribute => Center to Page | P |
| twelfth | Order => To front of Page | Ctrl + Home |
| 13 | Order => To Back of Page | Ctrl + End |
| 14 | Order => To Front of Layer | Shift + Page Up |
| 15 | Order => To Back of Layer | Shift + Page Down |
| 16 | Order => Forward One | Ctrl + Page Up |
| 17 | Order => Backward One | Ctrl + Page Down |
| 18 | Group | Ctrl + WOOD |
| 19 | Ungroup | Ctrl + U |
| 20 | Combine | Ctrl + ERROR |
| 21 | Break Apart | Ctrl + KY |
| 22 | Convert to Curves | Ctrl + Q |
| 23 | Convert Outline to Object | Ctrl + Shift + Q |
5. Keyboard shortcuts to manipulate Effects in CorelDRAW
| STT | COMEINAND | SHORT KEYS |
|---|---|---|
| first | Adjust => Brightness/Contrast/Intensity | Ctrl + REMOVE |
| 2 | Adjust => Color Balance | Ctrl + Shift + CANCEL |
| 3 | Adjust => Hue/saturation/Lightness | Ctrl + Shift + U |
| 4 | Contour | Ctrl + F9 |
| 5 | Envelope | Ctrl + F7 |
| 6 | Lens | Ctrl + F3 |
6. Keyboard shortcuts to manipulate Text in CorelDRAW
| STT | COMEINAND | SHORT KEYS |
|---|---|---|
| first | Text Properties | Ctrl + |
| 2 | Edit Text | Ctrl + Shift + UP |
| 3 | Insert Symbol Character | Ctrl + F11 |
| 4 | Insert Formating Code => Non-breaking Hypen | Ctrl + Shift + - |
| 5 | Insert Formating Code => Optional Hypen | Ctrl + - |
| 6 | Align to Baseline | Alt + F12 |
| 7 | Writing Tools => Spell Check | Ctrl + F12 |
| 8 | Convert | Ctrl + F8 |
7. Keyboard shortcuts to manipulate Tools in CorelDRAW
| STT | COMEINAND | SHORT KEYS |
|---|---|---|
| first | Options | Ctrl + J |
| 2 | View Manager | Ctrl + F2 |
| 3 | Color Styles | Ctrl + F6 |
| 4 | Object Styles | Ctrl + F5 |
| 5 | Macros => Macro Manager | Alt + Shift + F11 |
| 6 | Macros => Macro Editor | Alt + F11 |
| 7 | Macros => VSTA Editor | Alt + Shift + F12 |
| 8 | Macros => Stop Recording | Ctrl + Shift + O |
| 9 | Macros => Record Temporary Macro | Ctrl + Shift + RED |
| ten | Macros => Run Temporary Macro | Ctrl + Shift + P |
8. Help
| Comeinand | Keystrokes |
| Help Topics | F1 |
9. Window
| Comeinand | Keystrokes |
| Refresh Window | Ctrl + W |
Conclude
OK, so in this tutorial, I have guided you through the overview interface of the CorelDRAW X6 program, and at the same time, I have also summarized the shortcuts commonly used in the CorelDRAW program with you.
I would like to pause my pen here, in the next article I will introduce you to the functions of the tools in the Toolbox toolbox.
Hope the article is useful. See you in the next article.
Was this article helpful?
Your feedback helps us improve.
Related Articles
 Overview of the PowerPoint interface2 minutes read
 Comparing Illustrator and CorelDraw4 minutes read
 Overview of the interface in Excel 2013, 20163 minutes read
 How to install CorelDraw on a Macbook3 minutes read
 Fixed an error when opening DWG files in CorelDRAW4 minutes read
Reader Comments 0
Sign in with email or Google to join the discussion.