Introducing Folder Action in Mac OS X
TipsMake.com - If you often have to perform repetitive tasks in the folder of Mac OS X operating system, you can create scripts to automate those operations. The following article will introduce Folder Action in Mac OS X.
Automation technology is programmed to integrate into OS X operating system as AppleScript scripting language. As its name suggests, AppleScript is a scripting user interface - small programs can run separately or in combination with other scripts or macros. One of the very useful things you can do with AppleScript is to create Folder Actions, allowing you to automatically perform operations in the folder.
Folder Action has a very simple purpose: apply script-based operations to things that are added or removed from the folder. For example, if you have some image files in TIFF format, you need to resize them, change them all to gray scale, switch to PNG format and save. Graphics software like Photoshop can help you do that. But if those files are scattered all over your Mac, it would be much more convenient to just drag them to a separate folder that the change process was done automatically. With Folder Action, you won't need to open the additional programs needed to make changes.
Of course, Folder Action scripts don't need to be so complicated. If you intend to try writing a Folder Action from scratch, you should not try to create a script that is too troublesome. In fact, Mac OS X has a number of Folder Action scripts available and all are relatively simple. Here is a list of six of them:
add - new item alert.scpt A pop-up window appears to let you know a file has been added to the folder. This scenario is obviously very useful for shared folders that you need to track the content in.
close - close sub-folders.scpt Designed to clean the screen. Every time a file is added to the folder, that folder and all subdirectories will automatically close.
convert - PostScript to PDF.scpt This script converts PostScript files to PDF format as soon as you add them to the folder.
image - Duplicate as JPEG.scpt When you add images to a folder, OS X will automatically create a copy for that image in JPEG format. If the image itself is in JPEG format, the script will do nothing. There are actually three scenarios of this type built into OS X: a script to convert to JPEG, a script to convert to PNG format, and finally a script to convert to TIFF format.
image - Rotate Left.scpt Any image file added to the folder is rotated 90 degrees to the left. There is another scenario similar to this scenario, but turning the image to the right and having two scenarios flip the image horizontally or vertically.
image - Info to Comment.scpt When you add an image file to the folder, the image file information will be added to the Spotlight comment field. There is a related script that allows you to automatically see these annotations whenever a new file is added to the folder.

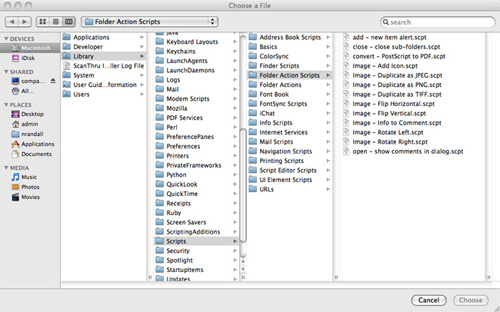
Available Folder Action scripts are located in Macintosh HD -> Libraries -> Scripts -> Folder Action Scripts.
Obviously, these are not too great additions to your automation. But they show the power of Folder Actions, especially in case you have multiple files to apply. Once you put the script in place, simply manipulating the file from one folder to another can be activated for the operation scenario. You will feel very easy and convenient.
Folder Actions work when you attach specific scripts to specific folders. But first, please note that the Folder Action system needs to be activated. You can do this in two main ways as follows:
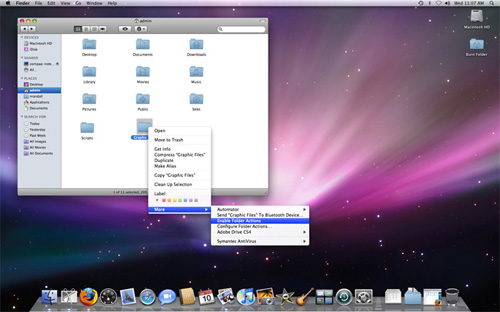
- Right-click the folder, select More -> Enable Folder Actions
- Right-click the folder, select More -> Configure Folder Actions , and check Enable Folder Actions on the Folder Actions Setup dialog box.
Enabling Folder Action system will be effective all over OS X, not just any folder. In fact, even if you want, you can't activate Folder Action individually.

The drop-down menu points to the option Enable Folder Actions.After activating Folder Actions, you can disable it by returning to this menu.
Once you have Folder Actions enabled, you can tell OS X what you want the folder to do by assigning it a script. To select the scenario you want to apply to a specific folder, right-click the folder, choose More -> Attach a Folder Action . Normally you will see the Folder Actions Scripts folder . Otherwise go to Macintosh HD -> Libraries -> Scripts -> Folder Action Scripts .

You can see the scripts in the rightmost frame.If you have scripts created or downloaded from the web, you should put them in this folder for your convenience.
Each folder can contain multiple Folder Actions, so you are not restricted to doing only one thing with drag and drop. If your Mac has a speaker on, you can hear it every time the script is executed. In some cases, the script creates subdirectories (such as the file format conversion script available in OS X), open the root directory to see what the script did.

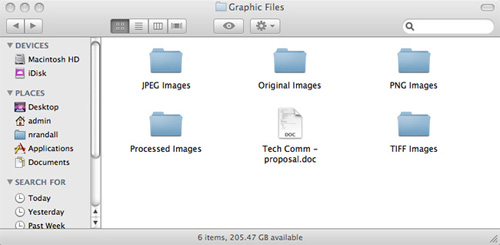
The Original Images subfolder contains graphic files that are dropped into the root directory.JPEG, PNG, and TIFF subfolders contain the corresponding copy that converted the format of those files.All these folders are created automatically by the script.
You should read it
- ★ Macromedia Flash - Advanced masking with action script
- ★ How to Enable and Use Script Execution Policy in Windows PowerShell
- ★ How to create and run a shell script in Ubuntu 20.04 LTS
- ★ How to create and run a PowerShell script file on Windows 10
- ★ 4 Google Script makes Google Sheets more powerful