Increase the protection of Windows Defender with the following small changes
Antivirus programs are growing, so Microsoft has introduced new advanced functions for Windows Defender in the Creators Update version. If you want this software to enhance protection, follow these steps to enable advanced blocking.
Windows Defender is the anti-virus software available on Windows 10 and it is really worth believing. Because there is no advertising screen and integration into the operating system, this application provides good protection without any further configuration.
Antivirus programs are growing, so Microsoft has introduced new advanced functions for Windows Defender in the Creators Update version. If you want this software to enhance protection, follow these steps to enable advanced blocking.
- Here's how to completely disable Windows Defender on Windows 10, 7 and Windows Vista
- Use Windows Defender with Command Prompt on Windows 10
- How to kill viruses with Windows Defender Offline on Windows 10 Creators
In Windows 10 Pro version, you can use the Group Policy editor to enable options. Type gpedit.msc into the Start menu to open the editor, then browse to the following location (MAPS stands for Microsoft Active Protection Service and the network that Microsoft uses to identify threats):
Computer Configuration > Administrative Templates > Windows Components > Windows Defender Antivirus > MAPS
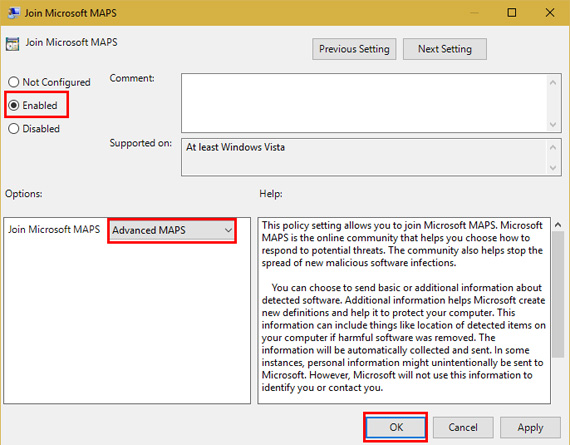
Here, double-click the Join Microsoft MAPS entry and switch to Enabled mode. In the bottom left box, switch to Basic Maps or Advanced MAPS . Then, click OK . This will send information to Microsoft about the detected software and request for advanced operation options.
Still in the MAPS folder, you may want to configure three other settings. Enabling Configure the 'Block at First Sight' feature will perform real-time testing with security services on infected content. You can choose how to send file templates ( never send, always prompt, send samples automatically, send all samples automatically ) to the Send file samples when further analysis is required section . You need to choose one of the following two options if Block at First Sight is enabled.
Once MAPS is activated, switch to the MpEngine folder on the left bar. Click on Select cloud protection level and set to Enabled . Then, in the bottom left options box, select High blocking level. Microsoft has stressed that " This makes Windows Defender more flexible when identifying suspicious files to block and scan ". So you can see many positive notifications when using it.
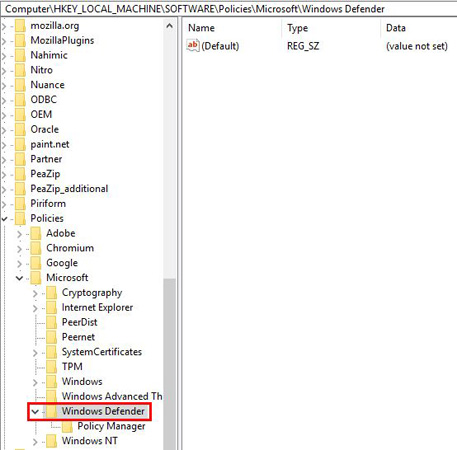
If you are using Windows 10 Home, you can use an alternative solution to access the Group Policy editor or perform it via the Registry. For the Registry, type regedit into the Start menu to access the editor. Go to the following position:
HKEY_LOCAL_MACHINESoftwarePoliciesMicrosoftWindows Defender
Right-click Windows Defender , then select New> Key and name it Spynet (a name of MAPS). Next, right-click Spynet and select New> DWORD (32-bit) Value . Name it SpynetReporting and double click on it to open its properties and set it to 2.
Again right-click on Windows Defender and use New> Key to name another key, MpEngine . Right-click MpEngine and create New> DWORD (32-bit) Value with the name MpCloudBlockLevel . Double-click this value and also set to 2.
Make these changes in the Group Policy editor to customize the Registry for you, making it simpler. In addition, one of these two ways will make Windows Defender against major threats.
Do you use Windows Defender or another antivirus program on Windows 10? Will you use these settings to make it stronger? If you have any comments, please let us know by commenting below!
Was this article helpful?
Your feedback helps us improve.
Related Articles
 How to set up Windows Defender to increase defense capabilities8 minutes read
 Add the 'Scan with Windows Defender' command to the right-click menu in Windows 82 minutes read
 How to fix 'This app has been blocked for your protection' error on Windows 10 PC3 minutes read
 How to schedule automatic scans for Windows Defender on Windows 82 minutes read
 Microsoft Defender Windows Defender before Kaspersky's complaint3 minutes read
 4 ways to delete Microsoft Defender protection history on Windows 10/118 minutes read
Reader Comments 0
Sign in with email or Google to join the discussion.