How to change the system font after updating Windows 10 Creator's Update
Changing the size of the system font is probably just a small but surprisingly useful feature.
Table of Contents
As the computer screen grows, you will see everything on the screen with a higher resolution. But that also makes things much smaller, the font on the screen becomes very difficult to read.
Changing the default font on the web browser is very simple. So is Windows, until the Creator's Update update when Microsoft removed the setup to change system fonts, from the title bar, menus to message dialogs, tooltip. If you're having trouble seeing these fonts on the screen, the following compact app can help you.
System Font Changer for Windows 10
System Font Changer is a compact portable application from reputable WinTools. Windows 7 and Windows 8 are supported but you will need this software on Windows 10 much more to change the system font size.
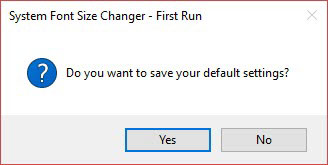
Choose to save the default settings
When you first open it, you will be asked if you want to save the default settings. Select Yes to save the registry file to the directory of your choice. Later the default settings can be exported from the main interface.
On the simple interface of the software, select and change the font of each item you want to change. For example, select tooltip and drag the slider between 0 and 20 to resize it. Click Apply to complete the change.

Main interface with options to change the system font
After logging out and logging back in, you will see the change. It may take several tries to find the appropriate display size, so don't forget to export and save the most optimal settings to use when needed.
Was this article helpful?
Your feedback helps us improve.
Related Articles
 Instructions for delaying updating Windows 10 Spring Creators Update in 365 days4 minutes read
 Microsoft died of Windows 10 Creators Update version2 minutes read
 How to disable Windows 10 Creators Update ads6 minutes read
 How to install Windows 10 Creators Update using a USB drive4 minutes read
 How to get a new version of Windows 10 Creators Update now7 minutes read
 How to change fonts in Windows 117 minutes read
Reader Comments 0
Sign in with email or Google to join the discussion.