How to use the new Camera effect on Facebook Messenger
Messenger on iOS and Android has just added a new feature that adds many camera effects, giving users more rich options to refresh their conversations.
Table of Contents
An interesting information for those who are using Messenger for the latest version, is that you will have more options for Camera effects to insert into your conversation. In addition, the Camera button will always appear on the Messenger interface, whether we are on a personal page or a group interface. With this feature, users can take photos or record videos quickly, without having to press the Camera icon to the left of the screen as before. In the article below, Network Administrator will guide you how to use the new Messenger camera feature.
Insert new Camera effects on Messenger
- Download the Messenger app for iOS
- Download Facebook Messenger for Android
Step 1:
After upgrading the latest version of Facebook Messenger, we open the application. Right at the main interface, you will see the green shooting button appear below. This icon will always appear on the interface of Messenger.
When clicking on the icon, the Camera interface will appear. Click on the camera icon with the rotating arrow to change the camera from front to back, or vice versa. Press the white circle button in the middle to capture or hold to record a video.


Step 2:
Next is to insert the Camera effect into the image. Messenger will allow users to take pictures and then insert effects, or use effects then take photos.
For example, I will take a photo and then insert the effect. After you have the image or video, click on the smiley icon to choose the theme of the effect. In the search bar, we can type the effect theme we want to use , such as a Xmas theme. A series of related effects appear, click on a certain effect. If you want to add an icon, swipe left or right.


Step 3:
Next, also in that interface click on the letter A to enter text if you like. Move the color bar up or down to select the color for the text. Click Done to save. Click the paint icon if you want to add a stroke to the image. If you don't like to add a brush stroke, click the rotating arrow icon to remove the stroke.


Step 4:
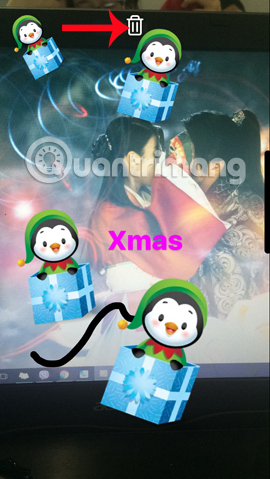
After aligning as well as adding effects, textures into the picture, you don't feel like it, you can move the position of each effect, sticker . Or if the user wants to remove any effect , just keep the effect and move up the trash can icon . Finally, click the arrow icon to save the image .

So you have finished your artwork with completely new effects on Messenger already. There are quite a lot of effects to choose from, especially during Christmas festivals with lots of funny and unique images. Don't forget to upgrade Messenger and use this new feature on the app.
Refer to the following articles:
- How to create snowfall effect on Facebook Messenger
- How to log out of Facebook Messenger on iOS, Android and Windows Phone
- Transform color chat window Facebook Messenger
I wish you all success!
Was this article helpful?
Your feedback helps us improve.
Related Articles
 How to create snowfall effect on Facebook Messenger3 minutes read
 Fixed a bug with Facebook Messenger being escaped on iOS1 minutes read
 What does the green dot on Facebook mean?3 minutes read
 All about how to use Facebook Messenger Lite4 minutes read
 GIFUR emoji set for Facebook Messenger5 minutes read
 How to take a picture of the 2018 World Cup effect on Messenger3 minutes read
Reader Comments 0
Sign in with email or Google to join the discussion.