How to use the auto-click feature on Nox Player
The auto-click feature will be recorded as a NoxPlayer record, you can customize the click time, number of clicks, repeat ... to suit all applications.
Table of Contents
Nox Player has many features that users can use, not only to install and use the Android application on a computer, for example, to open multiple emulator windows at the same time on the Nox Player. Set up virtual keyboard to play mobile games on computer with NoxPlayer .
There is a feature that saves time and effort for NoxPlayer users, which is an action record feature on this emulator, called Macro Recorder. This feature only appears on the NoxPlayer version V6.0.3.0 or higher and if not known, users can confuse it as a feature of recording the NoxPlayer emulator screen.
Marcro Recorder supports users to record their actions when on NoxPlayer, specifically click action, you can use this feature for applications that require multiple clicks in a certain location. there. For easy visualization, QuanTang will guide you to use this feature on NoxPlayer offline.
- Download NoxPlayer emulator for Windows
https://vn.bignox.com/vn/download/fullPackage - Download NoxPlayer emulator for macOS
https://vn.bignox.com/vn/download/fullPackage/mac_fullzip
Instructions for using Auto Click feature on NoxPlayer emulator
Step 1: Start NoxPlayer and select the Macro Recorder icon on the emulator toolbar, or press the shortcut key combination Ctrl + 9.

Step 2: In the Macro Recorder menu, you will have 3 function keys to perform and save the action, F1 is Start / Continue recording your action, F3 is paused and F2 is saved. just do.

Step 3: At the top, next to the Recording text is the icon that shows the status of the record, the middle is the start, the left side is pause and the right is stopped.

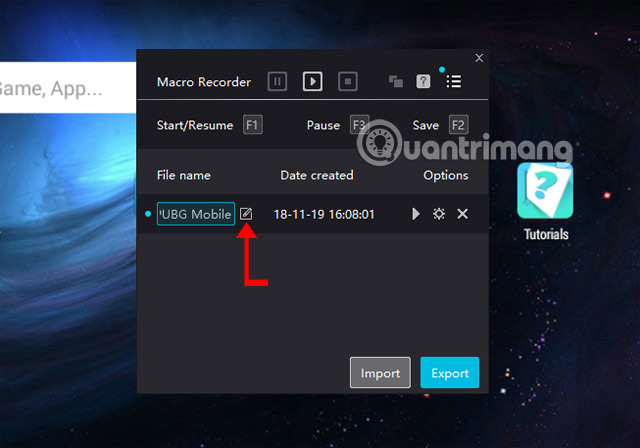
Step 4: Once your record is complete, you can change the record name to remember which application the action is for. Click on the edit icon name and write the content of the record next.
Step 5: Next is the advanced installation, click on the installation icon of the log to open the advanced settings menu.

In this menu will include advanced settings, we will have in turn:
Loop:
Option 1: Loop the number of times, the number you wrote in the number box will be the number of times the record is made, it will stop when the number of items you have written in the middle space is completed. For example, if you click 10 times and record in that record, you write the number 4 in the number box and run the record then the click will be 40 times.
Option 2: Here record the Loop until stop button is pressed, meaning that when you click on the NoxPlayer screen, the record's action will stop.
Option 3: You can set the record execution time, it will automatically stop when the timer runs out.
Loop 2:
This second option will set the pause time of the records, for example, write the number 10 in the middle (Interval 10 sec) box. Equivalent to 5 seconds of pause between repetitions of the logs.
Acceleration:
This is a time to fast forward the action of the recording, the faster you choose the Acceleration number, the faster the speed of the recording.
Restart:
Will restart emulator in minutes: Set the time before the simulation reboot, here is 60 minutes before NoxPlayer restarts.
Auto-start when the emulator startup: This option will automatically run the action log when the NoxPlayer boots up.

Step 6: Once you're done installing the log, click Export to save the record, select the record in the Select scripts to export table and click OK.

Write down the record name in the File name section and click Save, the log file will be saved with 7z format. You can upload the log file to Google Drive to save and download it when transferring to another device. To import the record into NoxPlayer, click Import to load the record and use it normally.

With the auto click guide on NoxPlayer above, you save time in applications that require continuous clicking. Save time and effort when you don't have to click on your hands on NoxPlayer anymore.
See more:
- How to speed up, use NoxPlayer without lag?
- How to install NoxPlayer to play Android games on computers
- 10 best Android emulator software for Windows
Was this article helpful?
Your feedback helps us improve.
Related Articles
 Auto Click and how to automatically click when playing games6 minutes read
 How to use Auto Click, automatic mouse click effectively4 minutes read
 Top 5 best Auto Click software that doesn't take up the mouse 20249 minutes read
 Top 4 Auto Click apps for Android do not need root8 minutes read
 Top Auto Game application on the phone7 minutes read
 Ways to fix auto click errors when working or playing online games3 minutes read
Reader Comments 0
Sign in with email or Google to join the discussion.