How to Use Selection Tools in Zoner Photo Studio X
Making a selection is very helpful in any photo program. Zoner Photo Studio has a significantly lower learning curve than Photoshop and it is much more affordable. Selections, layers, and masks give you real editing power. This wikiHow...
Table of Contents
Part 1 of 4:
Getting to Know the Tools
- Open up your image in Zoner Photo Studio X and go to the Editor tab. Click on the selections tools icon.

- There are some basic options for when you are using the selection tools.
- Ctrl: This is for taking away some of the selection. You will see a very small - near the cursor.
- ⇧ Shift: This is for adding to the selection. You will see a very small + near the cursor.
- Alt: Use this to move your selection.
- Ctrl+⇧ Shift+I (Invert Selection): Sometimes, what you are not selecting is easier than what you are selecting. If so, select the easy parts and then invert the selection.
- There are some basic options for when you are using the selection tools.
- Experiment with the various ways of making selections. What you use is really subjective. What you may like and use, may differ greatly to what someone else does. From left to right, they are:

- Rectangular Selection - M
- Elliptical Selection - O
- Lasso - L
- Polygonal Lasso - N
- Magnetic Lasso - A
- Magic Wand - W
- Selection Brush - SHIFT Q
- Your selection options will vary depending on which ones you use.
Part 2 of 4:
Using the Rectangular and Elliptical Selection Tools
- Start at the upper left corner of where you want to make the selection. Hold down your left mouse button and drag down left until what you want is selected.
- Most often the rectangular selection is used for cropping. However, there are lots of things you can do with this, and all the other, selection tools.
-
 Check out the "Invert Selection" option. As mentioned before, if you can select what is not the subject more easily, then invert the selection afterwards.
 - Use the selections with masks. This is a really powerful tool. You can use it to blend in multiple images, adding a vignette, and whatever your creative mind can come up with.
Part 3 of 4:
Using the Lasso Tools
-
 Start out with the Lasso tool (L). If you have some type of stylus or pen tool to use with your computer, this will be much more precise. Zoom in to get closer to your target.
 -
 Try the Polygonal Lasso tool for more precise selections. To do this, use the mouse and click as close to the edge of your target until you have completely selected it. Once complete, double click and the selection will connect.
 -
 Use the Magnetic Lasso tool for even more precision. It will do its best to align with your apparent subject. If it starts to go wrong, back up until it is more aligned with what you are doing.
 -
 Use the Magic Wand to select pixels based on tone and color. This is a quicker way of doing some basic selection. This works mostly with any tolerance that you have set. If it selects too much, lower the tolerance. This isn't the most precise tool, so use with caution.
 -
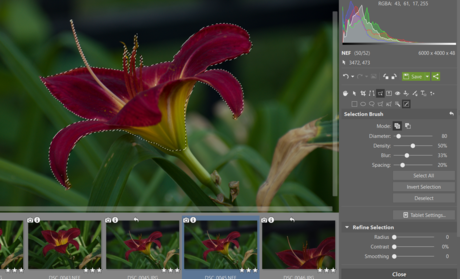 Use the Selection Brush. This one can really be useful and should be at the top of your list of tools that you use.
Part 4 of 4:
Fine Tuning Your Selection
-
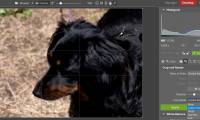
 Go to "Selection" > "Selection Display". You can select what you see and how well it is (or is not) selected.
- Definitely make use of the "Black and White" option. This really lets you know what you have selected so far.

- Definitely make use of the "Black and White" option. This really lets you know what you have selected so far.
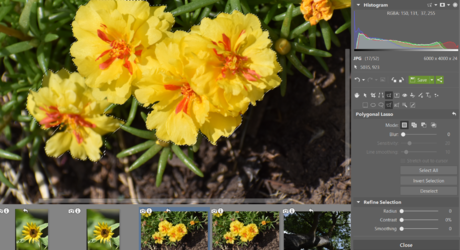
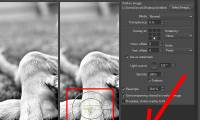
- Start refining your selection. To do that, you will see the "Radius," "Contrast," and "Smoothing" options in your toolbar.
-
 Start by slowly increasing the Radius. This will determine how close to the original border your selection will be.
 -
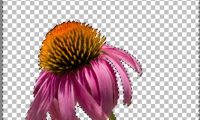
 Raise the Contrast value. This will help the program tell the flower (or your subject) from the background. Of course, if there is very little contrast, this could be an issue.
- Don't push the bars all the way up, unless you back it down.
- Use the Smoothing slider when you are pretty much done. It's more difficult to continue editing, after smoothing.
-
 Save your selection once you're happy with it.
Was this article helpful?
Your feedback helps us improve.
Related Articles
 How to Post Your Images to Flickr Using Zoner Photo Studio2 minutes read
 How to Organize Your Images Using Zoner Photo Studio X4 minutes read
 How to Rate Your Images with Stars in Zoner Photo Studio Pro 173 minutes read
 How to Use Layer Masks in Zoner Photo Studio X3 minutes read
 How to Improve Your Photographs Using Zoner Photo Studio X2 minutes read
 How to Watermark Your Images with Zoner Photo Studio Pro 162 minutes read
Reader Comments 0
Sign in with email or Google to join the discussion.