Table of Contents
This practical guide explains how to use Mail Merge in Word to Merge Text in a clear sequence, including preparation, key settings, common mistakes, and troubleshooting steps.
What This Guide Covers
- Instructions for using mail merge in Word
- Step 1:
- Step 2:
The email merge feature is available on all versions of Word from Word 2007 to Word 2019. The article below will guide you how to use the mail merge feature in Word.
Instructions for using mail merge in Word
First, you need to prepare an Excel file with a complete list of names and a Word file of the invitation letter template, or the content to be merged.
Step 1:
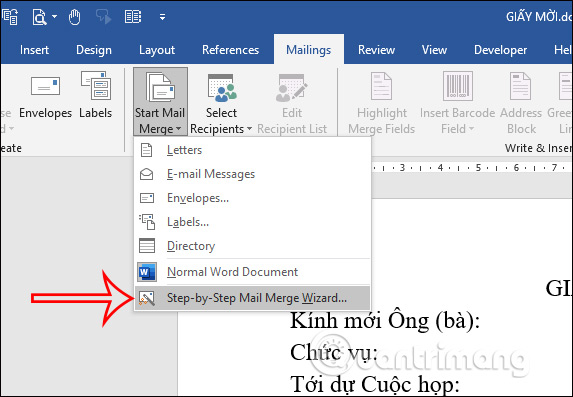
At the Word interface with the form, click on Mailings and then click on Start Mail Merge displayed below. Continue clicking on Step-by-Step Mail Merge Wizard .
Step 2:
In the interface displaying the steps, you first select the type of message we are composing, including:
- Letters: Invitation letter type.
- E-mail messages: Email.
- Envelopes: Envelopes.
- Labels: Mail by label.
- Directory: Mail by category.
Then you click on Next.

Step 3:
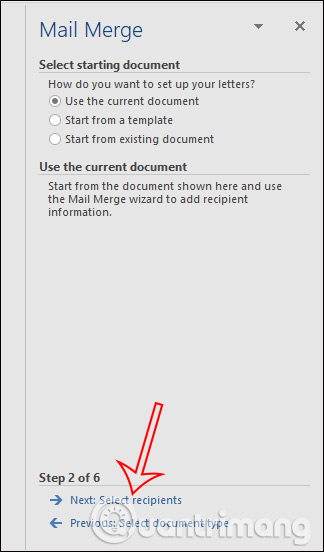
In this step, you will choose a letter template to merge text with, including:
- Use the current document: Use the currently opened message template.
- Start from a template: Use a letter template in Word.
- Start from existing document: Use existing or created letter templates saved in Word.
Click Next to move to the next step.
Step 4:
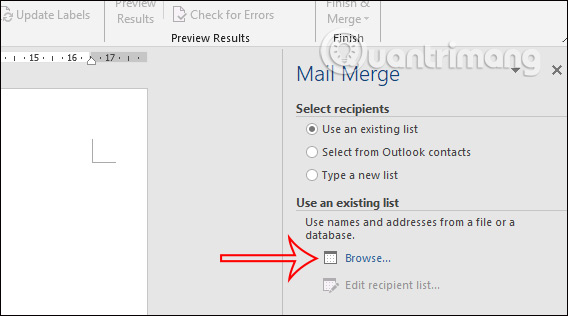
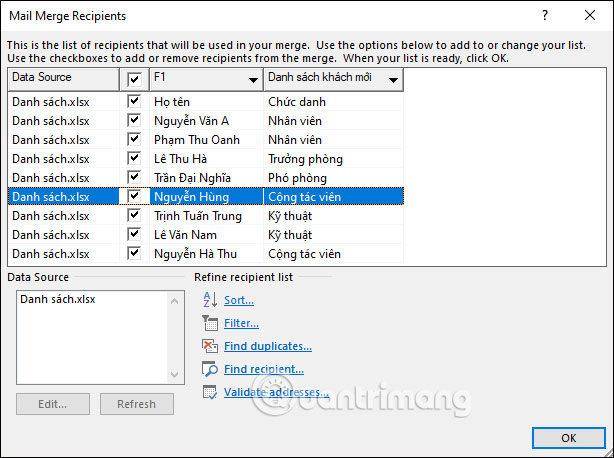
In this step we select data taken from the Excel file containing the list of names. Click Browse… to select the Excel file .
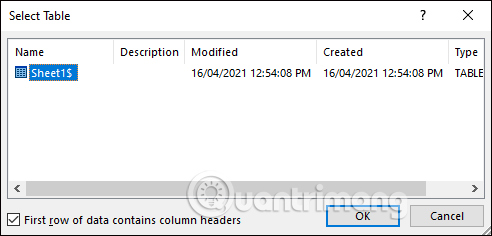
Now displays the interface in Word with Excel document sheets. Click on the sheet containing the data you want to use and then click OK to continue.
At this point, the full content of the columns in the Excel file will be displayed . You can select or uncheck the information in the interface. Click OK to continue. Then click Next to move to the next step.
Step 5:
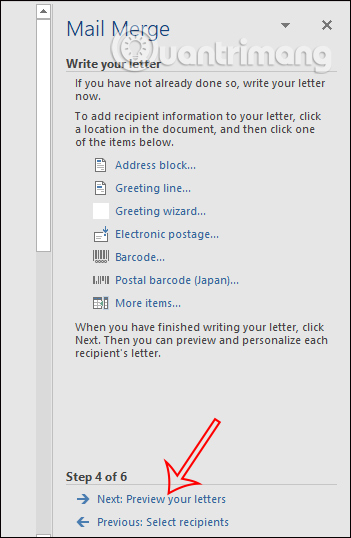
In this step, you will have the option to write more or edit the information in the mail merge in case you have not finished writing the form. If the form is completely written, skip this step and click Next to continue.
Step 6:
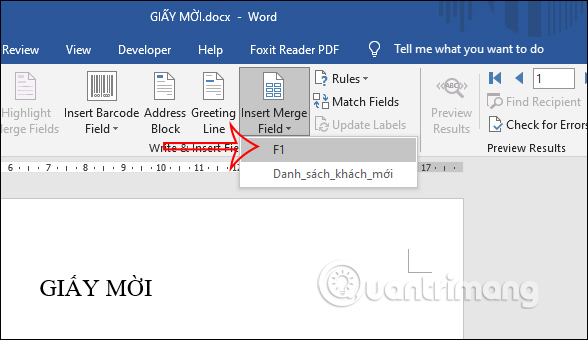
In this step, click on the location where you want to insert content, then click the Insert Merge Field button and select the field you want to get , First the person's name.
At this time, the field name will be displayed. To also display the person's name , look at the content column on the right side, click on the arrow at Recipient to change the items in the list . Immediately displays the name of the person who wants to fill the list.
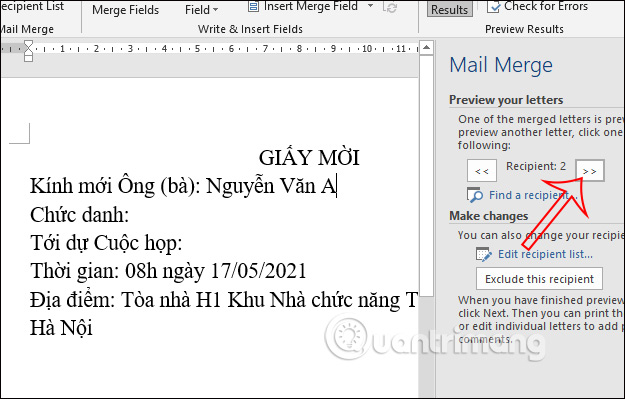
Next, click on other content below to fill in the information. We also click on Insert Merge Field and then select the content field , here is the position. Then the title name corresponding to the name above will be displayed as an Excel file. If you click on the arrow at Recipient, the content of the fields changes immediately.
At this point, you can immediately click to print the invitation and you're done.
Finally click Next to complete the mail merge process in Word.
Step 7:
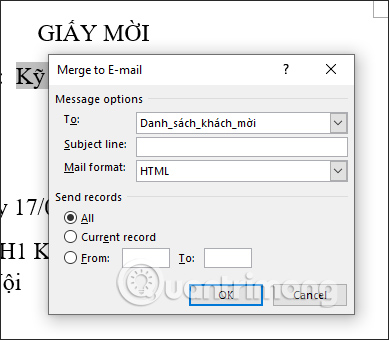
Once completed, click the Finish & Merge button and select Send Email Messages below.

Then, fill in the email content you want to send and click OK to open Outlook on your computer and send the email via Outlook. In case of using Gmail, you must save it as a separate doc file and then email it.
Final Thoughts
Use the instructions and checks above in order, verify the result after each major step, and keep a backup whenever the process changes important files or system settings.
FAQ
What should I check before starting?
Confirm that your device or software version matches the instructions, save important data, and note the original settings before making changes.
What should I do if the steps do not work?
Restart the app or device, install available updates, review any error message, and repeat the steps carefully in the same order.
Can I undo the changes?
Many changes can be reversed, but the exact method depends on the feature. A backup or restore point gives you the safest way to recover.
Related Articles
 How to Merge Text, Merge Mail Merge Messages in Word 2016: Mix Text6 minutes read
 Mix Text, Merge Messages, Mix Excel Tables into Word 2007 Documents2 minutes read
 Instructions on Using Mail Merge in Word to Merge Documents3 minutes read
 How to Merge Mail (Mail Merge) in Word: Step-by-Step Guide4 minutes read
 How to Fix Number Formatting Errors When Using Mail Merge in Word12 minutes read
 Improved Email Performance with the Microsoft Word Mail Merge9 minutes read
Reader Comments 0
Sign in with email or Google to join the discussion.