Table of Contents
Open FastStone Capture’s Screen Recorder, choose a window or screen area, set the audio source, and select Record. When finished, stop the session, preview it, and save the video to a named folder. Make a short test first so you can catch muted audio or an incorrect capture area.
FastStone Capture is commercial Windows software with a trial. Download it only from FastStone’s official download page.
1. Open Screen Recorder
Launch FastStone Capture and select the Screen Recorder icon on the floating toolbar. The location can differ by version, but the icon opens a separate recorder window.
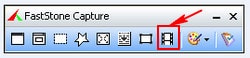
2. Choose what to record
Select the smallest area that includes everything viewers need:
- Window/Object: records a selected app window or interface object.
- Rectangular Area: lets you draw a custom capture region.
- Full Screen Without Taskbar: records the desktop while excluding the taskbar.
- Full Screen: records the complete display.
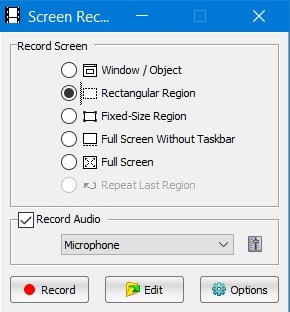
Close notifications, private documents, and unrelated windows before recording. If you use more than one monitor, verify which display is inside the capture boundary.
3. Configure video, cursor, and audio
Select Options before the first recording. Set the frame rate and quality for the content: a static software tutorial needs less motion detail than a game or animation. Higher settings increase file size and demand more from the computer.
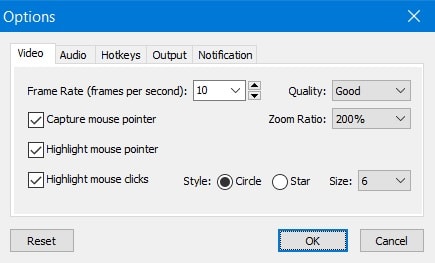
- Audio: select the microphone for narration, system/speaker audio for app sound, or both when the version and PC support it. “Microphone + speakers” means both sources, not one or the other.
- Hotkey: confirm or change the start, pause, or stop shortcut. The legacy screen shows Ctrl+F11; do not assume it is unchanged on your installation.
- Cursor: show it for software demonstrations and enable click highlighting only when it helps the viewer follow actions.
- Quality: use a moderate test setting first, then raise it only if text or motion looks unclear.
Wear headphones when recording system sound and a microphone together to prevent speaker audio from feeding back into the mic.
4. Start a short test recording
Select Record, confirm the capture boundary, then choose Start. Speak for a few seconds, perform a representative action, and stop. Play the result to check sharpness, cursor visibility, and both audio sources before recording the full session.
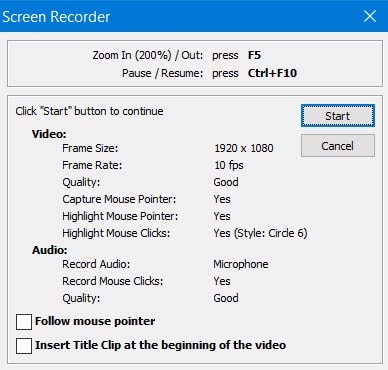
5. Pause, stop, and save
Use the configured hotkey or recorder control to pause and resume. When the demonstration is complete, stop the recording and choose Save. Select a clear filename and a folder with enough free space. Choose Discard only when you are certain the take is not needed.
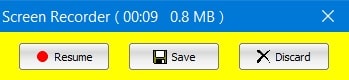
FastStone’s current feature page lists MP4 and WMV video output. Available formats and controls depend on the installed release, so use the options displayed by your recorder. Open the saved file in a separate media player and watch the beginning and end before deleting any source material.
Improve recording quality without huge files
- Record at the dimensions you plan to publish instead of enlarging the result later.
- Increase text size in the demonstrated app so it remains readable.
- Close games, browsers, and background tools that consume processor or graphics resources.
- Keep the recording on a local drive with adequate free space.
- Use a quiet microphone position and watch input levels to avoid clipping.
If FastStone’s recorder lacks a feature you need—such as advanced editing, multiple scenes, or livestreaming—compare the choices in the computer screen-recording guide and screen recorders that capture audio. For still images, see professional screen-capture tools.
Related Articles
 How to Use Faststone Capture to Record Computer and Laptop3 minutes read
 How to Take Screenshots of Your Computer Using FastStone Capture in Detail4 minutes read
 How to Use Faststone Capture to Take Professional Screenshots5 minutes read
 How to Transfer Images from FastStone Capture to Paint3 minutes read
 15 Useful Screen Capture Applications for Windows12 minutes read
 10 Best Screenshot Tools for Computers8 minutes read
Reader Comments 0
Sign in with email or Google to join the discussion.