Table of Contents
3D Image Commander can make a flat photo look as though it is tilted in space by adding perspective, a background, borders, reflections and shadows. The result is still a two-dimensional image—not a 3D model, stereoscopic photo or view that can be rotated after export.
Before using 3D Image Commander
This is a legacy Windows application, and a trustworthy current publisher page could not be confirmed from the source article. If you already have a verified installation, the steps below explain its interface. Do not install an old copy from an unknown download site simply to follow the tutorial.
- Work on a copy of the source photo.
- Use the highest-resolution original available.
- Decide where the result will be used so you can choose suitable output dimensions.
- If the software is unavailable, a maintained image editor can reproduce the effect with perspective, shadow and reflection tools. TipsMake lists several online photo editors.
Create the 3D-style photo effect
1. Add the photo
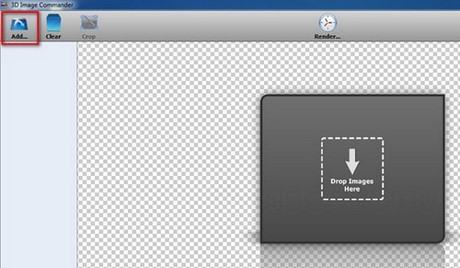
Open 3D Image Commander and click Add, then choose the source file. You can also drag the image into the main window if the installed version supports drag and drop.
2. Adjust the presentation and perspective
Select the photo and use the preview while changing one group of settings at a time.
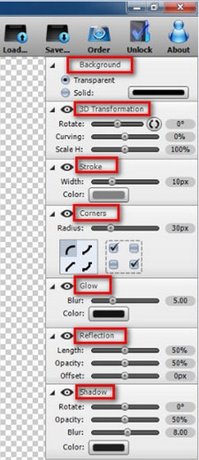
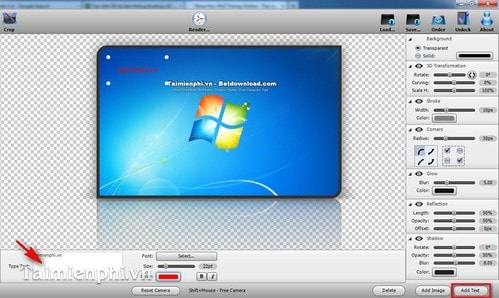
- Background: choose the area behind the tilted image. Use enough contrast to separate the photo from the canvas.
- 3D Transformation: adjust the horizontal and vertical perspective. Small changes usually look more convincing than extreme distortion.
- Stroke: add a border and choose its color or thickness.
- Corners: round selected corners. Check that the edge remains clean against the background.
- Reflection: control the reflected image's height, opacity and distance. Keep it subtle unless the design specifically calls for a glossy effect.
- Shadow: set the direction, softness, distance and color so the shadow agrees with the apparent light source.
3. Add optional text
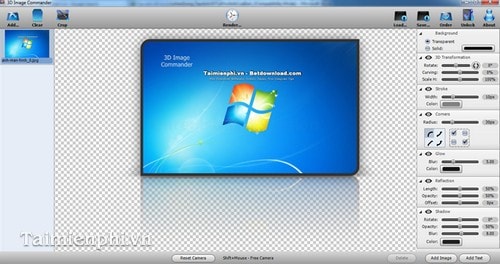
Click Add Text, type the label and choose its font, size and color. Place it where it remains readable without covering the important part of the photo.
4. Save the finished image
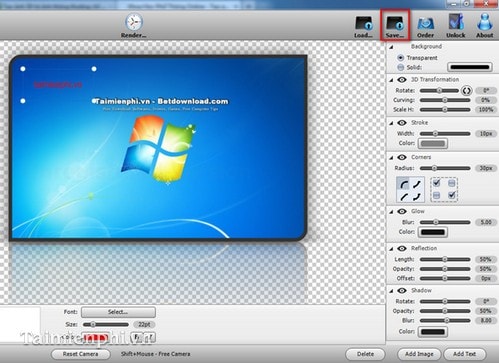
Click Save, choose an output format and save a new file. Keep the source image and, if the software supports it, a project file with editable settings.
How to make the effect look natural
- Use a consistent light direction for the photo, reflection and shadow.
- Avoid a reflection that is brighter or sharper than the source image.
- Keep perspective distortion moderate so faces, text and straight lines remain recognizable.
- Preview the image at its final display size; fine borders and shadows can disappear when reduced.
- Export a PNG when transparency is required, or a JPEG copy for a photographic web image when a solid background is acceptable.
Other ways to create a similar result
A presentation editor can be enough for a simple tilted-card effect; for example, TipsMake explains how to create a shadow effect in PowerPoint. A full 3D model reconstructed from photographs is a different task that requires photogrammetry software and multiple overlapping images, not the decorative controls shown here.
Related Articles
 NASA Opens the Entire Library of Photos, Videos and Audio for2 minutes read
 How to Turn a Still Image into an Image on Your Phone5 minutes read
 How to Copy a Photo Library from One Mac to Another4 minutes read
 Work with the Library Item in Adobe Dreamweaver CS615 minutes read
 How to Create Multiple Size Images at the Same Time5 minutes read
 Tutorial for Creating 3D Photo Effects in Photoshop (Part 1)5 minutes read
Reader Comments 0
Sign in with email or Google to join the discussion.