Table of Contents
Overview
This guide explains how to transfer data between 2 Windows 10 computers in clear, practical terms. It covers the key concepts, recommended steps, common limitations, and useful checks so you can make a better-informed decision.
Transferring data between two computers in the network is extremely useful and is taken advantage of by many users. However, not all of us know how to do this, especially for users who are using Windows 10 computers. If you are also looking for a solution to the problem of connecting and sharing data between two or more computers in the network, please read This guide.
There are many different ways to help us copy and move data between two or more computers such as using USB or cloud storage services. However, to transfer data within the same network, we can use the available utilities on Windows, which will be much more convenient. To do this, we can use LAN or Wi-Fi network depending on the conditions.
What Is LAN?
LAN (Local Area Network) is a network system used to connect computers within a small area (home, office, school, etc.). Computers in a LAN can share resources with each other, typically sharing files, printers, scanners and other devices.
Why should you use Lan to share data?
Normally, to copy data to another computer, you will transfer data from the computer to USB. And use this USB to copy to other computers, the way is quite simple and easy to do. However, what if you need to share files or data that are larger than the storage of the USB? You will have to spend time on this. That is why you should know the trick to share via LAN in Windows.
When using Lan to share data, you will reduce the implementation time a lot because the data transmission speed by network cable or Wi-Fi is very high. At the same time, you can also use shared devices from other computers easily.
Use LAN to share data between Windows 10 computers
One of the advantages of LAN is the ability to connect and transfer data between two computers, and many devices on the network together. Taking advantage of this, we can exchange data back and forth in an straightforward way. Here are ways to help users exchange data between two Win 10 computers together via LAN.
Use the Share feature to share data on Win 10
Among the methods I introduce below, this is the basic but effective way to quickly and easily share user data with other computers in the LAN.
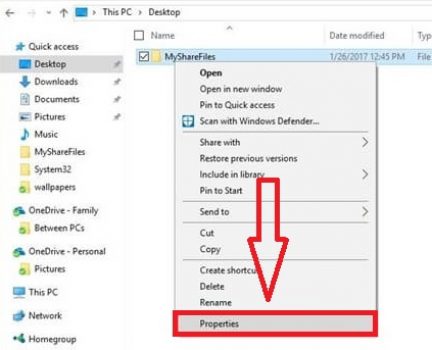
Step 1: First, right-click on the folder you want to share => select Properties.
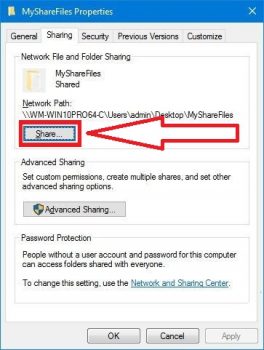
Step 2: Then, a new window will appear => click on the Sharing tab => then click on the Share button.
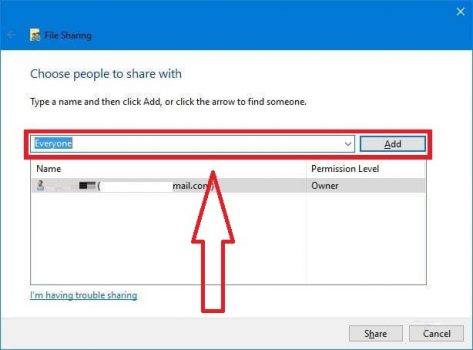
Step 3: In the permissions setting window => click on the drop-down arrow => select Everyone (share with all devices in the LAN) => click Add to add this group to the list.
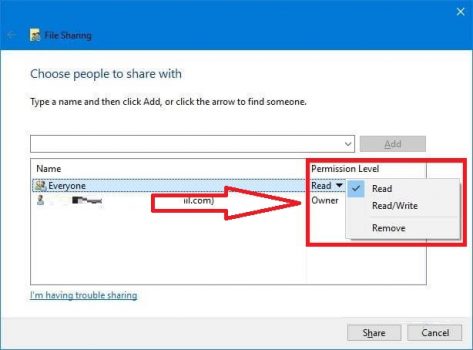
Step 4: Next, click on Everyone in the list => you grant permission to people to access the file in the Permission Level column. Here are the following options:
- Read option: Visitors can only view or copy shared content.
- Read/Write option: Visitors have full permissions (view, edit, copy, delete) to the shared folder.
Step 5: After completing the above settings, click Share to enable data sharing. A new window will appear immediately, providing the path to the shared folder to help users in the LAN access easily.
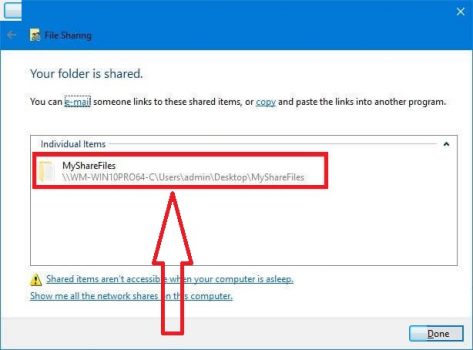
Share Files using Advanced Sharing
Advanced Sharing is a tool that helps transfer data between two computers in addition to the basic Share feature. To use this feature, do the following.
Step 1: First, right-click on the file or folder you want to share => select Properties => and switch to the Sharing tab.
Step 2: Here, click Advanced Sharing…. instead of Share.
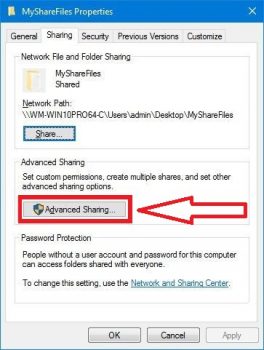
Step 3: A new window will appear => click Share this folder => and click OK. Now the data you have shared will be granted by default read-only and copy permissions for visitors.
To set permissions for Visitors to access the folder, click Permissions.
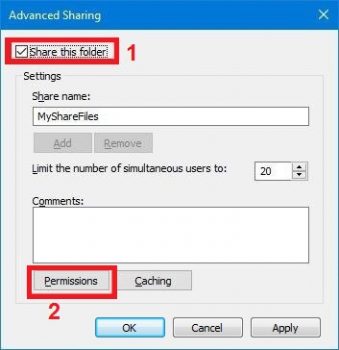
Step 4: In the User permission window => select Everyone => check the option you want to grant permission to the user below:
- Full Control: edit, delete, copy and view permissions.
- Change: have the right to change.
- Read: read and copy permission.
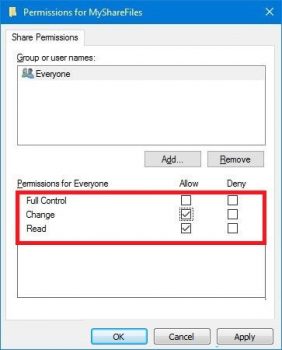
If you want to grant any permission to the User, check the Allow column right next to it, click OK to complete.
Share data with a specific computer
You use this method if you want to share and transfer data between only two computers in a LAN. The implementation is as follows:
Step 1. The first steps you perform are exactly the same as sharing data using Advanced Sharing (Method 2). When you get to the Permissions step (granting permission to the User), do the following:
Step 2: Click the Add button to add a new User.
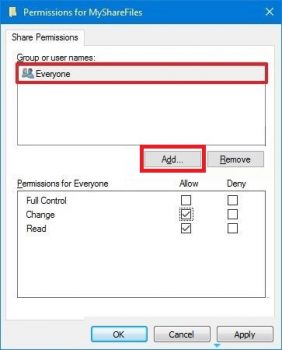
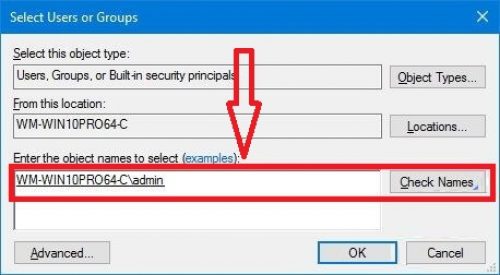
Step 3: In the new interface, enter the User name you want to share in the Enter the object names to select section => then click Check Names to check again => finally click OK to confirm.
Step 4: Next, click on Everyone => click Remove to delete this User => then click on New User => you can grant permissions to this account.
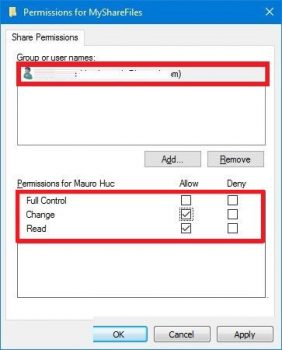
After setting up, click OK to finish.
Share data between computers in LAN without password
By default, the LAN sharing feature will require the password of the user who wants to access the shared file on Win 10. However, you can turn off this function when necessary, the steps are as follows:
Step 1: Open Control Panel (press Windows + R => enter control => Enter) => click Change advanced sharing settings.
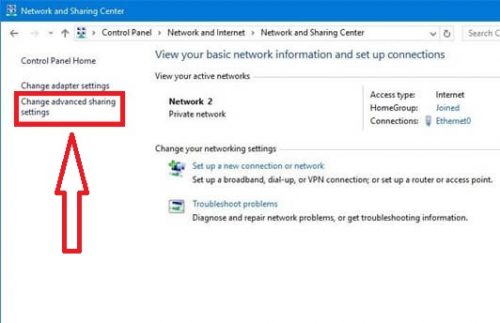
Step 2: Here, click the drop-down arrow in the All Networks section => then select Turn off password protected sharing in the Password protected sharing section => finally select Save changes to save.
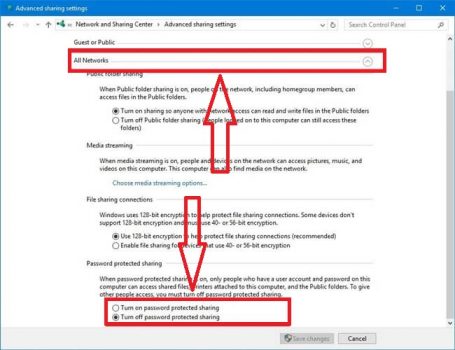
Note: If you check the name and cannot find the machine you are looking for in the LAN, don't worry, follow the steps below.
Step 1: Open the installer by pressing Windows + I => then select Network & Internet.
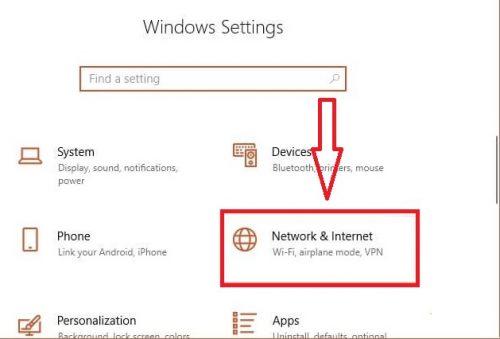
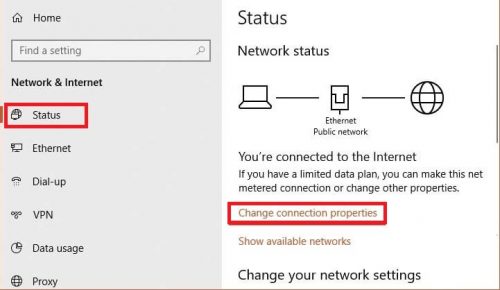
Step 2: Next, click Status in the left options list => then select Change connection properties.
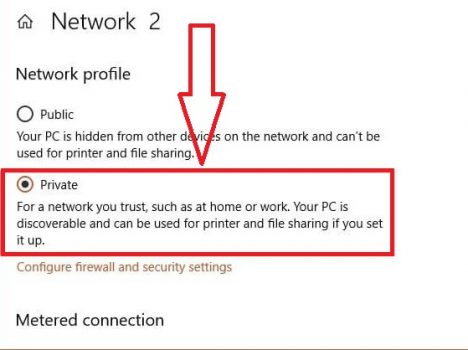
Step 3: Finally, you switch from Public to Private status in the Network profile section. The purpose is to let the system understand that the computer is in the internal network and is safe.
Instructions for transferring data between two Windows 10 computers using Wi-Fi
Sharing files over Wi-Fi is quite simple, basically the steps are similar to transferring data between two computers over LAN. They only differ slightly in the Network settings.
Setup from data sharing machine
To transfer files between computers on the network, we first need to grant Share file permission on the computer that needs to be shared.
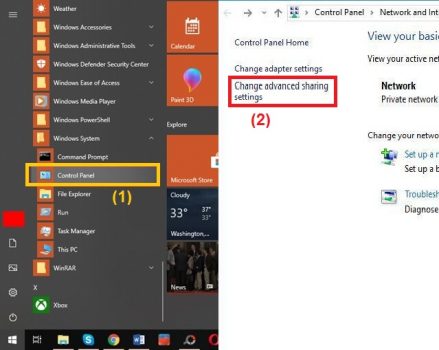
Step 1. From the main screen of your computer, go to Start Menu => Control Panel => then select Network and Sharing Center. Immediately after that, a new window will appear, select Change advanced sharing settings in the left menu.
Step 2. Now click Turn on file and printer sharing => click All Networks to expand the content => then check the box Turn off password protected sharing.
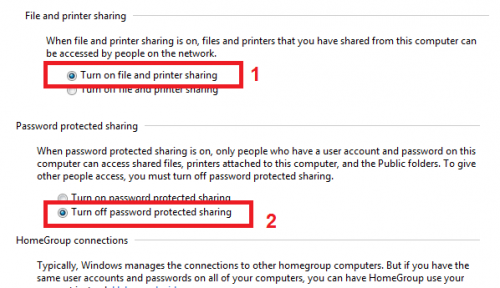
We do this to eliminate passwords during connection and data sharing between computers.
View IP address of sharing machine
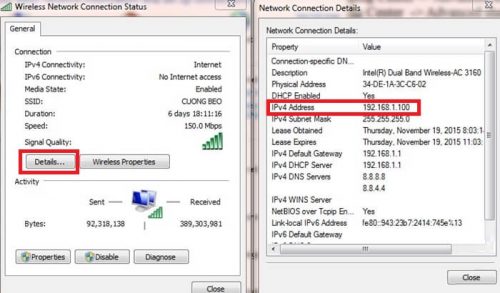
This is necessary to identify the machine sharing data from the machine that needs to receive it.
Step 1. From the Network and Sharing Center interface => click on the network you are connecting to.
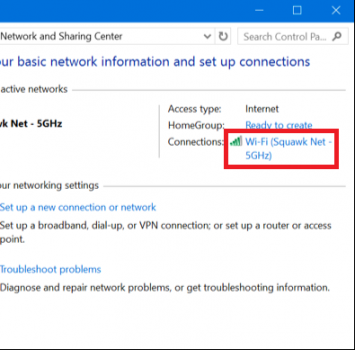
Step 2. Immediately after that, a new window will appear, click Details… In the new window that appears, there will be many information about the network, you find and save the series of numbers in the IPv4 Address section, the address is usually in the form 192.168.1. X
Enable data sharing mode on computer
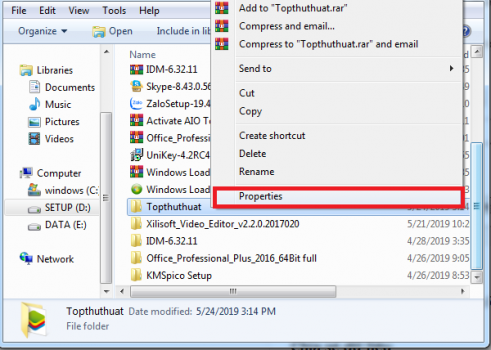
Step 1. Navigate to the file you want to share => right-click and select Properties.
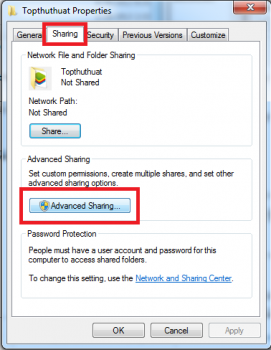
Step 2. In the new window interface that appears, click on the Sharing tab => continue to select Advanced Sharing…
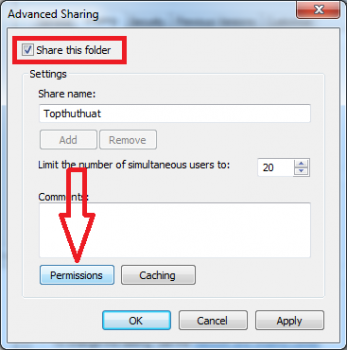
Step 3. Continue to select Share this folder => select Permissions to set data access permissions.
Step 4. In the new interface that appears, click on Everyone => below are the options you want to grant access to data, you select Allow corresponding to Full control, Change, and Read. Finally, click OK to save changes.
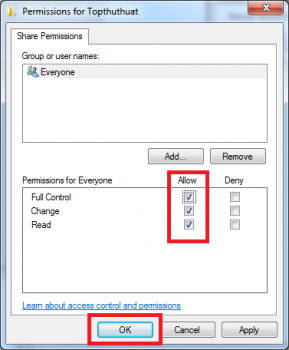
Now you have completed the steps to share folders on your Win 10 computer.
Access from the machine that needs to receive data
Step 1. On the computer you want to receive the shared file, go to Network by going to This PC (as shown below).
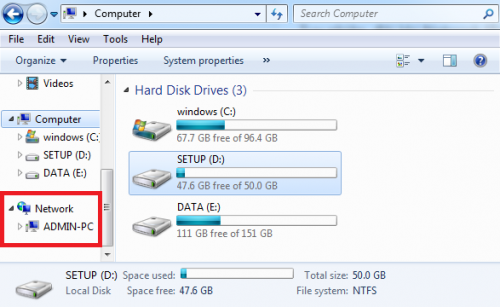
Step 2. Here will display computers shared in the same network. Click on the destination computer to access and copy shared data to your computer.
Note: In some cases, the connection between the two computers is not established and you will not see the destination computer has Shared Files. In this case, do the following:
Open the Run command window by pressing the Windows + R key combination => then enter the command line 192.168.1. X (this is the IP address of the computer that shared the data). => finally click OK.
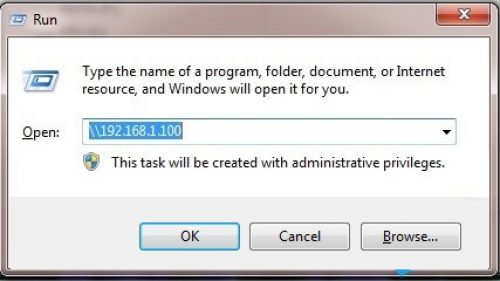
Note: If you use the IP address but cannot access it, the reason may be that the firewall on your computer is blocking access. So try turning off the firewall on Win 10 and try again, as follows:
Step 1: First, go to Start Menu => then type the keyword Firewall to access the Windows Firewall driver.
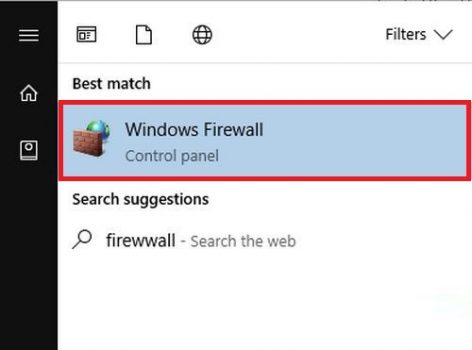
Step 2: In the Windows Firewall window interface => select Turn Windows Firewall on or off in the list of options on the left to turn on/off the Windows 10 computer firewall.
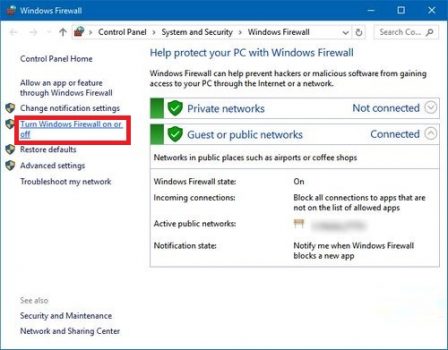
Step 3: Here, to turn off Windows 10 computer Firewall, select Turn off Windows Firewall on both Private network settings and Public network settings options => then click OK to save the settings.
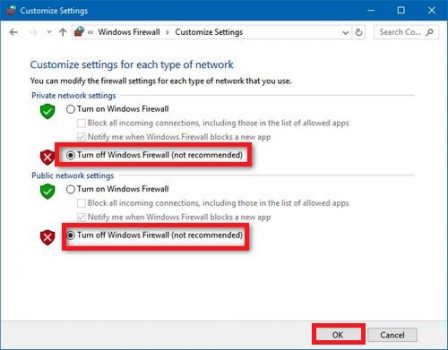
Now you can access the machine then destination.
Key Takeaways
Use the guidance above as a practical reference for transfer data quickly between 2 Windows 10 computers. Check compatibility, follow the steps carefully, and verify important details with official documentation when software, security, accounts, health, or purchases are involved.
FAQ
How do I transfer data between 2 Windows 10 computers?
Follow the steps in this guide in order, confirm each setting before continuing, and save, restart, or reconnect the device when the instructions require it.
What should I check before I begin?
Confirm the correct device, account access, software version, compatibility, and a current backup whenever the process could affect files, settings, or security.
What should I do if the process does not work?
Repeat the steps carefully, check for model or version differences, install available updates, and consult the manufacturer's official support documentation.
Related Articles
 7 Ways to Transfer Data Between 2 Computers5 minutes read
 Transfer Data Between Computers14 minutes read
 Ways to Transfer Data Between Phone and Computer Without Connecting8 minutes read
 How to Transfer Data from Windows to Mac OS X Quickly5 minutes read
 How to Transfer Application Data to Memory Card Quickly and Accurately7 minutes read
 How to Transfer Data Between Computers: Complete Guide15 minutes read
Reader Comments 0
Sign in with email or Google to join the discussion.