Table of Contents
This guide explains how to transplant One Person's Face to Another's Body Using GIMP, with clear steps, practical tips, and important checks before you begin.
However, these applications will not bring much fun, if you are unsure what you have to do. In this article, TipsMake. com will show you how to use GIMP to transplant a face onto another body.
Open images in GIMP
When you're ready, activate GIMP, open the image with the face to transplant, and the image containing the body you want to stitch the face on.
Click File> Open from the menu, locate and select the image, then click Open.
You will see both images on separate tabs in the GIMP window. The main task right now is to extract faces, so select the image tab of the face first.
Choose a face
In the left panel, select the Paths Tool , currently in the middle of the second row. With this tool, you will create a closed curve around the face and select what is inside the drawn line.
Technically, you can also use the Select Tool , but using the Paths Tool will give better results.
Create a closed curve around the face
You may want to start by zooming in on the face in the photo. The more you zoom, the more accurate the curves you create around the face. You can do this by clicking on the Zoom drop-down box in the status bar at the bottom or by selecting View> Zoom from the menu.
With the Paths Tool selected, start clicking around the face. Each click you create a point through which the closed curve passes.
Ideally, you should set this closed curve to coincide with the face contour. You can also bend lines between points for greater accuracy, by right-clicking on the line and moving the mouse.
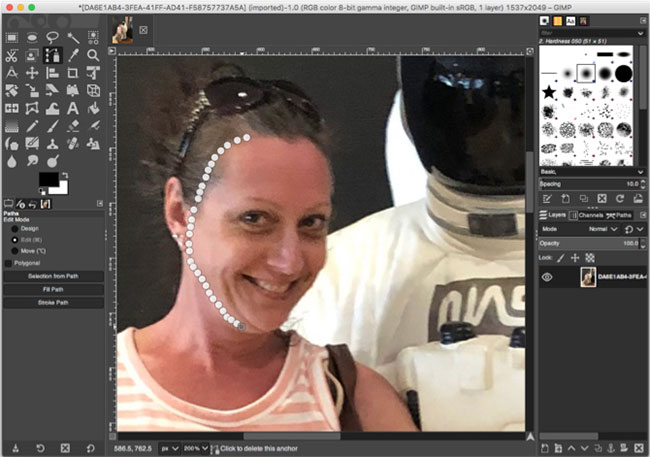 Create a closed curve around the face
Don't forget, you can always undo everything you're doing by using Edit> Undo from the menu. So if you get the wrong one, you can always undo and try again.
Complete the closed curve
Normally all of this will only take a few minutes, especially if you work with a high-resolution photo. You will have to keep creating points around the face until the closed line is formed.
Once done, click on the first point again to complete the closed curve.
If the first and last points do not match, you can still edit in the next step. However, this last line will be bent, so if you need high accuracy, try to make the endpoint as close to the first point as possible.
Copy and paste faces
With the closed curve created, you will find a button labeled Selection from Path at the bottom of the left panel. Click on it and a selection will be made inside this line.
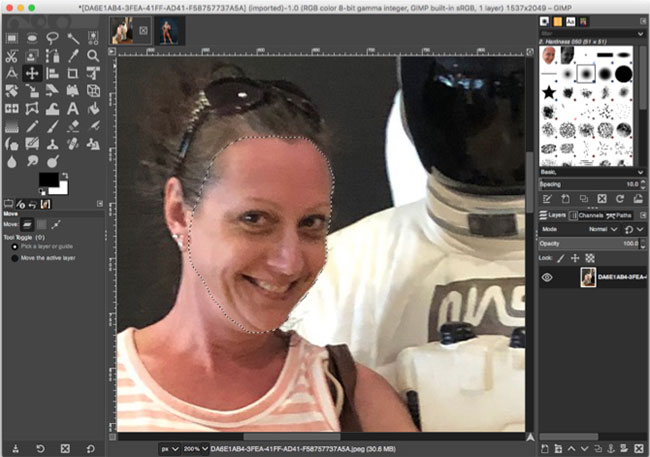 Create a selection
Next, copy the selection using Ctrl+ Con Windows, Cmd+ Con a Mac, or by clicking Edit> Copy from the menu.
Select the tab with the image containing the body you want to stitch the face on. You can do this by clicking Edit> Paste as New Layer from the menu. Placing faces on a new layer will make it easy to move, resize or rotate faces as needed.
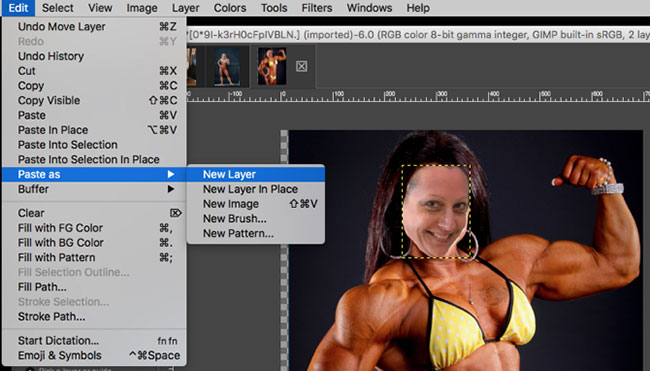 Place the face on a new layer
Move, resize or rotate faces
You are now ready to move, resize or rotate the face until it fits into the body.
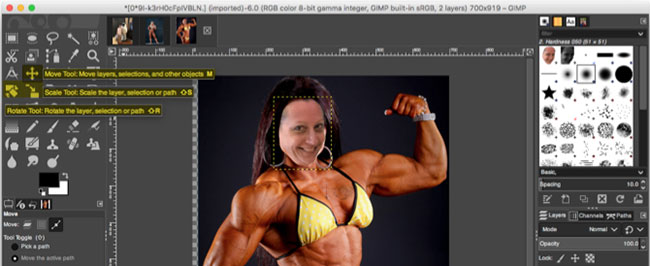 Face and body transplant
- Move : With the face selected, you can click the Move Tool from the left sidebar. This is a four sided arrow. Then drag the face to the place you want to place on the body.
- Resize : If you need to resize your face, you can use the Scale Tool just below the Move Tool . This tool will keep the proportion of the face, when you drag from the corners to resize. You can also use the Scale pop-up window to adjust the face. Click Scale when you're done.
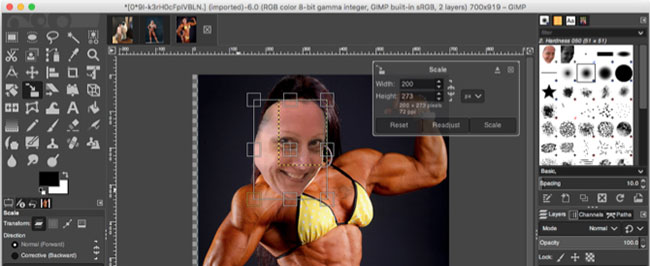 If you need to resize your face, you can use the Scale Tool
- Rotate: You may also need to turn the face slightly so that it fits the head on the torso. Click on the Rotate Tool to the left of the Scale Tool . Then drag the end to face in either direction. Alternatively, you can also use the Rotate pop-up window to adjust the face. Click Rotate when you're done.
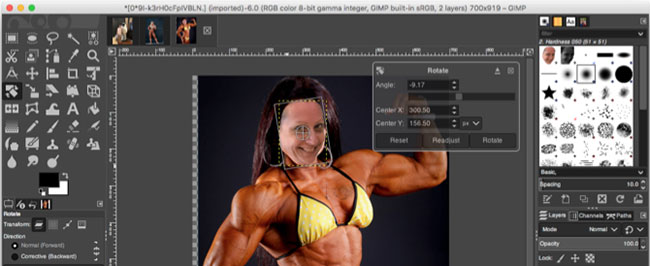 You may also need to turn the face slightly so that it fits the head on the torso
FAQ
What should I know about Transplant One Person's Face to Another's Body Using GIMP?
Focus on the key features, requirements, limitations, and practical use cases explained in this guide.
How do I get the best results with Transplant One Person's Face to Another's Body Using GIMP?
Follow the recommended steps, use current software or information, confirm compatibility, and review settings before major changes.
Are there any risks or limitations?
Potential limitations depend on compatibility, data quality, cost, privacy, support, and how the product or method is used.
Related Articles
 How to Swap and Combine Faces in GIMP6 minutes read
 Top 5 Face Transplant Apps for Free4 minutes read
 Face Transplant, Face Swap on iPhone6 minutes read
 Zao, How Dangerous Is China's Face-changing Application That Is3 minutes read
 8 Hottest Apps to Transplant Faces into Photos on Phones: What You Need to Know11 minutes read
 Microsoft Face Swap: Very Funny Face Transplant App for Smartphones4 minutes read
Reader Comments 0
Sign in with email or Google to join the discussion.