How to arrange brushes in GIMP with tags
Thanks to its plugins, add-ons, and deep level of customization, GIMP is a staple of many proficient users' workflows.
Table of Contents
This open source photo editing app has many tools that even seasoned users may not be aware of.
In today's post, learn about GIMP's tagging system and how it can be used to enhance your workflow.
How to assign tags in GIMP
Let's start by opening the Brushes dialog box. If your GIMP doesn't show the Brushes dialog box , you can show it by clicking Windows > Dockable Dialogs > Brushes .
Note that depending on how you've customized your own GIMP setup, your Brushes dialog box may not look like the one below. But don't worry. The steps to be taken when creating the tag will not change.
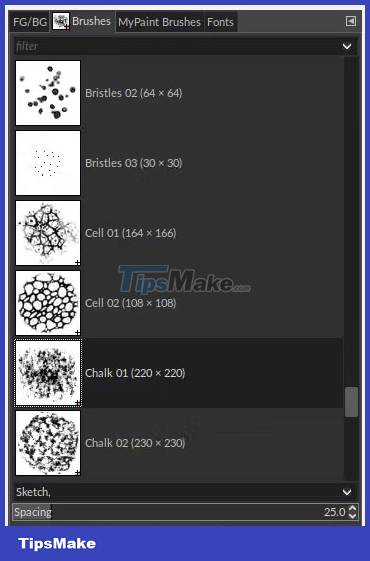
Now that we have the Brushes dialog open , click on some brushes, while also paying attention to the labels at the bottom and how they change as you browse. This is where we specify, create or change our tags.
Assign an existing tag to the brush
- For the purposes of this example, scroll through until you find the Chalk 01 (220 x 220) brush .
- This brush has been tagged Sketch . Click the drop-down arrow to the right to display a list of available tags.
- Add the Splatters and Fun tags to the brush by clicking on them.
- Remove the Sketch tag by clicking the tag, then clicking anywhere outside the drop-down menu to close the tag.
The label for that brush should now show "Fun" and "Splatters", separated by commas.

Create and assign a new tag to the brush
As seen above, there is no limit to the number of tags you can assign to a brush. So let's add some custom tags that will then be used to arrange the brush in the next section.
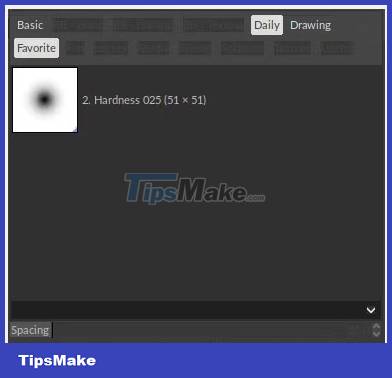
- Select 3 brushes. The brushes don't need to be specific as we'll be adding and using custom tags.
- With the first brush selected, click next to its existing tag to bring up the cursor.
- Just type Favorite , Daily and Drawing , separated by commas, and press Enter. The first brush will now have 4 tags assigned: its original tag and 3 newly created tags.
- Go to the second brush and select the Tags drop-down menu. You'll see your 3 new tags now included in the list that appears. On the second brush, click to add the Daily tag and remove the original tag. Close the drop-down menu.
- Now add the Favorite tag to the third brush, close the drop-down menu and add a new tag named Useful by adding it to the bottom of the list.
If you do everything right, the tags on the 3 brushes should look like in the screenshot.

How to browse and filter tags in GIMP
Now the brushes are tagged, but how to use them? To do this, use the filter drop-down menu at the top of the dialog box.
Functionally, filter tags work the same way they were created. You can display an existing list and select individual tags by clicking on them. Or you can type tag in the box and press Enter to search.
- Type "favorite" in the search bar. Your first and third brushes will appear according to the specified tags.
- Open the drop-down list and uncheck the Favorite filter, choose the Daily filter instead . Again, two brushes will appear, this time your first and second brushes.
- Select both tags, using the drop-down menu or by entering comma-separated labels. Now only one brush appears, which is the first brush.
So why does the brush count decrease as you add more tags? The answer is because GIMP's tagging system is additive, something that can be confusing if you don't expect it.
Basically, adding new tags won't show you brushes with only one of them. Instead, it will show you brushes with all those labels. This can be a powerful tool for filtering your brush list, especially when the list is relatively large, helping you feel comfortable using it and learning how to download and install new brushes. own.
Was this article helpful?
Your feedback helps us improve.
Related Articles
 How to Install Gimp Brushes5 minutes read
 Don't miss out on these 11 beautiful free brushes for GIMP7 minutes read
 17 simple HTML codes you can learn in 10 minutes12 minutes read
 Top 10 HTML tags that each blog and website owner should know5 minutes read
 New features of GIMP version 2.1010 minutes read
 4 plugins that help GIMP become a professional tool.5 minutes read
Reader Comments 0
Sign in with email or Google to join the discussion.